老司机种菜


  • 首页

  • 分类

  • 关于

  • 归档

  • 标签

  • 公益404

  • 搜索

Python之字符串

发表于 2019-01-14 | 分类于 language

字符串截取

1
2
3
4
5
6
7
8
9
10
11
str = ‘0123456789’
print str[0:3] #截取第一位到第三位的字符
print str[:] #截取字符串的全部字符
print str[6:] #截取第七个字符到结尾
print str[:-3] #截取从头开始到倒数第三个字符之前
print str[2] #截取第三个字符
print str[-1] #截取倒数第一个字符
print str[::-1] #创造一个与原字符串顺序相反的字符串
print str[-3:-1] #截取倒数第三位与倒数第一位之前的字符
print str[-3:] #截取倒数第三位到结尾
print str[:-5:-3] #逆序截取,具体啥意思没搞明白?

输出结果:

1
2
3
4
5
6
7
8
9
10
012
0123456789
6789
0123456
2
9
987654321
78
789
96

未命名

发表于 2019-01-10

title: gradle使用 date: 2019-01-10 18:38:26 tags: [工具] categories: 工具

https://docs.gradle.org/current/userguide/customizing_dependency_resolution_behavior.html#sec:component_selection_rules http://google.github.io/android-gradle-dsl/current/ https://www.kotlincn.net/docs/reference/server-overview.html

https://blog.csdn.net/u010014658/article/details/78999031

gradle命令:

  • gradle -v //版本号
  • gradle clean //清除build文件夹
  • gradle build //检查依赖并打包
  • gradle assembleDebug //编译打包Debug包
  • gradle assembleRelease //编译打包Release包
  • gradle installRelease //打包并安装Release包
  • gradle unstallRelease //卸载Release包
  • gradle dependencies //查看依赖图表
  • gradle clean build -x test //跳过测试编译
  • gradle –profile build //分析构建任务
  • gradle build –dry-run //编译并不执行任务
  • gradle install //安置项目jar包到本地Maven仓库
  • gradle tasks //查看Gradle任务
  • gradle tasks –all //查看所有Gradle任务
  • gradle build –daemon //使用Gradle守护程序(Daemon)
  • gradle build –offline //用离线模式运行
  • gradle clean build –refresh-dependencies //刷新Gradle依赖缓存
项目中存在的多个module,或者依赖的Library中引用了相同的库,但库的版本不一致。例如主项目中引用的是Glide4.2,但依赖的第三方库中使用的却是Glide3.8。此时需要统一项目中Glide的版本。
1
2
3
4
5
6
7
在build.gradle中添加如下配置:
configurations.all {
resolutionStrategy {
force 'com.github.bumptech.glide:glide:4.2.0'
force 'com.github.bumptech.glide:compiler:4.2.0'
}
}
从命令行解析buildType
1
2
3
4
5
6
7
8
9
10
11
12
13
14
project.getGradle().addListener(new DependencyResolutionListener() {
@Override
void beforeResolve(ResolvableDependencies dependencies) {
}

@Override
void afterResolve(ResolvableDependencies dependencies) {
def projectPath = dependencies.path.toLowerCase()
println("projectPath : ")
dependencies.resolutionResult.allDependencies.each { dependecy ->
println("depaaaaa: " + dependentComponents.toString())
}
}
})
1
2
3
4
5
6
7
8
9
10
11
12
13
14
15
16
//1. 从命令行中解析出buildType
def currentBuildType = "debug" //debug
gradle.startParameter.taskNames.each({
String taskNameL = it.toLowerCase();
if(taskNameL.contains("assemble") || taskNameL.contains("install")) {
if(taskNameL.contains("debug")) {
currentBuildType = "debug"
return;
} else if(taskNameL.contains("release")) {
currentBuildType = "release"
return;
}else{
currentBuildType = "debug"
}
}
})
1
2
3
4
5
6
7
8
9
10
11
12
13
applicationVariants.all { variant ->
variant.packageApplication.outputDirectory =
new File(project.buildDir.absolutePath + "/outputs/apk")

variant.outputs.all {
outputFileName = "linkim.jar"
}
variant.getCompileConfiguration().resolutionStrategy {
// Use Gradle's ResolutionStrategy API
// to customize how this variant resolves dependencies.
println("resolutionStrategy : " + variant.buildType.name + ";project name : " + variant)
}
}
1
2
3
4
compile project(':libim',{ pj ->
//2. 将解析出的buildType设置给library
pj.ext.buildType = currentBuildType
})

库中

1
2
3
4
5
6
7
8
9
10
11
12
13
14
15
16
17
18
19
20
21
roject.getGradle().addListener(new DependencyResolutionListener() {
@Override
void beforeResolve(ResolvableDependencies dependencies) {
}

@Override
void afterResolve(ResolvableDependencies dependencies) {
def projectPath = dependencies.path.toLowerCase()
println("libim projectPath : " + projectPath)
}
})

def currentBuildType = extensions.extraProperties.has("buildType") ? "${ext.buildType}" : "debug"


if(currentBuildType == "debug"){
provided rootProject.ext.depsLibs.ljim
}else{
provided("com.lianjia.sdk:chatui:2.32.0@aar")
}

Mac下快捷键

发表于 2019-01-09 | 分类于 env

AndroidStudio/IntelliJ 快捷键

之前一直用windows版的eclipse快捷键,现在准备切成mac原生快捷键映射.

特殊符号 :

  • Command () : ⌘ ;
  • Control : ⌃ ;
  • Option (alt) : ⌥ ;
  • Shift : ⇧ ;
  • Caps Lock : ⇪ ;

常用:

  • cmd + F12: 快速定位到方法和属性
  • ctrl + o : 查看所有可重写的方法
  • ctrl + I : 引入接口或抽象类方法的实现
  • cmd + o : 全局查找类
  • opt + cmd + o : 全局搜索类/方法/参数
  • cmd + f7 : 查看该方法在当前类中被用到的地方
  • alt + f7 : find usages
  • cmd + ][ : back
  • shift + cmd + f : 全局查找
  • cmd + d : 快捷向下复制
  • cmd + shift + enter : editor actions->complete current statement,不管光标在哪个位置,直接新开一行
  • ctrl + spack : main menu->Code->Completion->basic代码提示列表
  • alt + enter : other->show intention action, 错误修正提示列表
  • sht + sht : 搜索任意内容
  • cmd + f / cmd + r : 当前文件查找/替换
  • cmd + g / sht + cmd + g : 跳到下一个/上一个高亮的变量
  • cmd + opt + B : 查看接口的实现
  • ctrl + opt + H : 方法被调用层级结构
  • cmd + L : 跳转至行
  • opt + cmd + T : Surround with 快速调出if, for, try…catch, while等环绕代码
  • cmd + J : 快速生成模板代码块,如if,while, return
  • cmd + N : 快速生成getter/setter方法,构造方法,toString()方法等
  • stf + cmd + enter : 行尾自动添加分号,if后面自动加 “(){}”
  • cmd + / : 注释和取消注释,注释效果//…
  • opt + cmd + / : 注释与取消注释,注释效果/…/
  • sht + cmd + U : 切换大小写
  • opt + sht + up/down : 上下移动代码
  • cmd + sht + up/down : 上下代码行换位
  • opt + cmd + L: 格式化代码
  • opt + ctrl + o : 清除无效包引用
  • opt + cmd + M : 方法重构,方法抽离
  • opt + cmd + P : 抽离成方法参数
  • opt + cmd + V : 抽离为局部变量
  • opt + cmd + F : 抽离为成员变量
  • cmd + left/right : 快速定位到行首行位
  • cmd + p : 提示参数类型
  • cmd + y : 预览方法的定义
  • ctrl + H : 查看类的继承关系

其他

  • Shift+⌘+”+” 展开全部
  • Shift+⌘+”-“ 折叠全部
  • cmd+”+” 展开当前
  • cmd+”-“ 折叠当前
  • shift+⌘+L 展开文档注释
  • ctrl+shift+⌘+L 收起文档注释
  • ⌘+/ 当行注释
  • ⌘+alt+/ 多行注释
  • alt+F7 查找使用的位置
  • Ctrl+Shift+F FindInPath
  • shift+f6 重命名
  • Ctrl+Enter 生成set/get(或者Ctrl+N)
  • Ctrl+J 查看文档说明(同windows中的ctrl+Q)
  • Ctrl+O/⌘+O 重写父类方法
  • Ctrl+i 实现方法
  • Ctrl+shift+Q 查看当前光标所在的类
  • alt+回车 查看当前元素可以做的操作
  • alt+⌘+L 格式化代码
  • Ctrl+Alt+O 自动导包
  • Ctrl+Alt+I 自动缩进行
  • ⌘+Alt+M 抽取方法
  • ⌘+Alt+V 提取变量(还没尝试)
  • ⌘+Alt+F 提取成员变量
  • ⌘+Alt+C 提取为常量
  • ⌘+Alt+P 提取参数
  • ⌘+E 最近操作的文件
  • ⌘+F12 查看当前类的结构
  • ⌘+B / ⌘+左键单击 查看元素的源码(或者自定义元素的初始化)
  • Shift+left/right 从光标位置开始,向左/右逐个选中字母
  • Ctrl+cmd+”+” 窗口最大化(或者恢复窗口模式)
  • Ctrl+shift+向上箭头 类似win中的win+P(切换窗口)

VSCode

全局

  • Command + Shift + P / F1 显示命令面板
  • Command + P 快速打开
  • Command + Shift + N 打开新窗口
  • Command + W 关闭窗口
  • Alt + Shift + 左键 按列选择

    基本

  • Command + X 剪切(未选中文本的情况下,剪切光标所在行)
  • Command + C 复制(未选中文本的情况下,复制光标所在行)
  • Option + Up 向上移动行
  • Option + Down 向下移动行
  • Option + Shift + Up 向上复制行
  • Option + Shift + Down 向下复制行
  • Command + Shift + K 删除行
  • Command + Enter 下一行插入
  • Command + Shift + Enter 上一行插入
  • Command + Shift + \ 跳转到匹配的括号
  • Command + [ 减少缩进
  • Command + ] 增加缩进
  • Home 跳转至行首
  • End 跳转到行尾
  • Command + Up 跳转至文件开头
  • Command + Down 跳转至文件结尾
  • Ctrl + PgUp 按行向上滚动
  • Ctrl + PgDown 按行向下滚动
  • Command + PgUp 按屏向上滚动
  • Command + PgDown 按屏向下滚动
  • Command + Shift + [ 折叠代码块
  • Command + Shift + ] 展开代码块
  • Command + K Command + [ 折叠全部子代码块
  • Command + K Command + ] 展开全部子代码块
  • Command + K Command + 0 折叠全部代码块
  • Command + K Command + J 展开全部代码块
  • Command + K Command + C 添加行注释
  • Command + K Command + U 移除行注释
  • Command + / 添加、移除行注释
  • Option + Shift + A 添加、移除块注释
  • Option + Z 自动换行、取消自动换行

多光标与选择

  • Option + 点击 插入多个光标
  • Command + Option + Up 向上插入光标
  • Command + Option + Down 向下插入光标
  • Command + U 撤销上一个光标操作
  • Option + Shift + I 在所选行的行尾插入光标
  • Command + I 选中当前行
  • Command + Shift + L 选中所有与当前选中内容相同部分
  • Command + F2 选中所有与当前选中单词相同的单词
  • Command + Ctrl + Shift + Left 折叠选中
  • Command + Ctrl + Shift + Right 展开选中
  • Alt + Shift + 拖动鼠标 选中代码块
  • Command + Shift + Option + Up 列选择 向上
  • Command + Shift + Option + Down 列选择 向下
  • Command + Shift + Option + Left 列选择 向左
  • Command + Shift + Option + Right 列选择 向右
  • Command + Shift + Option + PgUp 列选择 向上翻页
  • Command + Shift + Option + PgDown 列选择 向下翻页

查找替换

Command + F 查找 Command + Option + F 替换 Command + G 查找下一个 Command + Shift + G 查找上一个 Option + Enter 选中所有匹配项 Command + D 向下选中相同内容 Command + K Command + D 移除前一个向下选中相同内容

进阶

Ctrl + Space 打开建议 Command + Shift + Space 参数提示 Tab Emmet插件缩写补全 Option + Shift + F 格式化 Command + K Command + F 格式化选中内容 F12 跳转到声明位置 Option + F12 查看具体声明内容 Command + K F12 分屏查看具体声明内容 Command + . 快速修复 Shift + F12 显示引用 F2 重命名符号 Command + Shift + . 替换为上一个值 Command + Shift + , 替换为下一个值 Command + K Command + X 删除行尾多余空格 Command + K M 更改文件语言

导航

Command + T 显示所有符号 Ctrl + G 跳转至某行 Command + P 跳转到某个文件 Command + Shift + O 跳转到某个符号 Command + Shift + M 打开问题面板 F8 下一个错误或警告位置 Shift + F8 上一个错误或警告位置 Ctrl + Shift + Tab 编辑器历史记录 Ctrl + - 后退 Ctrl + Shift + - 前进 Ctrl + Shift + M Tab 切换焦点

编辑器管理

Command + W 关闭编辑器 Command + K F 关闭文件夹 Command + \ 编辑器分屏 Command + 1 切换到第一分组 Command + 2 切换到第二分组 Command + 3 切换到第三分组 Command + K Command + Left 切换到上一分组 Command + K Command + Right 切换到下一分组 Command + K Command + Shift + Left 左移编辑器 Command + K Command + Shift + Right 右移编辑器 Command + K Left 激活左侧编辑组 Command + K Right 激活右侧编辑组

文件管理

Command + N 新建文件 Command + O 打开文件 Command + S 保存文件 Command + Shift + S 另存为 Command + Option + S 全部保存 Command + W 关闭 Command + K Command + W 全部关闭 Command + Shift + T 重新打开被关闭的编辑器 Command + K Enter 保持打开 Ctrl + Tab 打开下一个 Ctrl + Shift + Tab 打开上一个 Command + K P 复制当前文件路径 Command + K R 在资源管理器中查看当前文件 Command + K O 新窗口打开当前文件

显示

Command + Ctrl + F 全屏、退出全屏 Command + Option + 1 切换编辑器分屏方式(横、竖) Command + + 放大 Command + - 缩小 Command + B 显示、隐藏侧边栏 Command + Shift + E 显示资源管理器 或 切换焦点 Command + Shift + F 显示搜索框 Ctrl + Shift + G 显示Git面板 Command + Shift + D 显示调试面板 Command + Shift + X 显示插件面板 Command + Shift + H 全局搜索替换 Command + Shift + J 显示、隐藏高级搜索 Command + Shift + C 打开新终端 Command + Shift + U 显示输出面板 Command + Shift + V Markdown预览窗口 Command + K V 分屏显示 Markdown预览窗口

调试

F9 设置 或 取消断点 F5 开始 或 继续 F11 进入 Shift + F11 跳出 F10 跳过 Command + K Command + I 显示悬停信息

集成终端

Ctrl + 显示终端 Ctrl + Shift + 新建终端 Command + Up 向上滚动 Command + Down 向下滚动 PgUp 向上翻页 PgDown 向下翻页 Command + Home 滚动到顶部 Command + End 滚动到底部

插件

python格式化代码

pip install yapf安装yapf,安装yapf成功后,打开VScode,文件->首选项->用户设置,在settings.json文件中输入”python.formatting.provider”: “yapf” Alt+Shift+F即可格式化代码

格式化json: mac下 cmd + alt +M

url encode URIDecode cmd+U+D URIEncode cmd+U+E

上传图片到七牛云: ctrl+alt+O

Android权限适配

发表于 2018-12-06 | 分类于 Android

动态权限

背景

从Android6.0版本开始google将权限分为普通权限和特殊权限,app必须在AndroidManifest.xml添加引用权限的语句。 在安装apk时安卓会将普通权限授予该app,但特殊权限需要运行时申请。

安卓按照权限类别分为权限组和权限, 每个权限都隶属于一个权限组。 当安卓系统授权一个权限时, 那么该权限所属权限组的权限都会自动被授权。

目前如果app的targetSdkVersion等于21,即按照Android5.0版本特性运行。 技术层面与市场上主流app差距较大, 功能层面也有一些功能可能失效(例如在一些机型上无法打电话、读写SD卡), 根本原因是没适配动态权限。

如何申请动态权限

判断当前手机系统是Android6.0及以上版本, 在Activity/Fragment里申请权限并处理权限结果回调。 这里要说明一下:Fragment是通过Activity申请权限的, 且权限回调onRequestPermissionResult也是Activity调用的Fragment该方法. image 
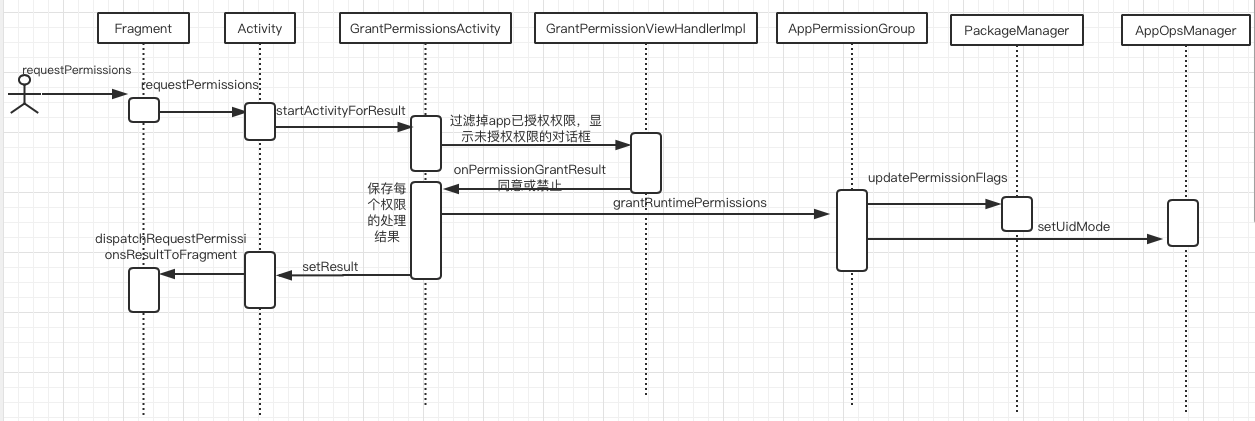
上图是权限申请流程图, 我们看到的权限弹窗对应/packages/apps/PackageInstaller/src/com/android/packageinstaller/permission/ui/GrantPermisssionsActivity.java, 点击“同意”或“不同意”通过PackageManager、AppOpsManager将权限操作更新到PackageManagerService和AppOpsService中。

调用Activity的申请权限方法其实是打开一个系统的Activity,操作结果通过setResult返回过来。

能不能直接调用PackageManager/AppOpsManagerd的方法授权给自己? 显然是不行的, PackageManagerService只允许在AndroidManifest.xml配置coreApp=”true”的应用修改权限,而普通app无法设置coreApp属性。

1
2
3
4
5
6
7
8
9
10
11
12
13
14
15
16
17
18
19
20
public int getPermissionFlags(String name, String packageName, int userId) {
if (!sUserManager.exists(userId)) {
return 0;
}
//普通app调用该方法会抛异常
enforceGrantRevokeRuntimePermissionPermissions("getPermissionFlags");
enforceCrossUserPermission(Binder.getCallingUid(), userId, true, false,
"getPermissionFlags");
...
}
private void enforceGrantRevokeRuntimePermissionPermissions(String message) {
if (mContext.checkCallingOrSelfPermission(Manifest.permission.GRANT_RUNTIME_PERMISSIONS)
!= PackageManager.PERMISSION_GRANTED
&& mContext.checkCallingOrSelfPermission(Manifest.permission.REVOKE_RUNTIME_PERMISSIONS)
!= PackageManager.PERMISSION_GRANTED) {
throw new SecurityException(message + " requires "
+ Manifest.permission.GRANT_RUNTIME_PERMISSIONS + " or "
+ Manifest.permission.REVOKE_RUNTIME_PERMISSIONS);
}
}

如何判断权限

image 如上图所示,判断是否有权限最终会执行到PackagerManagerService的checkUidPermission函数中。

适配动态权限的方式

  1. 基本用法:在Activity、Fragment派生类中添加权限申请和结果回调。 坑:1、在插件中调用View的getContext返回值是PluginContext, 无法通过类型强转调用其附着Activity/Fragment的方法。2、如果界面层级很深,需要逐层添加回调参数。
  2. AOP方式,推荐https://github.com/permissions-dispatcher/PermissionsDispatcher, 在需要权限的函数上添加注解并在构建阶段注入代码。缺点是app插件中有多View控件如BaseCard无法使用。
  3. 第三方库https://github.com/yanzhenjie/AndPermission, 原理:新启动个透明Activity申请权限并保存回调函数到静态变量里,用户操作权限提示框结束后通过回调执行成功、失败逻辑。

示例代码: 为了避免适配动态权限逻辑产生风险, 可以新增if代码块做动态权限逻辑, else分支仍然是现有逻辑。 各业务线可能无法在同一个版本上搞定, 可以按照这种写法先后完成动态权限适配工作,待所有业务线都完成后调整宿主targetSdkVersion到26。

1
2
3
4
5
6
7
8
9
10
11
12
13
14
15
16
17
18
19
20
21
22
23
24
25
26
if (getBaseContext().getApplicationInfo().targetSdkVersion >= Build.VERSION_CODES.M
&& Build.VERSION.SDK_INT >= Build.VERSION_CODES.M) {
AndPermission.with(this)
.runtime()
.permission(permissions)
// .rationale(new RuntimeRationale())
.onGranted(new Action<List<String>>() {
@Override
public void onAction(List<String> permissions) {
toast(R.string.successfully);
}
})
.onDenied(new Action<List<String>>() {
@Override
public void onAction(@NonNull List<String> permissions) {
toast(R.string.failure);
if (AndPermission.hasAlwaysDeniedPermission(MainActivity.this,
permissions)) {
showSettingDialog(MainActivity.this, permissions);
}
}
})
.start();
} else {
//默认有权限, 用现在的业务逻辑
}

注意事项

  1. 适配小米机型动态权限;
  2. Android7.0版本开始使用FileProvider, 需要适配拍照功能;
  3. 适配DownloadManager安装apk;
  4. 用户禁用权限且不再提醒, 需要有个提示框提示用户去应用详情界面里放开权限, 弹窗建议使用CustomDialog(各业务UI样式统一)。
  5. 适配WindowManager悬浮窗;

附录

官方文档 AndPermission

AndPermission库解决方案

1
2
3
4
5
6
7
8
9
10
11
12
13
14
15
16
17
18
19
20
21
22
23
24
25
26
27
28
29
30
31
32
33
34
35
36
/**
* 权限申请其实是startActivityForResult的过程, 弹出的权限提示框是安卓系统应用的GrantPermisssionsActivity.java
* 即:申请权限是阻塞的, 在申请权限时当前界面(activity)被GrantPermisssionsActivity盖住了。
* 为了实现回调有2种方式:
* 1、类似于Glide的做法,在当前activity里添加个空fragment申请权限; 优点是无资源文件,可编译成jar。
* 2、新启动个无界面activity申请权限。优点是不限制context类型,缺点是要编译成aar,占位编译只能引用jar,
* 打开activity时要依赖链家routerbus。
*
* 参考新房陈少的实现方式修改,即添加fragment申请权限,返回结果后移除fragment
* 没处理8.0的2个新增权限,貌似贝壳没用到
*
* 备注:
* 只是为了集中管理申请权限逻辑,代码要尽量简单好维护。
* 1、没有判断入参权限是否在AndroidManifest.xml中声明,感觉没啥必要
* 2、申请权限时没有判断是否已经有这个权限了,考虑实际业务场景没添加。
* 3、申请"禁用且不再提醒"的权限时会执行返回deny, 不会弹权限申请框。这时需要引导用户去系统设置放开权限。
*
* 用法:
* LjPermissionUtil.with(MainActivity.this)
* .requestPermissions(Manifest.permission.CAMERA)
* .onCallBack(new LjPermissionUtil.PermissionCallBack() {
* @Override public void onPermissionResult(List<String> granted, List<String> denied) {
* Log.d("brycegao", "onPermissionResult");
* if (denied != null && denied.size() > 0) {
* boolean isAlwayDeny = LjPermissionUtil.isAlwaysDeniedPermission(MainActivity.this,
* denied.get(0));
* //这里要弹出个自定义提示框,引用用户去系统设置里放开权限
* Log.d("brycegao", "");
* }
* }
* }).begin();
* 集成方式
* compileOnly("com.lianjia.common.android:lib_permission:1.0.0-SNAPSHOT") {
* changing = true
* }
*/

Java并发编程:可重入锁ReentrantLock

发表于 2018-11-13 | 分类于 并发编程

参考

JDK 5.0 中更灵活、更具可伸缩性的锁定机制 用ReentrantLock和Condition实现线程间通信

android system_server进程

发表于 2018-11-10 | 分类于 Android

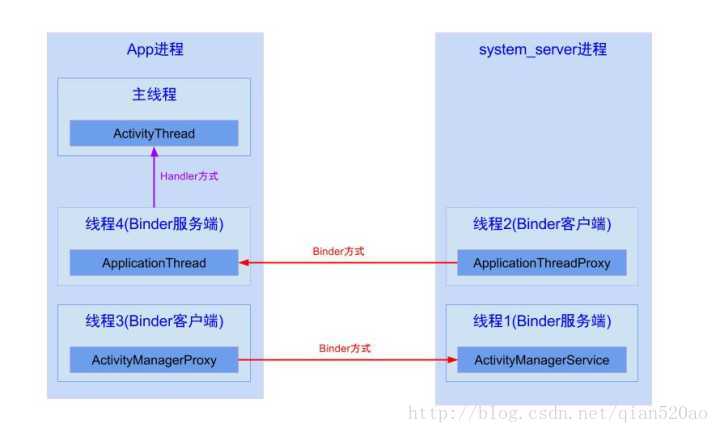
system_server进程是系统进程,java framework框架的核心载体,里面运行了大量的系统服务,比如这里提供ApplicationThreadProxy(简称ATP),ActivityManagerService(简称AMS),这个两个服务都运行在system_server进程的不同线程中,由于ATP和AMS都是基于IBinder接口,都是binder线程,binder线程的创建与销毁都是由binder驱动来决定的。

App进程则是我们常说的应用程序,主线程主要负责Activity/Service等组件的生命周期以及UI相关操作都运行在这个线程; 另外,每个App进程中至少会有两个binder线程 ApplicationThread(简称AT)和ActivityManagerProxy(简称AMP),除了图中画的线程,其中还有很多线程

Binder用于不同进程之间通信,由一个进程的Binder客户端向另一个进程的服务端发送事务,比如图中线程2向线程4发送事务;而handler用于同一个进程中不同线程的通信,比如图中线程4向主线程发送消息。

image

结合图说说Activity生命周期,比如暂停Activity,流程如下:

  1. 线程1的AMS中调用线程2的ATP;(由于同一个进程的线程间资源共享,可以相互直接调用,但需要注意多线程并发问题)
  2. 线程2通过binder传输到App进程的线程4;
  3. 线程4通过handler消息机制,将暂停Activity的消息发送给主线程;
  4. 主线程在looper.loop()中循环遍历消息,当收到暂停Activity的消息时,便将消息分发给 ActivityThread.H.handleMessage()方法,再经过方法的调用, 最后便会调用到Activity.onPause(),当onPause()处理完后,继续循环loop下去。

ActivityThread通过ApplicationThread和AMS进行进程间通讯,AMS以进程间通信的方式完成ActivityThread的请求后会回调ApplicationThread中的Binder方法,然后ApplicationThread会向H发送消息,H收到消息后会将ApplicationThread中的逻辑切换到ActivityThread中去执行,即切换到主线程中去执行,这个过程就是主线程的消息循环模型

进程 每个app运行时前首先创建一个进程,该进程是由Zygote fork出来的,用于承载App上运行的各种Activity/Service等组件。进程对于上层应用来说是完全透明的,这也是google有意为之,让App程序都是运行在Android Runtime。大多数情况一个App就运行在一个进程中,除非在AndroidManifest.xml中配置Android:process属性,或通过native代码fork进程。

线程 线程对应用来说非常常见,比如每次new Thread().start都会创建一个新的线程。该线程与App所在进程之间资源共享,从Linux角度来说进程与线程除了是否共享资源外,并没有本质的区别,都是一个task_struct结构体,在CPU看来进程或线程无非就是一段可执行的代码,CPU采用CFS调度算法,保证每个task都尽可能公平的享有CPU时间片。

其实承载ActivityThread的主线程就是由Zygote fork而创建的进程。

Handler创建的时候会采用当前线程的Looper来构造消息循环系统,Looper在哪个线程创建,就跟哪个线程绑定,并且Handler是在他关联的Looper对应的线程中处理消息的。(敲黑板)

那么Handler内部如何获取到当前线程的Looper呢—–ThreadLocal。ThreadLocal可以在不同的线程中互不干扰的存储并提供数据,通过ThreadLocal可以轻松获取每个线程的Looper。当然需要注意的是①线程是默认没有Looper的,如果需要使用Handler,就必须为线程创建Looper。我们经常提到的主线程,也叫UI线程,它就是ActivityThread,②ActivityThread被创建时就会初始化Looper,这也是在主线程中默认可以使用Handler的原因。

系统为什么不允许在子线程中访问UI? 这是因为Android的UI控件不是线程安全的,如果在多线程中并发访问可能会导致UI控件处于不可预期的状态,那么为什么系统不对UI控件的访问加上锁机制呢?缺点有两个:

  1. 首先加上锁机制会让UI访问的逻辑变得复杂
  2. 锁机制会降低UI访问的效率,因为锁机制会阻塞某些线程的执行。 所以最简单且高效的方法就是采用单线程模型来处理UI操作。

Android Handler消息处理机制

发表于 2018-11-10 | 分类于 Android

Android应用程序是通过消息来驱动的,Android某种意义上也可以说成是一个以消息驱动的系统,UI、事件、生命周期都和消息处理机制息息相关,并且消息处理机制在整个Android知识体系中也是尤其重要,在太多的源码分析的文章讲得比较繁琐,很多人对整个消息处理机制依然是懵懵懂懂,这篇文章通过一些问答的模式结合Android主线程(UI线程)的工作原理来讲解,源码注释很全,还有结合流程图

概述

1、我们先说下什么是Android消息处理机制?

消息处理机制本质:一个线程开启循环模式持续监听并依次处理其他线程给它发的消息。

简单的说:一个线程开启一个无限循环模式,不断遍历自己的消息列表,如果有消息就挨个拿出来做处理,如果列表没消息,自己就堵塞(相当于wait,让出cpu资源给其他线程),其他线程如果想让该线程做什么事,就往该线程的消息队列插入消息,该线程会不断从队列里拿出消息做处理。

2、Android消息处理机制的工作原理?

打个比方:公司类比App

  • PM 的主要工作是设计产品,写需求文档,改需求,中途改需求,提测前改需求…
  • UI 主要工作是UI设计,交互等。
  • RD 工作我就不说了
  • CEO 不解释。 公司开创之后(App启动),那么CEO开始干活了(主线程【UI线程】启动),这时候CEO开启了无限循环工作狂模式,自己的公司没办法啊(相当于UI主线程转成Looper线程【源码里面有】)CEO招了一名RD(new Handler 实例)并把告诉PM和UI,如果你们有什么任务和需求就让RD(Handler实例)转告给我(CEO)。RD会把PM和UI的需求(Message)一条条记到CEO的备忘录里(MessageQueue)。CEO 无限循环的工作就是不断查看备忘录,看有什么任务要做,有任务就从备忘录一条一条拿出任务来,然后交给这一名RD(Handler 实例)去处理(毕竟CEO 不会写代码 囧…)。当然如果备忘录都做完了,这时候CEO就会去睡觉(线程堵塞【简单理解成线程wait】,让出CPU资源,让其他线程去执行)。但是这个备忘录有个特殊的功能就是没有任务的时候突然插入第一条任务(从无到有)就会有闹钟功能叫醒CEO起床继续处理备忘录。 整个消息处理机制的工作原理基本就是这样的。后面会有源码分析,你再来结合这个场景,会更好理解一些。

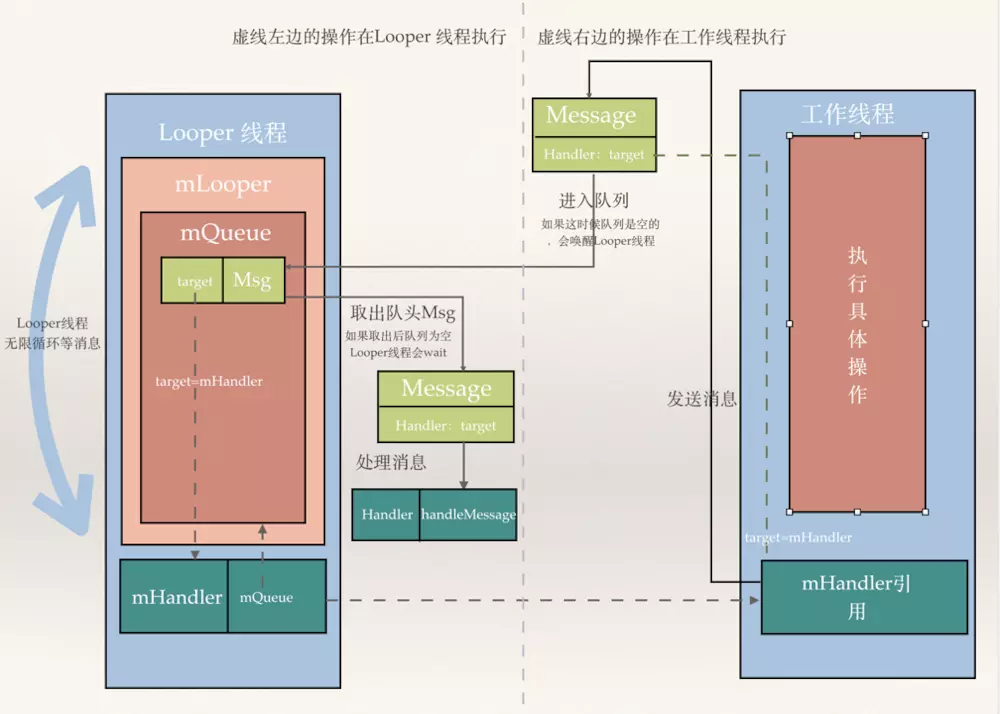
这里先给一张Android消息处理机制流程图和具体执行动画,如果看不懂没事,接着往下看(后面会结合Android UI主线程来讲解),然后结合着图和动画一块看更能理解整个机制的实现原理。 image image

3、Looper、Handler、MessageQueue,Message作用和存在的意义?

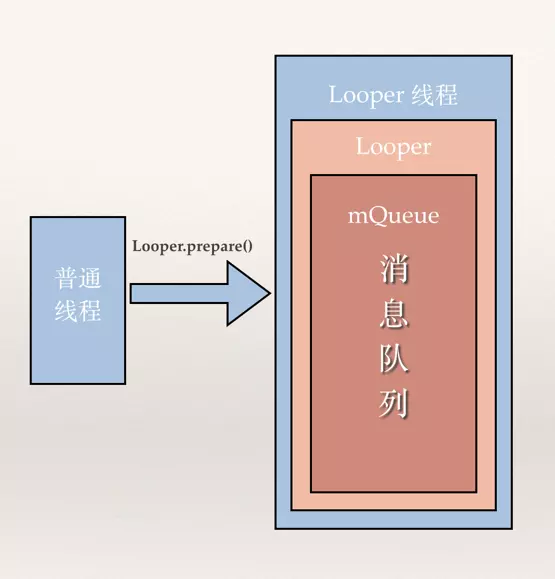
Looper 我们知道一个线程是一段可执行的代码,当可执行代码执行完成后,线程生命周期便会终止,线程就会退出,那么做为App的主线程,如果代码段执行完了会怎样?,那么就会出现App启动后执行一段代码后就自动退出了,这是很不合理的。所以为了防止代码段被执行完,只能在代码中插入一个死循环,那么代码就不会被执行完,然后自动退出,怎么在在代码中插入一个死循环呢?那么Looper出现了,在主线程中调用Looper.prepare()…Looper.loop()就会变当前线程变成Looper线程(可以先简单理解:无限循环不退出的线程),Looper.loop()方法里面有一段死循环的代码,所以主线程会进入while(true){…}的代码段跳不出来,但是主线程也不能什么都不做吧?其实所有做的事情都在while(true){…}里面做了,主线程会在死循环中不断等其他线程给它发消息(消息包括:Activity启动,生命周期,更新UI,控件事件等),一有消息就根据消息做相应的处理,Looper的另外一部分工作就是在循环代码中会不断从消息队列挨个拿出消息给主线程处理。

MessageQueue MessageQueue 存在的原因很简单,就是同一线程在同一时间只能处理一个消息,同一线程代码执行是不具有并发性,所以需要队列来保存消息和安排每个消息的处理顺序。多个其他线程往UI线程发送消息,UI线程必须把这些消息保持到一个列表(它同一时间不能处理那么多任务),然后挨个拿出来处理,这种设计很简单,我们平时写代码其实也经常这么做。每一个Looper线程都会维护这样一个队列,而且仅此一个,这个队列的消息只能由该线程处理。

Handler 简单说Handler用于同一个进程的线程间通信。Looper让主线程无限循环地从自己的MessageQueue拿出消息处理,既然这样我们就知道处理消息肯定是在主线程中处理的,那么怎样在其他的线程往主线程的队列里放入消息呢?其实很简单,我们知道在同一进程中线程和线程之间资源是共享的,也就是对于任何变量在任何线程都是可以访问和修改的,只要考虑并发性做好同步就行了,那么只要拿到MessageQueue 的实例,就可以往主线程的MessageQueue放入消息,主线程在轮询的时候就会在主线程处理这个消息。那么怎么拿到主线程 MessageQueue的实例,是可以拿到的(在主线程下mLooper = Looper.myLooper();mQueue = mLooper.mQueue;),但是Google 为了统一添加消息和消息的回调处理,又专门构建了Handler类,你只要在主线程构建Handler类,那么这个Handler实例就获取主线程MessageQueue实例的引用(获取方式mLooper = Looper.myLooper();mQueue = mLooper.mQueue;),Handler 在sendMessage的时候就通过这个引用往消息队列里插入新消息。Handler 的另外一个作用,就是能统一处理消息的回调。这样一个Handler发出消息又确保消息处理也是自己来做,这样的设计非常的赞。具体做法就是在队列里面的Message持有Handler的引用(哪个handler 把它放到队列里,message就持有了这个handler的引用),然后等到主线程轮询到这个message的时候,就来回调我们经常重写的Handler的handleMessage(Message msg)方法。

Message Message 很简单了,你想让主线程做什么事,总要告诉它吧,总要传递点数据给它吧,Message就是这个载体。

源码分析

接下来我们会结合App主线程(UI线程)来讲解,从App启动后一步一步往下走分析整个Android的消息处理机制,首先在ActivityThread类有我们熟悉的main的函数,App启动的代码的入口就在这里,UI线程本来只是一个普通线程,在这里会把UI线程转换成Looper线程,什么是Looper线程,不急往下看就知道了。

1
2
3
4
5
6
7
8
9
10
11
12
13
14
15
16
public final class ActivityThread {
public static final void main(String[] args) {
......
Looper.prepareMainLooper();
......
ActivityThread thread = new ActivityThread();
thread.attach(false);

if (sMainThreadHandler == null) {
sMainThreadHandler = thread.getHandler();
}
......
Looper.loop();
......
}
}

首先执行的是 Looper.prepareMainLooper() 我们来看下Looper里面的这个方法做了什么?

注:看之前先稍微了解下ThreadLocal是什么? ThreadLocal: 线程本地存储区(Thread Local Storage,简称为TLS),每个线程都有自己的私有的本地存储区域,不同线程之间彼此不能访问对方的TLS区域。这里线程自己的本地存储区域存放是线程自己的Looper。具体看下ThreadLocal.java 的源码!

1
2
3
4
5
6
7
8
9
10
11
12
13
14
15
16
17
18
19
20
21
22
23
24
25
26
27
28
29
30
31
32
33
34
35
36
37
38
39
40
41
42
43
44
45
46
47
48
49
public final class Looper {
// sThreadLocal 是static的变量,可以先简单理解它相当于map,key是线程,value是Looper,
//那么你只要用当前的线程就能通过sThreadLocal获取当前线程所属的Looper。
static final ThreadLocal<Looper> sThreadLocal = new ThreadLocal<Looper>();
//主线程(UI线程)的Looper 单独处理,是static类型的,通过下面的方法getMainLooper()
//可以方便的获取主线程的Looper。
private static Looper sMainLooper;

//Looper 所属的线程的消息队列
final MessageQueue mQueue;
//Looper 所属的线程
final Thread mThread;

public static void prepare() {
prepare(true);
}

private static void prepare(boolean quitAllowed) {
//如果线程的TLS已有数据,则会抛出异常,一个线程只能有一个Looper,prepare不能重复调用。
if (sThreadLocal.get() != null) {
throw new RuntimeException("Only one Looper may be created per thread");
}
//往线程的TLS插入数据,简单理解相当于map.put(Thread.currentThread(),new Looper(quitAllowed));
sThreadLocal.set(new Looper(quitAllowed));
}

//实际上是调用 prepare(false),并然后给sMainLooper赋值。
public static void prepareMainLooper() {
prepare(false);
synchronized (Looper.class) {
if (sMainLooper != null) {
throw new IllegalStateException("The main Looper has already been prepared.");
}
sMainLooper = myLooper();
}
}
//static 方法,方便获取主线程的Looper.
public static Looper getMainLooper() {
synchronized (Looper.class) {
return sMainLooper;
}
}

public static @Nullable Looper myLooper() {
//具体看ThreadLocal类的源码的get方法,
//简单理解相当于map.get(Thread.currentThread()) 获取当前线程的Looper
return sThreadLocal.get();
}
}

看了上面的代码(仔细看下注释),我们发现 Looper.prepareMainLooper()做的事件就是new了一个Looper实例并放入Looper类下面一个static的ThreadLocal sThreadLocal静态变量中,同时给sMainLooper赋值,给sMainLooper赋值是为了方便通过Looper.getMainLooper()快速获取主线程的Looper,sMainLooper是主线程的Looper可能获取会比较频繁,避免每次都到 sThreadLocal 去查找获取。

接下来重点是看下Looper的构造函数,看看在new Looper的时候做了什么事?

1
2
3
4
private Looper(boolean quitAllowed) {
mQueue = new MessageQueue(quitAllowed);
mThread = Thread.currentThread();
}

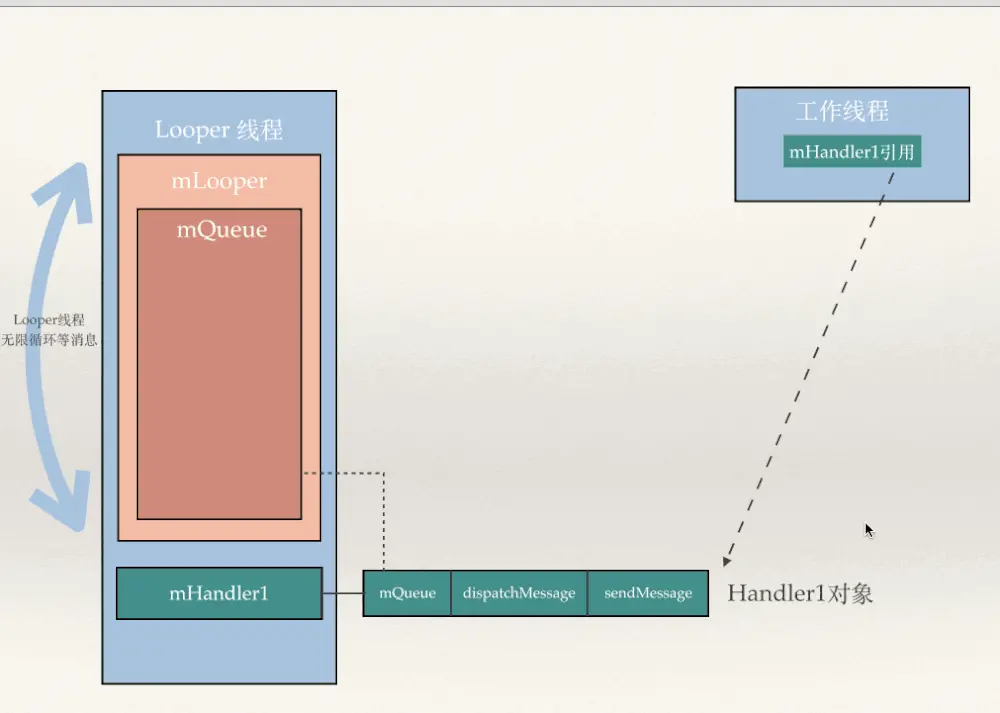
看到没有,这时候给当前线程创建了消息队列MessageQueue,并且让Looper持有MessageQueue的引用。执行完Looper.prepareMainLooper() 之后,主线程从普通线程转成一个Looper线程。目前的主线程线程已经有一个Looper对象和一个消息队列mQueue,引用关系如下图:(主线程可以轻松获取它的Looper,主线程的Looper持有主线程消息队列的引用) image 具体如何获取主线程的Looper对象和消息列表呢?

1
2
3
4
5
//在主线程中执行
mLooper = Looper.myLooper();
mQueue = mLooper.mQueue
//或者
mLooper=Looper.getMainLooper()

接下来回到ActivityThread 的main函数,执行完Looper.prepareMainLooper() 之后下一句代码是ActivityThread thread = new ActivityThread();这句话就是创建一下ActivityThread对象,这边需要注意的时候ActivityThread并不是一个线程,它并没有继承Thread,而只是一个普通的类public final class ActivityThread{…}ActivityThread的构造函数并没有做什么事只是初始化了资源管理器。

1
2
3
ActivityThread() {
mResourcesManager = ResourcesManager.getInstance();
}

接着往下看下一行代码

1
2
3
ActivityThread thread = new ActivityThread();
//建立Binder通道 (创建新线程)
thread.attach(false);

thread.attach(false);便会创建一个Binder线程(具体是指ApplicationThread,该Binder线程会通过想 Handler将Message发送给主线程,之后讲)。我们之前提到主线程最后会进入无限循环当中,如果没有在进入死循环之前创建其他线程,那么待会谁会给主线程发消息呢?,没错就是在这里创建了这个线程,这个线程会接收来自系统服务发送来的一些事件封装了Message并发送给主线程,主线程在无限循环中从队列里拿到这些消息并处理这些消息。(Binder线程发生的消息包括LAUNCH_ACTIVITY,PAUSE_ACTIVITY 等等)

继续回到mian 函数的下一句代码Looper.loop() 那么重点来了,我们来看下Looper.loop()的源码:

1
2
3
4
5
6
7
8
9
10
11
12
13
14
15
16
17
18
19
20
21
22
23
24
public static void loop() {
final Looper me = myLooper(); //获取TLS存储的Looper对象,获取当前线程的Looper
if (me == null) {
throw new RuntimeException("No Looper; Looper.prepare() wasn't called on this thread.");
}

final MessageQueue queue = me.mQueue; //获取Looper对象中的消息队列
....

for (;;) { //主线程开启无限循环模式
Message msg = queue.next(); //获取队列中的下一条消息,可能会线程阻塞
if (msg == null) { //没有消息,则退出循环,退出消息循环,那么你的程序也就可以退出了
return;
}
....
//分发Message,msg.target 是一个Handler对象,哪个Handler把这个Message发到队列里,
//这个Message会持有这个Handler的引用,并放到自己的target变量中,这样就可以回调我们重写
//的handler的handleMessage方法。
msg.target.dispatchMessage(msg);
....
....
msg.recycleUnchecked(); //将Message回收到消息池,下次要用的时候不需要重新创建,obtain()就可以了。
}
}

上面的代码,大家具体看下注释,这时候主线程(UI线程)执行到这一步就进入了死循环,不断地去拿消息队列里面的消息出来处理?那么问题来了

  1. UI线程一直在这个循环里跳不出来,主线程不会因为Looper.loop()里的死循环卡死吗,那还怎么执行其他的操作呢? 在looper启动后,主线程上执行的任何代码都是被looper从消息队列里取出来执行的。也就是说主线程之后都是通过其他线程给它发消息来实现执行其他操作的。生命周期的回调也是如此的,系统服务ActivityManagerService通过Binder发送IPC调用给APP进程,App进程接到到调用后,通过App进程的Binder线程给主线程的消息队列插入一条消息来实现的。
  2. 主线程是UI线程和用户交互的线程,优先级应该很高,主线程的死循环一直运行是不是会特别消耗CPU资源吗?App进程的其他线程怎么办? 这基本是一个类似生产者消费者的模型,简单说如果在主线程的MessageQueue没有消息时,就会阻塞在loop的queue.next()方法里,这时候主线程会释放CPU资源进入休眠状态,直到有下个消息进来时候就会唤醒主线程,在2.2 版本以前,这套机制是用我们熟悉的线程的wait和notify 来实现的,之后的版本涉及到Linux pipe/epoll机制,通过往pipe管道写端写入数据来唤醒主线程工作。原理类似于I/O,读写是堵塞的,不占用CPU资源。 所以上面代码的重点是queue.next() 的函数,其他的我们就不多说了,我们来看下queue.next()的源码(主要还是看注释):
    1
    2
    3
    4
    5
    6
    7
    8
    9
    10
    11
    12
    13
    14
    15
    16
    17
    18
    19
    20
    21
    22
    23
    24
    25
    26
    27
    28
    29
    30
    31
    32
    33
    34
    35
    36
    37
    38
    39
    40
    41
    42
    43
    44
    45
    46
    47
    48
    49
    50
    51
    52
    53
    54
    55
    56
    57
    58
    59
    60
    Message next() 

    final long ptr = mPtr;
    if (ptr == 0) {
    return null;
    }
    int pendingIdleHandlerCount = -1; // -1 only during first iteration

    //nextPollTimeoutMillis 表示nativePollOnce方法需要等待nextPollTimeoutMillis
    //才会返回
    int nextPollTimeoutMillis = 0;
    for (;;) {
    if (nextPollTimeoutMillis != 0) {
    Binder.flushPendingCommands();
    }
    //读取消息,队里里没有消息有可能会堵塞,两种情况该方法才会返回(代码才能往下执行)
    //一种是等到有消息产生就会返回,
    //另一种是当等了nextPollTimeoutMillis时长后,nativePollOnce也会返回
    nativePollOnce(ptr, nextPollTimeoutMillis);
    //nativePollOnce 返回之后才能往下执行
    synchronized (this) {
    // Try to retrieve the next message. Return if found.
    final long now = SystemClock.uptimeMillis();
    Message prevMsg = null;
    Message msg = mMessages;
    if (msg != null && msg.target == null) {
    // 循环找到一条不是异步而且msg.target不为空的message
    do {
    prevMsg = msg;
    msg = msg.next;
    } while (msg != null && !msg.isAsynchronous());
    }
    if (msg != null) {
    if (now < msg.when) {
    // 虽然有消息,但是还没有到运行的时候,像我们经常用的postDelay,
    //计算出离执行时间还有多久赋值给nextPollTimeoutMillis,
    //表示nativePollOnce方法要等待nextPollTimeoutMillis时长后返回
    nextPollTimeoutMillis = (int) Math.min(msg.when - now, Integer.MAX_VALUE);
    } else {
    // 获取到消息
    mBlocked = false;
    //链表一些操作,获取msg并且删除该节点
    if (prevMsg != null)
    prevMsg.next = msg.next;
    } else {
    mMessages = msg.next;
    }
    msg.next = null;
    msg.markInUse();
    //返回拿到的消息
    return msg;
    }
    } else {
    //没有消息,nextPollTimeoutMillis复位
    nextPollTimeoutMillis = -1;
    }
    .....
    .....

    }

nativePollOnce()很重要,是一个native的函数,在native做了大量的工作,主要涉及到epoll机制的处理(在没有消息处理时阻塞在管道的读端),具体关于native相关的源码本篇文章不涉及,感兴趣的同学可以网上找找,有不少分析得比较深。

分析到这里,从应用启动创建Looper,创建消息队列,到进入loop方法执行无限循环中,那么这一块就告一段落了,主线程已经在死循环里轮询等待消息了,接下来我们就要再看看,系统是怎么发消息给主线程的,主线程是怎么处理这些个消息的?

在准备启动一个Activity的时候,系统服务进程下的ActivityManagerService(简称AMS)线程会通过Binder发送IPC调用给APP进程,App进程接到到调用后,通过App进程下的Binder线程最终调用ActivityThread类下面的scheduleLaunchActivity方法来准备启动Activity,看下scheduleLaunchActivity方法:

注:Binder线程:具体是指ApplicationThread,在App进程中接受系统进程传递过来的信息的线程(在主线程进入死循环之前创建了这个线程)。

1
2
3
4
5
6
7
8
9
10
11
12
13
14
15
16
17
18
19
20
21
22
23
24
25
26
27
28
29
30
31
32
33
34
35
//这个方法不是在主线程调用,是Binder线程下调用的
public final void scheduleLaunchActivity(Intent intent, IBinder token, int ident,
ActivityInfo info, Configuration curConfig, Configuration overrideConfig,
CompatibilityInfo compatInfo, String referrer, IVoiceInteractor voiceInteractor,
int procState, Bundle state, PersistableBundle persistentState,
List<ResultInfo> pendingResults, List<ReferrerIntent> pendingNewIntents,
boolean notResumed, boolean isForward, ProfilerInfo profilerInfo) {

updateProcessState(procState, false);

ActivityClientRecord r = new ActivityClientRecord();

r.token = token;
r.ident = ident;
r.intent = intent;
r.referrer = referrer;
r.voiceInteractor = voiceInteractor;
r.activityInfo = info;
r.compatInfo = compatInfo;
r.state = state;
r.persistentState = persistentState;

r.pendingResults = pendingResults;
r.pendingIntents = pendingNewIntents;

r.startsNotResumed = notResumed;
r.isForward = isForward;

r.profilerInfo = profilerInfo;

r.overrideConfig = overrideConfig;
updatePendingConfiguration(curConfig);

sendMessage(H.LAUNCH_ACTIVITY, r);
}

把启动一些信息封装成ActivityClientRecord之后,最后一句调用sendMessage(H.LAUNCH_ACTIVITY, r);我们接着往下看:

1
2
3
4
5
6
7
8
9
10
11
12
13
14
private void sendMessage(int what, Object obj) {
sendMessage(what, obj, 0, 0, false);
}
private void sendMessage(int what, Object obj, int arg1, int arg2, boolean async) {
Message msg = Message.obtain();
msg.what = what;
msg.obj = obj;
msg.arg1 = arg1;
msg.arg2 = arg2;
if (async) {
msg.setAsynchronous(true);
}
mH.sendMessage(msg);
}

看到没有,最后启动Activity的信息都封装一个Message,但是这里有个问题了,之前在分析main函数的时候,完全没给出往主线程消息队列插入消息的方式,这里有了消息,但是怎么发到主线程的消息队列呢?最后一句又是重点mH.sendMessage(msg); mH 是什么呢?难道是Handler,我们来看下它是什么东西? 我们看了下ActivityThread 的成员变量,发现一句初始化的代码

1
final H mH = new H();

继续往下看H是什么?

1
2
3
4
5
6
7
8
9
10
11
12
13
14
15
16
17
18
19
20
21
22
23
24
25
26
27
28
29
30
31
32
33
34
35
36
37
38
public final class ActivityThread{
....
final H mH = new H();
....
private class H extends Handler {
....
....
public void handleMessage(Message msg) {
if (DEBUG_MESSAGES) Slog.v(TAG, ">>> handling: " + codeToString(msg.what));
switch (msg.what) {
case LAUNCH_ACTIVITY: {
Trace.traceBegin(Trace.TRACE_TAG_ACTIVITY_MANAGER, "activityStart");
final ActivityClientRecord r = (ActivityClientRecord) msg.obj;

r.packageInfo = getPackageInfoNoCheck(
r.activityInfo.applicationInfo, r.compatInfo);
handleLaunchActivity(r, null);
Trace.traceEnd(Trace.TRACE_TAG_ACTIVITY_MANAGER);
} break;
case RELAUNCH_ACTIVITY: {
Trace.traceBegin(Trace.TRACE_TAG_ACTIVITY_MANAGER, "activityRestart");
ActivityClientRecord r = (ActivityClientRecord)msg.obj;
handleRelaunchActivity(r);
Trace.traceEnd(Trace.TRACE_TAG_ACTIVITY_MANAGER);
} break;
case PAUSE_ACTIVITY:
Trace.traceBegin(Trace.TRACE_TAG_ACTIVITY_MANAGER, "activityPause");
handlePauseActivity((IBinder)msg.obj, false, (msg.arg1&1) != 0, msg.arg2,
(msg.arg1&2) != 0);
maybeSnapshot();
Trace.traceEnd(Trace.TRACE_TAG_ACTIVITY_MANAGER);
break;
.....
}
.....
.....
}
}

H 果不出其然是Handler,而且是ActivityThread的内部类,看了一下它的handleMessage 方法,LAUNCH_ACTIVITY、PAUSE_ACTIVITY、RESUME_ACTIVITY…好多好多,H 类帮我们处理了好多声明周期的事情。那么再回到mH.sendMessage(msg)这句代码上,在Binder线程执行mH.sendMessage(msg);,由主线程创建的Handler mH实例发送消息到主线程的消息队列里,消息队列从无到有,主线程堵塞被唤醒,主线程loop拿到消息,并回调mH的handleMessage 方法处理LAUNCH_ACTIVITY 等消息。从而实现Activity的启动。

讲到这里,基本一个启动流程分析完了,大家可能比较想知道的是 mH.sendMessage(msg); 关于Hanlder是怎么把消息发到主线程的消息队列的?我们接下来就讲解下Handler,首先看下Handler的源码!我们先来看看我们经常用的Handler的无参构造函数,实际调用的是Handler(Callback callback, boolean async)构造函数(看注释)

1
2
3
4
5
6
7
8
9
10
11
12
13
14
15
16
17
18
19
20
21
22
23
24
25
26
27
28
public Handler() {
this(null, false);
}
public Handler(Callback callback, boolean async) {
//不是static 发出可能内存泄露的警告!
if (FIND_POTENTIAL_LEAKS) {
final Class<? extends Handler> klass = getClass();
if ((klass.isAnonymousClass() || klass.isMemberClass() || klass.isLocalClass()) &&
(klass.getModifiers() & Modifier.STATIC) == 0) {
Log.w(TAG, "The following Handler class should be static or leaks might occur: " +
klass.getCanonicalName());
}
}
//获取当前线程的Looper,还记得前面讲过 Looper.myLooper()方法了吗?
//Looper.myLooper()内部实现可以先简单理解成:map.get(Thread.currentThread())
//获取当前线程的Looper
mLooper = Looper.myLooper();
if (mLooper == null) {
//当前线程不是Looper 线程,没有调用Looper.prepare()给线程创建Looper对象
throw new RuntimeException(
"Can't create handler inside thread that has not called Looper.prepare()");
}
//让Handler 持有当前线程消息队列的引用
mQueue = mLooper.mQueue;
//这些callback先不管,主要用于handler的消息发送的回调,优先级是比handlerMessage高,但是不常用
mCallback = callback;
mAsynchronous = async;
}

上面的代码说明了下面几个问题:

  1. Handler 对象在哪个线程下构建(Handler的构造函数在哪个线程下调用),那么Handler 就会持有这个线程的Looper引用和这个线程的消息队列的引用。因为持有这个线程的消息队列的引用,意味着这个Handler对象可以在任意其他线程给该线程的消息队列添加消息,也意味着Handler的handlerMessage 肯定也是在该线程执行的。
  2. 如果该线程不是Looper线程,在这个线程new Handler 就会报错!
  3. 上面两点综合说明了下面一段很常见的代码:把普通线程转成Looper线程的代码,为什么在Looper.prepare()和Looper.loop()中间要创建Handler:
1
2
3
4
5
6
7
8
9
10
11
12
13
14
class LooperThread extends Thread {
//其他线程可以通过mHandler这个引用给该线程的消息队列添加消息
public Handler mHandler;
public void run() {
Looper.prepare();
//需要在线程进入死循环之前,创建一个Handler实例供外界线程给自己发消息
mHandler = new Handler() {
public void handleMessage(Message msg) {
//Handler 对象在这个线程构建,那么handleMessage的方法就在这个线程执行
}
};
Looper.loop();
}
}

那么接下来,我们接着往下看Handler的sendMessage(msg)方法,这个方法也是比较重要的,也比较常用,Handler 有很多sendXXXX开头的方法sendMessageAtTime、sendEmptyMessageDelayed、sendEmptyMessage等等,都是用来给消息队列添加消息的,那么这些方法最终都会调用enqueueMessage来实现消息进入队列:

1
2
3
4
5
6
7
8
9
10
private boolean enqueueMessage(MessageQueue queue, Message msg, long uptimeMillis) {
//这句话很重要,让消息持有当前Handler的引用,在消息被Looper线程轮询到的时候
//回调handler的handleMessage方法
msg.target = this;
if (mAsynchronous) {
msg.setAsynchronous(true);
}
//调用MessageQueue 的enqueueMessage 方法把消息放入队列
return queue.MessageQueue(msg, uptimeMillis);
}

我们再来看下MessageQueue 的enqueueMessage(msg, uptimeMillis)方法:

1
2
3
4
5
6
7
8
9
10
11
12
13
14
15
16
17
18
19
20
21
22
23
24
25
26
27
28
29
30
31
32
33
34
35
36
37
38
39
40
41
42
43
44
45
46
47
48
49
50
51
52
53
54
55
56
57
58
59
boolean enqueueMessage(Message msg, long when) {
// msg 必须有target也就是必须有handler
if (msg.target == null) {
throw new IllegalArgumentException("Message must have a target.");
}
if (msg.isInUse()) {
throw new IllegalStateException(msg + " This message is already in use.");
}
//插入消息队列的时候需要做同步,因为会有多个线程同时做往这个队列插入消息
synchronized (this) {
if (mQuitting) {
IllegalStateException e = new IllegalStateException(
msg.target + " sending message to a Handler on a dead thread");
Log.w(TAG, e.getMessage(), e);
msg.recycle();
return false;
}

msg.markInUse();
//when 表示这个消息执行的时间,队列是按照消息执行时间排序的
//如果handler 调用的是postDelay 那么when=SystemClock.uptimeMillis()+delayMillis
msg.when = when;
Message p = mMessages;
boolean needWake;
if (p == null || when == 0 || when < p.when) {
// p==null 表示当前消息队列没有消息
msg.next = p;
mMessages = msg;
//需要唤醒主线程,如果队列没有元素,主线程会堵塞在管道的读端,这时
//候队列突然有消息了,就会往管道写入字符,唤醒主线程
needWake = mBlocked;
} else {
// Inserted within the middle of the queue. Usually we don't have to wake
// up the event queue unless there is a barrier at the head of the queue
// and the message is the earliest asynchronous message in the queue.
needWake = mBlocked && p.target == null && msg.isAsynchronous();
Message prev;
//将消息放到队列的确切位置,队列是按照msg的when 排序的,链表操作自己看咯
for (;;) {
prev = p;
p = p.next;
if (p == null || when < p.when) {
break;
}
if (needWake && p.isAsynchronous()) {
needWake = false;
}
}
msg.next = p; // invariant: p == prev.next
prev.next = msg;
}

// 如果需要唤醒Looper线程,这里调用native的方法实现epoll机制唤醒线程,我们就不在深入探讨了
if (needWake) {
nativeWake(mPtr);
}
}
return true;
}

最后我们再看下Handler 的dispatchMessage方法,这个方法在Looper线程从消息队列拿出来的时候,通过msg.target.dispatchMessage(msg)调用的。

1
2
3
4
5
6
7
8
9
10
11
12
13
14
15
16
17
/**
* Handle system messages here.
*/
public void dispatchMessage(Message msg) {
//优先调用callback方法
if (msg.callback != null) {
handleCallback(msg);
} else {
if (mCallback != null) {
if (mCallback.handleMessage(msg)) {
return;
}
}
//最后会回调我们重写的handleMessage 方法
handleMessage(msg);
}
}

Native层面

相关源码:

1
2
3
4
5
6
7
8
9
10
framework/base/core/java/andorid/os/MessageQueue.java
framework/base/core/jni/android_os_MessageQueue.cpp
framework/base/core/java/andorid/os/Looper.java (Java层)

system/core/libutils/Looper.cpp (Native层)
system/core/include/utils/Looper.h
system/core/libutils/RefBase.cpp

framework/base/native/android/looper.cpp (ALoop对象)
framework/native/include/android/looper.h

子线程中Toast,showDialog问题与子线程更新ui问题的区别

Handler其他用法

  • HandlerThread
  • IdleHandler

HandlerThread HandlerThread继承Thread,它是一种可以使用Handler的Thread,它的实现也很简单,在run方法中也是通过Looper.prepare()来创建消息队列,并通过Looper.loop()来开启消息循环(与我们手动创建方法基本一致),这样在实际的使用中就允许在HandlerThread中创建Handler了。

HandlerThread的本质也是线程,所以切记关联的Handler中处理消息的handleMessage为子线程。

IdleHandler

1
2
3
4
5
6
7
8
9
10
11
12
13
14
/**
* Callback interface for discovering when a thread is going to block
* waiting for more messages.
*/
public static interface IdleHandler {
/**
* Called when the message queue has run out of messages and will now
* wait for more. Return true to keep your idle handler active, false
* to have it removed. This may be called if there are still messages
* pending in the queue, but they are all scheduled to be dispatched
* after the current time.
*/
boolean queueIdle();
}

根据注释可以了解到,这个接口方法是在消息队列全部处理完成后或者是在阻塞的过程中等待更多的消息的时候调用的,返回值false表示只回调一次,true表示可以接收多次回调。

1
2
3
4
5
6
7
8
Looper.myQueue().addIdleHandler(new MessageQueue.IdleHandler() {
@Override
public boolean queueIdle() {


return false;
}
});

参考

  1. 为什么我们可以在非UI线程中更新UI
  2. Android 消息机制——你真的了解Handler?
  3. 深入源码解析Android中的Handler,Message,MessageQueue,Looper
  4. Android 消息处理机制(Looper、Handler、MessageQueue,Message)
  5. Android消息机制2-Handler(Native层)

Java并发编程:深入剖析ThreadLocal

发表于 2018-11-10 | 分类于 并发编程

一.对ThreadLocal的理解

ThreadLocal,很多地方叫做线程本地变量,也有些地方叫做线程本地存储,其实意思差不多。可能很多朋友都知道ThreadLocal为变量在每个线程中都创建了一个副本,那么每个线程可以访问自己内部的副本变量。 这句话从字面上看起来很容易理解,但是真正理解并不是那么容易。 我们还是先来看一个例子:

1
2
3
4
5
6
7
8
9
10
11
12
13
14
15
16
class ConnectionManager {

private static Connection connect = null;

public static Connection openConnection() {
if(connect == null){
connect = DriverManager.getConnection();
}
return connect;
}

public static void closeConnection() {
if(connect!=null)
connect.close();
}
}

假设有这样一个数据库链接管理类,这段代码在单线程中使用是没有任何问题的,但是如果在多线程中使用呢?很显然,在多线程中使用会存在线程安全问题:第一,这里面的2个方法都没有进行同步,很可能在openConnection方法中会多次创建connect;第二,由于connect是共享变量,那么必然在调用connect的地方需要使用到同步来保障线程安全,因为很可能一个线程在使用connect进行数据库操作,而另外一个线程调用closeConnection关闭链接。

所以出于线程安全的考虑,必须将这段代码的两个方法进行同步处理,并且在调用connect的地方需要进行同步处理。这样将会大大影响程序执行效率,因为一个线程在使用connect进行数据库操作的时候,其他线程只有等待。

那么大家来仔细分析一下这个问题,这地方到底需不需要将connect变量进行共享?事实上,是不需要的。假如每个线程中都有一个connect变量,各个线程之间对connect变量的访问实际上是没有依赖关系的,即一个线程不需要关心其他线程是否对这个connect进行了修改的。

到这里,可能会有朋友想到,既然不需要在线程之间共享这个变量,可以直接这样处理,在每个需要使用数据库连接的方法中具体使用时才创建数据库链接,然后在方法调用完毕再释放这个连接。比如下面这样:

1
2
3
4
5
6
7
8
9
10
11
12
13
14
15
16
17
18
19
20
21
22
23
24
25
26
27
class ConnectionManager {

private Connection connect = null;

public Connection openConnection() {
if(connect == null){
connect = DriverManager.getConnection();
}
return connect;
}

public void closeConnection() {
if(connect!=null)
connect.close();
}
}

class Dao{
public void insert() {
ConnectionManager connectionManager = new ConnectionManager();
Connection connection = connectionManager.openConnection();

//使用connection进行操作

connectionManager.closeConnection();
}
}

这样处理确实也没有任何问题,由于每次都是在方法内部创建的连接,那么线程之间自然不存在线程安全问题。但是这样会有一个致命的影响:导致服务器压力非常大,并且严重影响程序执行性能。由于在方法中需要频繁地开启和关闭数据库连接,这样不尽严重影响程序执行效率,还可能导致服务器压力巨大。

那么这种情况下使用ThreadLocal是再适合不过的了,因为ThreadLocal在每个线程中对该变量会创建一个副本,即每个线程内部都会有一个该变量,且在线程内部任何地方都可以使用,线程之间互不影响,这样一来就不存在线程安全问题,也不会严重影响程序执行性能。

但是要注意,虽然ThreadLocal能够解决上面说的问题,但是由于在每个线程中都创建了副本,所以要考虑它对资源的消耗,比如内存的占用会比不使用ThreadLocal要大。

二.深入解析ThreadLocal类

在上面谈到了对ThreadLocal的一些理解,那我们下面来看一下具体ThreadLocal是如何实现的。

先了解一下ThreadLocal类提供的几个方法:

1
2
3
4
public T get() { }
public void set(T value) { }
public void remove() { }
protected T initialValue() { }

get()方法是用来获取ThreadLocal在当前线程中保存的变量副本,set()用来设置当前线程中变量的副本,remove()用来移除当前线程中变量的副本,initialValue()是一个protected方法,一般是用来在使用时进行重写的,它是一个延迟加载方法,下面会详细说明。

首先我们来看一下ThreadLocal类是如何为每个线程创建一个变量的副本的。 先看下get方法的实现:

1
2
3
4
5
6
7
8
9
10
11
12
13
14
15
16
17
18
/**
* Returns the value in the current thread's copy of this
* thread-local variable. If the variable has no value for the
* current thread, it is first initialized to the value returned
* by an invocation of the {@link #initialValue} method.
*
* @return the current thread's value of this thread-local
*/
public T get() {
Thread t = Thread.currentThread();
ThreadLocalMap map = getMap(t);
if (map != null) {
ThreadLocalMap.Entry e = map.getEntry(this);
if (e != null)
return (T)e.value;
}
return setInitialValue();
}

第一句是取得当前线程,然后通过getMap(t)方法获取到一个map,map的类型为ThreadLocalMap。然后接着下面获取到<key,value>键值对,注意这里获取键值对传进去的是 this,而不是当前线程t。如果获取成功,则返回value值。如果map为空,则调用setInitialValue方法返回value。 我们上面的每一句来仔细分析: 首先看一下getMap方法中做了什么:

1
2
3
4
5
6
7
8
9
10
/**
* Get the map associated with a ThreadLocal. Overridden in
* InheritableThreadLocal.
*
* @param t the current thread
* @return the map
*/
ThreadLocalMap getMap(Thread t) {
return t.threadLocals;
}

可能大家没有想到的是,在getMap中,是调用当期线程t,返回当前线程t中的一个成员变量threadLocals。 那么我们继续取Thread类中取看一下成员变量threadLocals是什么:

1
2
3
/* ThreadLocal values pertaining to this thread. This map is maintained
* by the ThreadLocal class. */
ThreadLocal.ThreadLocalMap threadLocals = null;

实际上就是一个ThreadLocalMap,这个类型是ThreadLocal类的一个内部类,我们继续取看ThreadLocalMap的实现:

1
2
3
4
5
6
7
8
9
10
11
12
13
14
15
16
17
18
19
20
21
22
23
24
25
26
27
28
29
30
31
32
33
34
35
36
37
38
39
40
41
42
43
44
45
46
47
48
49
50
51
52
53
54
55
56
57
58
59
60
61
62
63
64
65
66
67
68
69
70
71
72
73
74
75
76
77
78
79
80
81
82
83
84
85
86
87
88
89
90
91
92
93
94
95
96
97
98
99
100
101
102
103
104
105
106
107
108
109
110
111
112
113
114
115
116
117
118
119
120
121
122
123
124
125
126
127
128
129
130
131
132
133
134
135
136
137
138
139
140
141
142
143
144
145
146
147
148
149
150
151
152
153
154
155
156
157
158
159
160
161
162
163
164
165
166
167
168
169
170
171
172
173
174
175
176
177
178
179
180
181
182
183
184
185
186
187
188
189
190
191
192
193
194
195
196
197
198
199
200
201
202
203
204
205
206
207
208
209
210
211
212
213
214
215
216
217
218
219
220
221
222
223
224
225
226
227
228
229
230
231
232
233
234
235
236
237
238
239
240
241
242
243
244
245
246
247
248
249
250
251
252
253
254
255
256
257
258
259
260
261
262
263
264
265
266
267
268
269
270
271
272
273
274
275
276
277
278
279
280
281
282
283
284
285
286
287
288
289
290
291
292
293
294
295
296
297
298
299
300
301
302
303
304
305
306
307
308
309
310
311
312
313
314
315
316
317
318
319
320
321
322
323
324
325
326
327
328
329
330
331
332
333
334
335
336
337
338
339
340
341
342
343
344
345
346
347
348
349
350
351
352
353
354
355
356
357
358
359
360
361
362
363
364
365
366
367
368
369
370
371
372
373
374
375
376
377
378
379
380
381
382
383
384
385
386
387
388
389
390
391
392
393
394
395
396
397
398
399
400
401
402
403
404
405
406
407
408
409
410
411
412
413
414
415
416
417
418
419
420
421
422
423
424
425
426
427
428
429
430
431
432
433
/**
* ThreadLocalMap is a customized hash map suitable only for
* maintaining thread local values. No operations are exported
* outside of the ThreadLocal class. The class is package private to
* allow declaration of fields in class Thread. To help deal with
* very large and long-lived usages, the hash table entries use
* WeakReferences for keys. However, since reference queues are not
* used, stale entries are guaranteed to be removed only when
* the table starts running out of space.
*/
static class ThreadLocalMap {

/**
* The entries in this hash map extend WeakReference, using
* its main ref field as the key (which is always a
* ThreadLocal object). Note that null keys (i.e. entry.get()
* == null) mean that the key is no longer referenced, so the
* entry can be expunged from table. Such entries are referred to
* as "stale entries" in the code that follows.
*/
static class Entry extends WeakReference<ThreadLocal> {
/** The value associated with this ThreadLocal. */
Object value;

Entry(ThreadLocal k, Object v) {
super(k);
value = v;
}
}

/**
* The initial capacity -- MUST be a power of two.
*/
private static final int INITIAL_CAPACITY = 16;

/**
* The table, resized as necessary.
* table.length MUST always be a power of two.
*/
private Entry[] table;

/**
* The number of entries in the table.
*/
private int size = 0;

/**
* The next size value at which to resize.
*/
private int threshold; // Default to 0

/**
* Set the resize threshold to maintain at worst a 2/3 load factor.
*/
private void setThreshold(int len) {
threshold = len * 2 / 3;
}

/**
* Increment i modulo len.
*/
private static int nextIndex(int i, int len) {
return ((i + 1 < len) ? i + 1 : 0);
}

/**
* Decrement i modulo len.
*/
private static int prevIndex(int i, int len) {
return ((i - 1 >= 0) ? i - 1 : len - 1);
}

/**
* Construct a new map initially containing (firstKey, firstValue).
* ThreadLocalMaps are constructed lazily, so we only create
* one when we have at least one entry to put in it.
*/
ThreadLocalMap(ThreadLocal firstKey, Object firstValue) {
table = new Entry[INITIAL_CAPACITY];
int i = firstKey.threadLocalHashCode & (INITIAL_CAPACITY - 1);
table[i] = new Entry(firstKey, firstValue);
size = 1;
setThreshold(INITIAL_CAPACITY);
}

/**
* Construct a new map including all Inheritable ThreadLocals
* from given parent map. Called only by createInheritedMap.
*
* @param parentMap the map associated with parent thread.
*/
private ThreadLocalMap(ThreadLocalMap parentMap) {
Entry[] parentTable = parentMap.table;
int len = parentTable.length;
setThreshold(len);
table = new Entry[len];

for (int j = 0; j < len; j++) {
Entry e = parentTable[j];
if (e != null) {
ThreadLocal key = e.get();
if (key != null) {
Object value = key.childValue(e.value);
Entry c = new Entry(key, value);
int h = key.threadLocalHashCode & (len - 1);
while (table[h] != null)
h = nextIndex(h, len);
table[h] = c;
size++;
}
}
}
}

/**
* Get the entry associated with key. This method
* itself handles only the fast path: a direct hit of existing
* key. It otherwise relays to getEntryAfterMiss. This is
* designed to maximize performance for direct hits, in part
* by making this method readily inlinable.
*
* @param key the thread local object
* @return the entry associated with key, or null if no such
*/
private Entry getEntry(ThreadLocal key) {
int i = key.threadLocalHashCode & (table.length - 1);
Entry e = table[i];
if (e != null && e.get() == key)
return e;
else
return getEntryAfterMiss(key, i, e);
}

/**
* Version of getEntry method for use when key is not found in
* its direct hash slot.
*
* @param key the thread local object
* @param i the table index for key's hash code
* @param e the entry at table[i]
* @return the entry associated with key, or null if no such
*/
private Entry getEntryAfterMiss(ThreadLocal key, int i, Entry e) {
Entry[] tab = table;
int len = tab.length;

while (e != null) {
ThreadLocal k = e.get();
if (k == key)
return e;
if (k == null)
expungeStaleEntry(i);
else
i = nextIndex(i, len);
e = tab[i];
}
return null;
}

/**
* Set the value associated with key.
*
* @param key the thread local object
* @param value the value to be set
*/
private void set(ThreadLocal key, Object value) {

// We don't use a fast path as with get() because it is at
// least as common to use set() to create new entries as
// it is to replace existing ones, in which case, a fast
// path would fail more often than not.

Entry[] tab = table;
int len = tab.length;
int i = key.threadLocalHashCode & (len-1);

for (Entry e = tab[i];
e != null;
e = tab[i = nextIndex(i, len)]) {
ThreadLocal k = e.get();

if (k == key) {
e.value = value;
return;
}

if (k == null) {
replaceStaleEntry(key, value, i);
return;
}
}

tab[i] = new Entry(key, value);
int sz = ++size;
if (!cleanSomeSlots(i, sz) && sz >= threshold)
rehash();
}

/**
* Remove the entry for key.
*/
private void remove(ThreadLocal key) {
Entry[] tab = table;
int len = tab.length;
int i = key.threadLocalHashCode & (len-1);
for (Entry e = tab[i];
e != null;
e = tab[i = nextIndex(i, len)]) {
if (e.get() == key) {
e.clear();
expungeStaleEntry(i);
return;
}
}
}

/**
* Replace a stale entry encountered during a set operation
* with an entry for the specified key. The value passed in
* the value parameter is stored in the entry, whether or not
* an entry already exists for the specified key.
*
* As a side effect, this method expunges all stale entries in the
* "run" containing the stale entry. (A run is a sequence of entries
* between two null slots.)
*
* @param key the key
* @param value the value to be associated with key
* @param staleSlot index of the first stale entry encountered while
* searching for key.
*/
private void replaceStaleEntry(ThreadLocal key, Object value,
int staleSlot) {
Entry[] tab = table;
int len = tab.length;
Entry e;

// Back up to check for prior stale entry in current run.
// We clean out whole runs at a time to avoid continual
// incremental rehashing due to garbage collector freeing
// up refs in bunches (i.e., whenever the collector runs).
int slotToExpunge = staleSlot;
for (int i = prevIndex(staleSlot, len);
(e = tab[i]) != null;
i = prevIndex(i, len))
if (e.get() == null)
slotToExpunge = i;

// Find either the key or trailing null slot of run, whichever
// occurs first
for (int i = nextIndex(staleSlot, len);
(e = tab[i]) != null;
i = nextIndex(i, len)) {
ThreadLocal k = e.get();

// If we find key, then we need to swap it
// with the stale entry to maintain hash table order.
// The newly stale slot, or any other stale slot
// encountered above it, can then be sent to expungeStaleEntry
// to remove or rehash all of the other entries in run.
if (k == key) {
e.value = value;

tab[i] = tab[staleSlot];
tab[staleSlot] = e;

// Start expunge at preceding stale entry if it exists
if (slotToExpunge == staleSlot)
slotToExpunge = i;
cleanSomeSlots(expungeStaleEntry(slotToExpunge), len);
return;
}

// If we didn't find stale entry on backward scan, the
// first stale entry seen while scanning for key is the
// first still present in the run.
if (k == null && slotToExpunge == staleSlot)
slotToExpunge = i;
}

// If key not found, put new entry in stale slot
tab[staleSlot].value = null;
tab[staleSlot] = new Entry(key, value);

// If there are any other stale entries in run, expunge them
if (slotToExpunge != staleSlot)
cleanSomeSlots(expungeStaleEntry(slotToExpunge), len);
}

/**
* Expunge a stale entry by rehashing any possibly colliding entries
* lying between staleSlot and the next null slot. This also expunges
* any other stale entries encountered before the trailing null. See
* Knuth, Section 6.4
*
* @param staleSlot index of slot known to have null key
* @return the index of the next null slot after staleSlot
* (all between staleSlot and this slot will have been checked
* for expunging).
*/
private int expungeStaleEntry(int staleSlot) {
Entry[] tab = table;
int len = tab.length;

// expunge entry at staleSlot
tab[staleSlot].value = null;
tab[staleSlot] = null;
size--;

// Rehash until we encounter null
Entry e;
int i;
for (i = nextIndex(staleSlot, len);
(e = tab[i]) != null;
i = nextIndex(i, len)) {
ThreadLocal k = e.get();
if (k == null) {
e.value = null;
tab[i] = null;
size--;
} else {
int h = k.threadLocalHashCode & (len - 1);
if (h != i) {
tab[i] = null;

// Unlike Knuth 6.4 Algorithm R, we must scan until
// null because multiple entries could have been stale.
while (tab[h] != null)
h = nextIndex(h, len);
tab[h] = e;
}
}
}
return i;
}

/**
* Heuristically scan some cells looking for stale entries.
* This is invoked when either a new element is added, or
* another stale one has been expunged. It performs a
* logarithmic number of scans, as a balance between no
* scanning (fast but retains garbage) and a number of scans
* proportional to number of elements, that would find all
* garbage but would cause some insertions to take O(n) time.
*
* @param i a position known NOT to hold a stale entry. The
* scan starts at the element after i.
*
* @param n scan control: <tt>log2(n)</tt> cells are scanned,
* unless a stale entry is found, in which case
* <tt>log2(table.length)-1</tt> additional cells are scanned.
* When called from insertions, this parameter is the number
* of elements, but when from replaceStaleEntry, it is the
* table length. (Note: all this could be changed to be either
* more or less aggressive by weighting n instead of just
* using straight log n. But this version is simple, fast, and
* seems to work well.)
*
* @return true if any stale entries have been removed.
*/
private boolean cleanSomeSlots(int i, int n) {
boolean removed = false;
Entry[] tab = table;
int len = tab.length;
do {
i = nextIndex(i, len);
Entry e = tab[i];
if (e != null && e.get() == null) {
n = len;
removed = true;
i = expungeStaleEntry(i);
}
} while ( (n >>>= 1) != 0);
return removed;
}

/**
* Re-pack and/or re-size the table. First scan the entire
* table removing stale entries. If this doesn't sufficiently
* shrink the size of the table, double the table size.
*/
private void rehash() {
expungeStaleEntries();

// Use lower threshold for doubling to avoid hysteresis
if (size >= threshold - threshold / 4)
resize();
}

/**
* Double the capacity of the table.
*/
private void resize() {
Entry[] oldTab = table;
int oldLen = oldTab.length;
int newLen = oldLen * 2;
Entry[] newTab = new Entry[newLen];
int count = 0;

for (int j = 0; j < oldLen; ++j) {
Entry e = oldTab[j];
if (e != null) {
ThreadLocal k = e.get();
if (k == null) {
e.value = null; // Help the GC
} else {
int h = k.threadLocalHashCode & (newLen - 1);
while (newTab[h] != null)
h = nextIndex(h, newLen);
newTab[h] = e;
count++;
}
}
}

setThreshold(newLen);
size = count;
table = newTab;
}

/**
* Expunge all stale entries in the table.
*/
private void expungeStaleEntries() {
Entry[] tab = table;
int len = tab.length;
for (int j = 0; j < len; j++) {
Entry e = tab[j];
if (e != null && e.get() == null)
expungeStaleEntry(j);
}
}
}

可以看到ThreadLocalMap的Entry继承了WeakReference,并且使用ThreadLocal作为键值。 然后再继续看setInitialValue方法的具体实现:

1
2
3
4
5
6
7
8
9
10
11
12
13
14
15
16
/**
* Variant of set() to establish initialValue. Used instead
* of set() in case user has overridden the set() method.
*
* @return the initial value
*/
private T setInitialValue() {
T value = initialValue();
Thread t = Thread.currentThread();
ThreadLocalMap map = getMap(t);
if (map != null)
map.set(this, value);
else
createMap(t, value);
return value;
}

很容易了解,就是如果map不为空,就设置键值对,为空,再创建Map,看一下createMap的实现:

1
2
3
4
5
6
7
8
9
10
11
/**
* Create the map associated with a ThreadLocal. Overridden in
* InheritableThreadLocal.
*
* @param t the current thread
* @param firstValue value for the initial entry of the map
* @param map the map to store.
*/
void createMap(Thread t, T firstValue) {
t.threadLocals = new ThreadLocalMap(this, firstValue);
}

至此,可能大部分朋友已经明白了ThreadLocal是如何为每个线程创建变量的副本的:

首先,在每个线程Thread内部有一个ThreadLocal.ThreadLocalMap类型的成员变量threadLocals,这个threadLocals就是用来存储实际的变量副本的,键值为当前ThreadLocal变量,value为变量副本(即T类型的变量)。

初始时,在Thread里面,threadLocals为空,当通过ThreadLocal变量调用get()方法或者set()方法,就会对Thread类中的threadLocals进行初始化,并且以当前ThreadLocal变量为键值,以ThreadLocal要保存的副本变量为value,存到threadLocals。

然后在当前线程里面,如果要使用副本变量,就可以通过get方法在threadLocals里面查找。

下面通过一个例子来证明通过ThreadLocal能达到在每个线程中创建变量副本的效果:

1
2
3
4
5
6
7
8
9
10
11
12
13
14
15
16
17
18
19
20
21
22
23
24
25
26
27
28
29
30
31
32
33
34
35
36
37
38
39
40
41
public class Test {
ThreadLocal<Long> longLocal = new ThreadLocal<Long>();
ThreadLocal<String> stringLocal = new ThreadLocal<String>();


public void set() {
longLocal.set(Thread.currentThread().getId());
stringLocal.set(Thread.currentThread().getName());
}

public long getLong() {
return longLocal.get();
}

public String getString() {
return stringLocal.get();
}

public static void main(String[] args) throws InterruptedException {
final Test test = new Test();


test.set();
System.out.println(test.getLong());
System.out.println(test.getString());


Thread thread1 = new Thread(){
public void run() {
test.set();
System.out.println(test.getLong());
System.out.println(test.getString());
};
};
thread1.start();
thread1.join();

System.out.println(test.getLong());
System.out.println(test.getString());
}
}

输出结果:

1
2
3
4
5
6
1
main
8
Thread-0
1
main

从这段代码的输出结果可以看出,在main线程中和thread1线程中,longLocal保存的副本值和stringLocal保存的副本值都不一样。最后一次在main线程再次打印副本值是为了证明在main线程中和thread1线程中的副本值确实是不同的。

总结一下:

  1. 实际的通过ThreadLocal创建的副本是存储在每个线程自己的threadLocals中的;
  2. 为何threadLocals的类型ThreadLocalMap的键值为ThreadLocal对象,因为每个线程中可有多个threadLocal变量,就像上面代码中的longLocal和stringLocal;
  3. 在进行get之前,必须先set,否则会报空指针异常;

如果想在get之前不需要调用set就能正常访问的话,必须重写initialValue()方法。因为在上面的代码分析过程中,我们发现如果没有先set的话,即在map中查找不到对应的存储,则会通过调用setInitialValue方法返回i,而在setInitialValue方法中,有一个语句是T value = initialValue(), 而默认情况下,initialValue方法返回的是null。

1
2
3
4
5
6
7
8
9
10
11
12
13
14
15
16
17
18
19
20
21
22
23
24
25
26
27
28
29
30
31
32
33
34
35
/**
* Returns the value in the current thread's copy of this
* thread-local variable. If the variable has no value for the
* current thread, it is first initialized to the value returned
* by an invocation of the {@link #initialValue} method.
*
* @return the current thread's value of this thread-local
*/
public T get() {
Thread t = Thread.currentThread();
ThreadLocalMap map = getMap(t);
if (map != null) {
ThreadLocalMap.Entry e = map.getEntry(this);
if (e != null)
return (T)e.value;
}
return setInitialValue();
}

/**
* Variant of set() to establish initialValue. Used instead
* of set() in case user has overridden the set() method.
*
* @return the initial value
*/
private T setInitialValue() {
T value = initialValue();
Thread t = Thread.currentThread();
ThreadLocalMap map = getMap(t);
if (map != null)
map.set(this, value);
else
createMap(t, value);
return value;
}

看下面这个例子:

1
2
3
4
5
6
7
8
9
10
11
12
13
14
15
16
17
18
19
20
21
22
23
24
25
26
27
28
29
30
31
32
33
34
35
36
37
public class Test {
ThreadLocal<Long> longLocal = new ThreadLocal<Long>();
ThreadLocal<String> stringLocal = new ThreadLocal<String>();

public void set() {
longLocal.set(Thread.currentThread().getId());
stringLocal.set(Thread.currentThread().getName());
}

public long getLong() {
return longLocal.get();
}

public String getString() {
return stringLocal.get();
}

public static void main(String[] args) throws InterruptedException {
final Test test = new Test();

System.out.println(test.getLong());
System.out.println(test.getString());

Thread thread1 = new Thread(){
public void run() {
test.set();
System.out.println(test.getLong());
System.out.println(test.getString());
};
};
thread1.start();
thread1.join();

System.out.println(test.getLong());
System.out.println(test.getString());
}
}

在main线程中,没有先set,直接get的话,运行时会报空指针异常。 但是如果改成下面这段代码,即重写了initialValue方法:

1
2
3
4
5
6
7
8
9
10
11
12
13
14
15
16
17
18
19
20
21
22
23
24
25
26
27
28
29
30
31
32
33
34
35
36
37
38
39
40
41
42
43
44
45
46
47
48
public class Test {
ThreadLocal<Long> longLocal = new ThreadLocal<Long>(){
protected Long initialValue() {
return Thread.currentThread().getId();
};
};
ThreadLocal<String> stringLocal = new ThreadLocal<String>(){;
protected String initialValue() {
return Thread.currentThread().getName();
};
};


public void set() {
longLocal.set(Thread.currentThread().getId());
stringLocal.set(Thread.currentThread().getName());
}

public long getLong() {
return longLocal.get();
}

public String getString() {
return stringLocal.get();
}

public static void main(String[] args) throws InterruptedException {
final Test test = new Test();

test.set();
System.out.println(test.getLong());
System.out.println(test.getString());


Thread thread1 = new Thread(){
public void run() {
test.set();
System.out.println(test.getLong());
System.out.println(test.getString());
};
};
thread1.start();
thread1.join();

System.out.println(test.getLong());
System.out.println(test.getString());
}
}

就可以直接不用先set而直接调用get了。

三.ThreadLocal的应用场景

最常见的ThreadLocal使用场景为 用来解决 数据库连接、Session管理等。 如:

1
2
3
4
5
6
7
8
9
10
11
12
13
14
15
16
17
18
19
20
21
22
23
24
25
private static ThreadLocal<Connection> connectionHolder
= new ThreadLocal<Connection>() {
public Connection initialValue() {
return DriverManager.getConnection(DB_URL);
}
};

public static Connection getConnection() {
return connectionHolder.get();
}

private static final ThreadLocal threadSession = new ThreadLocal();

public static Session getSession() throws InfrastructureException {
Session s = (Session) threadSession.get();
try {
if (s == null) {
s = getSessionFactory().openSession();
threadSession.set(s);
}
} catch (HibernateException ex) {
throw new InfrastructureException(ex);
}
return s;
}

HashMap原理

发表于 2018-11-06 | 分类于 tips

在很多地方都会利用到hash表来提高查找效率。在Java的Object类中有一个方法:

1
2
3
4
5
6
7
8
9
public native int hashCode();
``` 

根据这个方法的声明可知,该方法返回一个int类型的数值,并且是本地方法,因此在Object类中并没有给出具体的实现。
为何Object类需要这样一个方法?它有什么作用呢?

### hashCode方法的作用

对于包含容器类型的程序设计语言来说,基本上都会涉及到hashCode。在Java中也一样,hashCode方法的主要作用是为了配合基于散列的集合一起正常运行,这样的散列集合包括HashSet、HashMap以及HashTable。hashCode 存在的第一重要的原因就是在 HashMap(HashSet 其实就是HashMap) 中使用(其实Object 类的 hashCode 方法注释已经说明了 ),我知道,HashMap 之所以速度快,因为他使用的是散列表,根据 key 的 hashcode 值生成数组下标(通过内存地址直接查找,没有任何判断),时间复杂度完美情况下可以达到 n1(和数组相同,但是比数组用着爽多了,但是需要多出很多内存,相当于以空间换时间)。为什么这么说呢?考虑一种情况,当向集合中插入对象时,如何判别在集合中是否已经存在该对象了?(注意:集合中不允许重复的元素存在)虽然可以通过调用equals方法来逐个进行比较,这个方法确实可行。但是如果集合中已经存在一万条数据或者更多的数据,如果采用equals方法去逐一比较,效率必然是一个问题。此时hashCode方法的作用就体现出来了,当集合要添加新的对象时,先调用这个对象的hashCode方法,得到对应的hashcode值,实际上在HashMap的具体实现中会用一个table保存已经存进去的对象的hashcode值,如果table中没有该hashcode值,它就可以直接存进去,不用再进行任何比较了;如果存在该hashcode值, 就调用它的equals方法与新元素进行比较,相同的话就不存了,不相同就散列其它的地址,所以这里存在一个冲突解决的问题,这样一来实际调用equals方法的次数就大大降低了,说通俗一点:Java中的hashCode方法就是根据一定的规则将与对象相关的信息(比如对象的存储地址,对象的字段等)映射成一个数值,这个数值称作为散列值。下面这段代码是java.util.HashMap的中put方法的具体实现:

public V put(K key, V value) { if (key == null) return putForNullKey(value); int hash = hash(key.hashCode()); int i = indexFor(hash, table.length); for (Entry<K,V> e = table[i]; e != null; e = e.next) { Object k; if (e.hash == hash && ((k = e.key) == key || key.equals(k))) { V oldValue = e.value; e.value = value; e.recordAccess(this); return oldValue; } }

    modCount++;
    addEntry(hash, key, value, i);
    return null;
}
1
2
3
4
5
6
7
put方法是用来向HashMap中添加新的元素,从put方法的具体实现可知,会先调用hashCode方法得到该元素的hashCode值,然后查看table中是否存在该hashCode值,如果存在则调用equals方法重新确定是否存在该元素,如果存在,则更新value值,否则将新的元素添加到HashMap中。从这里可以看出,hashCode方法的存在是为了减少equals方法的调用次数,从而提高程序效率。

> Hash表数据结构参考:
> 1. http://www.cnblogs.com/dolphin0520/archive/2012/09/28/2700000.html
> 2. http://www.cnblogs.com/jiewei915/archive/2010/08/09/1796042.html

hashCode返回的就是对象的存储地址,这种看法是不全面的,确实有些JVM在实现时是直接返回对象的存储地址,但是大多时候并不是这样,只能说可能存储地址有一定关联。下面是HotSpot JVM中生成hash散列值的实现:

static inline intptr_t get_next_hash(Thread * Self, oop obj) { intptr_t value = 0 ; if (hashCode == 0) { // This form uses an unguarded global Park-Miller RNG, // so it’s possible for two threads to race and generate the same RNG. // On MP system we’ll have lots of RW access to a global, so the // mechanism induces lots of coherency traffic. value = os::random() ; } else if (hashCode == 1) { // This variation has the property of being stable (idempotent) // between STW operations. This can be useful in some of the 1-0 // synchronization schemes. intptr_t addrBits = intptr_t(obj) >> 3 ; value = addrBits ^ (addrBits >> 5) ^ GVars.stwRandom ; } else if (hashCode == 2) { value = 1 ; // for sensitivity testing } else if (hashCode == 3) { value = ++GVars.hcSequence ; } else if (hashCode == 4) { value = intptr_t(obj) ; } else { // Marsaglia’s xor-shift scheme with thread-specific state // This is probably the best overall implementation – we’ll // likely make this the default in future releases. unsigned t = Self->_hashStateX ; t ^= (t << 11) ; Self->_hashStateX = Self->_hashStateY ; Self->_hashStateY = Self->_hashStateZ ; Self->_hashStateZ = Self->_hashStateW ; unsigned v = Self->_hashStateW ; v = (v ^ (v >> 19)) ^ (t ^ (t >> 8)) ; Self->_hashStateW = v ; value = v ; }

value &= markOopDesc::hash_mask; if (value == 0) value = 0xBAD ; assert (value != markOopDesc::no_hash, “invariant”) ; TEVENT (hashCode: GENERATE) ; return value; }

1
2
3
4
5
6
7
8
9
10
11
12
该实现位于`hotspot/src/share/vm/runtime/synchronizer.cpp`文件下。

可以直接根据hashcode值判断两个对象是否相等吗?肯定是不可以的,因为不同的对象可能会生成相同的hashcode值。虽然不能根据hashcode值判断两个对象是否相等,但是可以直接根据hashcode值判断两个对象不等,如果两个对象的hashcode值不等,则必定是两个不同的对象。如果要判断两个对象是否真正相等,必须通过equals方法。也就是说对于两个对象:
1. 如果调用equals方法得到的结果为true,则两个对象的hashcode值必定相等;
2. 如果equals方法得到的结果为false,则两个对象的hashcode值不一定不同;
3. 如果两个对象的hashcode值不等,则equals方法得到的结果必定为false;
4. 如果两个对象的hashcode值相等,则equals方法得到的结果未知。

### equals方法和hashCode方法
在有些情况下,程序设计者在设计一个类的时候为需要重写equals方法,比如String类,但是千万要注意,在重写equals方法的同时,必须重写hashCode方法。为什么这么说呢?

例如:

import java.util.HashMap; import java.util.HashSet; import java.util.Set; class People{ private String name; private int age;

public People(String name,int age) {
    this.name = name;
    this.age = age;
}  
public void setAge(int age){
    this.age = age;
}  
@Override
public boolean equals(Object obj) {
    // TODO Auto-generated method stub
    return this.name.equals(((People)obj).name) && this.age== ((People)obj).age;
}

}

public class Main {

public static void main(String[] args) {

    People p1 = new People("Jack", 12);
    System.out.println(p1.hashCode());
    HashMap<People, Integer> hashMap = new HashMap<People, Integer>();
    hashMap.put(p1, 1);

    System.out.println(hashMap.get(new People("Jack", 12)));
}

}

1
2
3
在这里只重写了equals方法,也就说如果两个People对象,如果它的姓名和年龄相等,则认为是同一个人。这段代码本来的意愿是想这段代码输出结果为“1”,但是事实上它输出的是“null”。为什么呢?原因就在于**重写equals方法的同时忘记重写hashCode方法**。

虽然通过重写equals方法使得逻辑上姓名和年龄相同的两个对象被判定为相等的对象(跟String类类似),但是要知道默认情况下,hashCode方法是将对象的存储地址进行映射。那么上述代码的输出结果为“null”就不足为奇了。原因很简单,p1指向的对象和`System.out.println(hashMap.get(new People("Jack", 12)));`这句中的`new People("Jack", 12)`生成的是两个对象,它们的存储地址肯定不同。下面是HashMap的get方法的具体实现:

public V get(Object key) { if (key == null) return getForNullKey(); int hash = hash(key.hashCode()); for (Entry<K,V> e = table[indexFor(hash, table.length)]; e != null; e = e.next) { Object k; if (e.hash == hash && ((k = e.key) == key || key.equals(k))) return e.value; } return null; }

1
所以在hashmap进行get操作时,因为得到的hashcdoe值不同(注意,上述代码也许在某些情况下会得到相同的hashcode值,不过这种概率比较小,因为虽然两个对象的存储地址不同也有可能得到相同的hashcode值),所以导致在get方法中for循环不会执行,直接返回null。因此如果想上述代码输出结果为“1”,很简单,只需要重写hashCode方法,让equals方法和hashCode方法始终在逻辑上保持一致性。

@Override public int hashCode() { return name.hashCode()*37+age; }

1
2
3
4
5
6
7
8
9
10
11
12
13
这样一来的话,输出结果就为“1”了。


下面这段话摘自Effective Java一书:
1. 在程序执行期间,只要equals方法的比较操作用到的信息没有被修改,那么对这同一个对象调用多次,hashCode方法必须始终如一地返回同一个整数。
2. 如果两个对象根据equals方法比较是相等的,那么调用两个对象的hashCode方法必须返回相同的整数结果。
3. 如果两个对象根据equals方法比较是不等的,则hashCode方法不一定得返回不同的整数。

对于第二条和第三条很好理解,但是第一条,很多时候就会忽略。在《Java编程思想》一书中的P495页也有同第一条类似的一段话:

> “设计hashCode()时最重要的因素就是:无论何时,对同一个对象调用hashCode()都应该产生同样的值。如果在讲一个对象用put()添加进HashMap时产生一个hashCdoe值,而用get()取出时却产生了另一个hashCode值,那么就无法获取该对象了。所以如果你的hashCode方法依赖于对象中易变的数据,用户就要当心了,因为此数据发生变化时,hashCode()方法就会生成一个不同的散列码”。

举个例子:

import java.util.HashMap; import java.util.HashSet; import java.util.Set;

class People{ private String name; private int age;

public People(String name,int age) {
    this.name = name;
    this.age = age;
}      
public void setAge(int age){
    this.age = age;
}     
@Override
public int hashCode() {
    // TODO Auto-generated method stub
    return name.hashCode()*37+age;
}    
@Override
public boolean equals(Object obj) {
    // TODO Auto-generated method stub
    return this.name.equals(((People)obj).name) && this.age== ((People)obj).age;
}

}

public class Main {

public static void main(String[] args) {

    People p1 = new People("Jack", 12);
    System.out.println(p1.hashCode());

    HashMap<People, Integer> hashMap = new HashMap<People, Integer>();
    hashMap.put(p1, 1);

    p1.setAge(13);

    System.out.println(hashMap.get(p1));
}

}

1
2
3
4
5
6
7
8
9
10
11
12
13
14
15
16
这段代码输出的结果为“null”,因此,在设计hashCode方法和equals方法的时候,如果对象中的数据易变,则最好在equals方法和hashCode方法中不要依赖于该字段。

### 为什么大部分 hashcode 方法使用 31
如果有使用 eclipse 的同学肯定知道,该工具默认生成的 hashCode 方法实现也和 String 类型差不多。都是使用的 31 ,那么有没有想过:为什么要使用 31 呢?

在名著 《Effective Java》第 42 页就有对 hashCode 为什么采用 31 做了说明:
> 之所以使用 31, 是因为他是一个奇素数。如果乘数是偶数,并且乘法溢出的话,信息就会丢失,因为与2相乘等价于移位运算(低位补0)。使用素数的好处并不很明显,但是习惯上使用素数来计算散列结果。 31 有个很好的性能,即用移位和减法来代替乘法,可以得到更好的性能: 31 * i == (i << 5) - i, 现代的 VM 可以自动完成这种优化。这个公式可以很简单的推导出来。

这个问题在 SO 上也有讨论: https://stackoverflow.com/questions/299304/why-does-javas-hashcode-in-string-use-31-as-a-multiplier)

可以看到,使用 31 最主要的还是为了性能。当然用 63 也可以。但是 63 的溢出风险就更大了。那么15 呢?仔细想想也可以。

在《Effective Java》也说道:编写这种散列函数是个研究课题,最好留给数学家和理论方面的计算机科学家来完成。我们此次最重要的是知道了为什么使用31。

### HashMap 的 hash 算法的实现原理(为什么右移 16 位,为什么要使用 ^ 位异或)
其实,这个也是数学的范畴,从我们的角度来讲,只要知道这是为了更好的均匀散列表的下标就好了,但是,就是耐不住好奇心啊! 能多知道一点就是一点,我们来看看 HashMap 的 hash 算法(JDK 8).
static final int hash(Object key) {
    int h;
    return (key == null) ? 0 : (h = key.hashCode()) ^ (h >>> 16);
}
1
2
3
乍看一下就是简单的异或运算和右移运算,但是为什么要异或呢?为什么要移位呢?而且移位16?

在分析这个问题之前,我们需要先看看另一个事情,什么呢?就是 HashMap 如何根据 hash 值找到数组种的对象,我们看看 get 方法的代码:
final Node<K,V> getNode(int hash, Object key) {
    Node<K,V>[] tab; Node<K,V> first, e; int n; K k;
    if ((tab = table) != null && (n = tab.length) > 0 &&
        // 我们需要关注下面这一行
        (first = tab[(n - 1) & hash]) != null) {
        if (first.hash == hash && // always check first node
            ((k = first.key) == key || (key != null && key.equals(k))))
            return first;
        if ((e = first.next) != null) {
            if (first instanceof TreeNode)
                return ((TreeNode<K,V>)first).getTreeNode(hash, key);
            do {
                if (e.hash == hash &&
                    ((k = e.key) == key || (key != null && key.equals(k))))
                    return e;
            } while ((e = e.next) != null);
        }
    }
    return null;
}
1
2
3
4
5
6
7
8
9
10
11
12
13
14
15
16
我们看看代码中注释下方的一行代码:first = tab[(n - 1) & hash])。

使用数组长度减一 与运算 hash 值。这行代码就是为什么要让前面的 hash 方法移位并异或。

我们分析一下:

首先,假设有一种情况,对象 A 的 hashCode 为 1000010001110001000001111000000,对象 B 的 hashCode 为 0111011100111000101000010100000。

如果数组长度是16,也就是 15 与运算这两个数, 你会发现结果都是0。这样的散列结果太让人失望了。很明显不是一个好的散列算法。

但是如果我们将 hashCode 值右移 16 位,也就是取 int 类型的一半,刚好将该二进制数对半切开。并且使用位异或运算(如果两个数对应的位置相反,则结果为1,反之为0),这样的话,就能避免我们上面的情况的发生。

总的来说,使用位移 16 位和 异或 就是防止这种极端情况。但是,该方法在一些极端情况下还是有问题,比如:10000000000000000000000000 和 1000000000100000000000000 这两个数,如果数组长度是16,那么即使右移16位,在异或,hash 值还是会重复。但是为了性能,对这种极端情况,JDK 的作者选择了性能。毕竟这是少数情况,为了这种情况去增加 hash 时间,性价比不高。

### HashMap 为什么使用 & 与运算代替模运算?
看看刚刚说的那个根据hash计算下标的方法:

tab[(n - 1) & hash];

1
2
3
其中 n 是数组的长度。其实该算法的结果和模运算的结果是相同的。但是,对于现代的处理器来说,除法和求余数(模运算)是最慢的动作。

上面情况下和模运算相同呢?

a % b == (b-1) & a ,当b是2的指数时,等式成立。

1
2
3
4
5
6
7
8
9
10
11
12
13
14
15
16
17
18
19
20
21
22
23
24
25
26
27
28
29
30
31
32
33
34
35
36
37
38
39

我们说 & 与运算的定义:与运算 第一个操作数的的第n位于第二个操作数的第n位如果都是1,那么结果的第n为也为1,否则为0;

当 n 为 16 时, 与运算 101010100101001001101 时,也就是
1111 & 101010100101001001000 结果:1000 = 8
1111 & 101000101101001001001 结果:1001 = 9
1111 & 101010101101101001010 结果: 1010 = 10
1111 & 101100100111001101100 结果: 1100 = 12

可以看到,当 n 为 2 的幂次方的时候,减一之后就会得到 1111* 的数字,这个数字正好可以掩码。并且得到的结果取决于 hash 值。因为 hash 值是1,那么最终的结果也是1 ,hash 值是0,最终的结果也是0。

### HashMap 的容量为什么建议是 2的幂次方?
到这里,我们提了一个关键的问题: HashMap 的容量为什么建议是 2的幂次方?正好可以和上面的话题接上。楼主就是这么设计的。

为什么要 2 的幂次方呢?

我们说,hash 算法的目的是为了让hash值均匀的分布在桶中(数组),那么,如何做到呢?试想一下,如果不使用 2 的幂次方作为数组的长度会怎么样?

假设我们的数组长度是10,还是上面的公式:
1010 & 101010100101001001000 结果:1000 = 8
1010 & 101000101101001001001 结果:1000 = 8
1010 & 101010101101101001010 结果: 1010 = 10
1010 & 101100100111001101100 结果: 1000 = 8

看到结果我们惊呆了,这种散列结果,会导致这些不同的key值全部进入到相同的插槽中,形成链表,性能急剧下降。

所以说,我们一定要保证 & 中的二进制位全为 1,才能最大限度的利用 hash 值,并更好的散列,只有全是1 ,才能有更多的散列结果。如果是 1010,有的散列结果是永远都不会出现的,比如 0111,0101,1111,1110…,只要 & 之前的数有 0, 对应的 1 肯定就不会出现(因为只有都是1才会为1)。大大限制了散列的范围。

### 自定义 HashMap 容量最好是多少?
那我们如何自定义呢?自从有了阿里的规约插件,每次楼主都要初始化容量,如果我们预计我们的散列表中有2个数据,那么我就初始化容量为2嘛?

绝对不行,如果大家看过源码就会发现,如果Map中已有数据的容量达到了初始容量的 75%,那么散列表就会扩容,而扩容将会重新将所有的数据重新散列,性能损失严重,所以,我们可以必须要大于我们预计数据量的 1.34 倍,如果是2个数据的话,就需要初始化 2.68 个容量。当然这是开玩笑的,2.68 不可以,3 可不可以呢?肯定也是不可以的,我前面说了,如果不是2的幂次方,散列结果将会大大下降。导致出现大量链表。那么我可以将初始化容量设置为4。 当然了,如果你预计大概会插入 12 条数据的话,那么初始容量为16简直是完美,一点不浪费,而且也不会扩容。

总结
好了,分析完了 hashCode 和 hash 算法,让我们对 HashMap 又有了全新的认识。当然,HashMap 中还有很多有趣的东西值得挖掘,楼主会继续写下去。争取将 HashMap 的衣服扒光。

总的来说,通过今天的分析,对我们今后使用 HashMap 有了更多的把握,也能够排查一些问题,比如链表数很多,肯定是数组初始化长度不对,如果某个map很大,注意,肯定是事先没有定义好初始化长度,假设,某个Map存储了10000个数据,那么他会扩容到 20000,实际上,根本不用 20000,只需要 10000* 1.34= 13400 个,然后向上找到一个2 的幂次方,也就是 16384 初始容量足够。

### Python版本Hash计算

import sys

if len(sys.argv) <= 1: print(“python vv_hash.py property_name”) exit(0)

propertyName = sys.argv[1] if len(propertyName) == 0: print(“empty element name”) exit(0)

hashCode = 0 for i in range(0, len(propertyName)): hashCode = (31 * hashCode + ord(propertyName[i])) & 0xFFFFFFFF if hashCode > 0x7FFFFFFF: hashCode = hashCode - 0x100000000 print(“hash code: %d” % (hashCode)) ```

tips-android-event-dispatch

发表于 2018-11-06
1…678…19
轻口味

轻口味

190 日志
27 分类
63 标签
RSS
GitHub 微博 豆瓣 知乎
友情链接
  • SRS
© 2015 - 2019 轻口味
京ICP备17018543号
本站访客数 人次 本站总访问量 次