OpenGL ES的javax.microedition.khronos.openges包定义了平台无关的GL绘制指令,EGL(javax.microedition.khronos.egl)则定义了控制dispays,contexts以及surfaces的统一的平台接口.
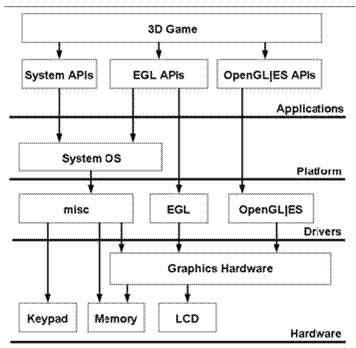 EGL 是 OpenGL ES 渲染 API 和本地窗口系统(native platform window system)之间的一个中间接口层,它主要由系统制造商实现。EGL提供如下机制:
- 与设备的原生窗口系统通信
- 查询绘图表面的可用类型和配置
- 创建绘图表面
- 在OpenGL ES 和其他图形渲染API之间同步渲染
- 管理纹理贴图等渲染资源
为了让OpenGL ES能够绘制在当前设备上,我们需要EGL作为OpenGL ES与设备的桥梁。
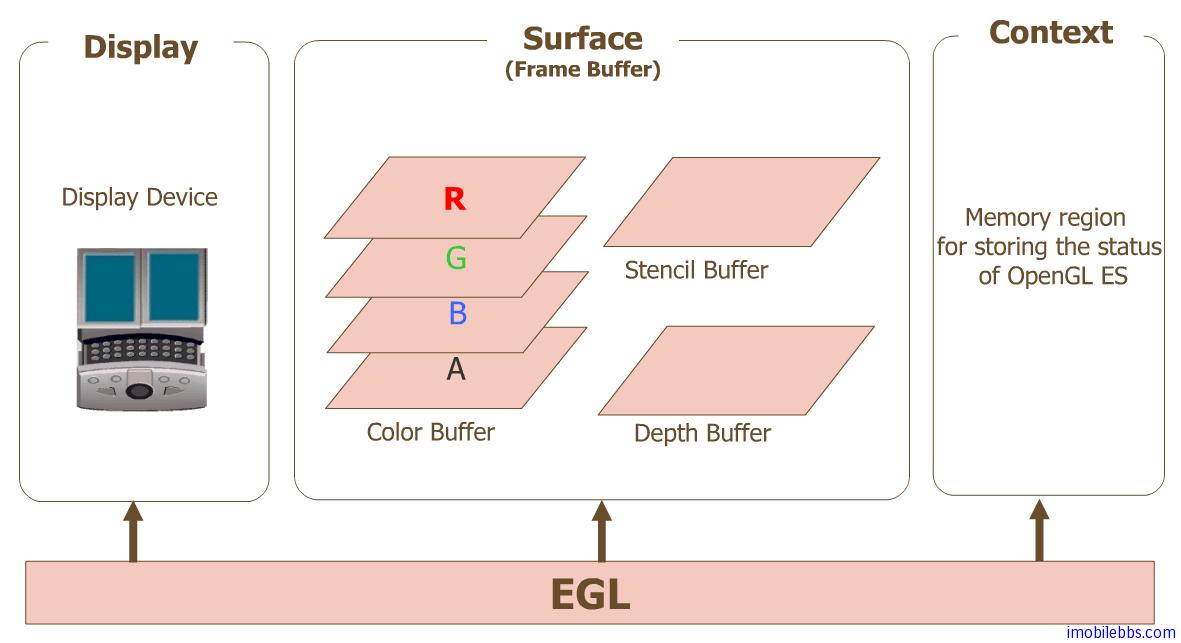
- Display(EGLDisplay)是对实际显示设备的抽象
- Surface(EGLSurface)是对用来存储图像的内存区域FrameBuffer的抽象,包括Color Buffer, Stencil Buffer, Depth Buffer.
- Context(EGLContext)存储OpenGLES绘图的一些状态信息
使用EGL绘制的一般步骤:
- 获取EGLDisplay对象
- 初始化与EGLDisplay之间的连接
- 获取EGLConfig实例
- 创建EGLContext实例
- 创建EGLSurface实例
- 连接EGLContext和EGLSurface
- 使用GL指令绘制图形
- 断开并释放与EGLSurface关联的EGLContext对象
- 删除EGLSurface对象
- 删除EGLContext对象
- 终止与EGLDisplay之间的连接
源码: 本地代码:
frameworks/native/opengl/libs/EGL:Android EGL框架,负责加载OpenGL函数库和EGL本地实现。frameworks/native/opengl/libagl:Android提供的OpenGL软件库
JNI代码:
frameworks/base/core/jni/com_google_android_gles_jni_EGLImpl.cpp:EGL本地代码的JNI调用接口frameworks/base/core/jni/com_google_android_gles_jni_GLImpl.cppframeworks/base/core/jni/android_opengl_GLESXXX.cpp:OpenGL功能函数的JNI调用接口
JAVA代码:
frameworks/base/opengl/java/javax/microedition/khronos/eglframeworks/base/opengl/java/javax/microedition/khronos/openglesframeworks/base/opengl/java/com/google/android/gles_jni/frameworks/base/opengl/java/android/opengl:EGL和OpenGL的Java层接口,提供给应用开发者,通过JNI方式调用底层函数。
OpenGL ES/EGL Wrapper 库
前面我们已经介绍过 OpenGL ES/EGL Wrapper 库是一个将 OpenGL ES API 和 OpenGL ES API 具体实现绑定在一起的库,它对应的源码路径是:/frameworks/native/opengl/libs/,其中:
libGLESv1_CM.so:OpenGL ES 1.x API 的 Wrapper 库 libGLESv2.so:OpenGL ES 2.0 的 Wrapper 库 libGLESv3.so:OpenGL ES 3.0 的 Wrapper 库 其中因为 OpenGL ES 3.0 API 是兼容 OpenGL ES 2.0 API 的,所以 libGLESv2.so 库本质上和 libGLESv3.so 库是一样的。
OpenGL ES/EGL 实现库
如果Android系统平台支持 OpenGL ES 硬件加速渲染,那么 OpenGL ES/EGL 实现库由系统厂商以.so的共享链接库的形式提供,例如,Nexus 9 平板中的厂商提供的 OpenGL ES/EGL 实现库为:
1 | flounder:/vendor/lib64/egl # ls |
如果Android系统平台不支持 OpenGL ES 硬件加速渲染,那么它就会默认启用软件模拟渲染,这时 OpenGL ES/EGL 实现库就是由 AOSP 提供,链接库的存在的路径为: /system/lib64/egl/libGLES_android.so。而 libGLES_android.so 库在 Android 7.1 系统对应的实现源码路径为:/frameworks/native/opengl/libagl/ 。
Android 7.1 中加载 OpenGL ES 库的过程
Android 中图形渲染所采用的方式(硬件 or 软件)是在系统启动之后动态确定的,而确定渲染方式的这个源码文件就是 /frameworks/native/opengl/libs/EGL/Loader.cpp 。
####### Android 7.1 OpenGL ES 库和 EGL 库加载说明 How Android finds OpenGL libraries, and the death of egl.cfg 这篇文章中提到了非常关键的一点,就是从 Android Kitkat 4.4 之后,Android 中加载 OpenGL ES/EGL 库的方法发生了变化了(但是整个加载过程都是由 /frameworks/native/opengl/libs/EGL/Loader.cpp 程序所决定的,也就是说 Loader.cpp 文件发生了变化)。
在 Android 4.4 之前,加载 OpenGL ES 库是由 /system/lib/egl/egl.cfg 文件所决定的,通过读取这个配置文件来确定是加载 OpenGL ES 软件模拟实现的库,还是OpenGL ES 硬件加速实现的库。
但是,在Android 4.4 之后,Android 不再通过读取 egl.cfg 配置文件的方式来加载 OpenGL ES 库,新的加载 OpenGL ES 库的规则,如下所示:
从 /system/lib/egl 或者 /vendor/lib/egl/ 目录下加载 libGLES.so 库文件或者 libEGL_vendor.so,libGLESv1_CM_vendor.so,libGLESv2_vendor.so 库文件。 为了向下兼容旧的库的命名方式,同样也会加载 /system/lib/egl 或者 /vendor/lib/egl/ 目录下的 libGLES_.so 或者 libEGL_.so,libGLESv1CM.so,libGLESv2_.so 库文件。 3.2 硬件加速渲染 or 软件模拟渲染? 前面我们提到 OpenGL ES 库的实现方式有两种,一种是硬件加速实现,一种是软件模拟实现,那么系统是怎么确定加载那一种 OpenGL ES 库的呢?
Android 7.1 源码中负责加载 OpenGL ES/EGL 库部分的代码位于:/frameworks/native/opengl/libs/EGL/Loader.cpp 文件中,这个文件中代码的主要入口函数是 Loader::open() 函数,而决定加载硬件加速渲染库还是软件模拟渲染库主要涉及到下面两个函数:
setEmulatorGlesValue() checkGlesEmulationStatus() 下面就来简要的分析一下 Android 系统是如何选择加载硬件加速渲染库还是软件模拟渲染库:
首先,Loader::open() 入口函数会调用 setEmulatorGlesValue() 从 property 属性系统中获取一些属性值来判断当前 Android 系统是否在 Emulator 环境中运行,并根据读取出来的信息来重新设置新的属性键值对,setEmulatorGlesValue() 函数的代码如下所示:
1
2
3
4
5
6
7
8
9
10
11
12
13
14
15
16
17
18
19
20
21
22
23
24
25
26
27
28
29
30
31
32static void setEmulatorGlesValue(void) {
char prop[PROPERTY_VALUE_MAX];
property_get("ro.kernel.qemu", prop, "0"); //读取 ro.kernel.qemu 属性值,判断Android系统是否运行在 qemu 中
if (atoi(prop) != 1) return;
property_get("ro.kernel.qemu.gles", prop, "0"); //读取 ro.kernel.qemu.gles 属性值,判断 qemu 中 OpenGL ES 库的实现方式
if (atoi(prop) == 1) {
ALOGD("Emulator has host GPU support, qemu.gles is set to 1.");
property_set("qemu.gles", "1");
return;
}
// for now, checking the following
// directory is good enough for emulator system images
const char* vendor_lib_path =
#if defined(__LP64__)
"/vendor/lib64/egl";
#else
"/vendor/lib/egl";
#endif
const bool has_vendor_lib = (access(vendor_lib_path, R_OK) == 0);
//如果存在 vendor_lib_path 这个路径,那么就说明厂商提供了 OpenGL ES库自己的软件模拟渲染库,而不是 Android 系统自己编译得到的软件模拟渲染库
if (has_vendor_lib) {
ALOGD("Emulator has vendor provided software renderer, qemu.gles is set to 2.");
property_set("qemu.gles", "2");
} else {
ALOGD("Emulator without GPU support detected. "
"Fallback to legacy software renderer, qemu.gles is set to 0.");
property_set("qemu.gles", "0"); //最后,默认采取的是方案就是调用传统的Android系统自己编译得到软件模拟渲染库
}
}在 load_system_driver() 函数中,内部类 MatchFile 类中会调用 checkGlesEmulationStatus() 函数来检查 Android 系统是否运行在模拟器中,以及在模拟器中是否启用了主机硬件加速的功能,然后根据 checkGlesEmulationStatus() 函数的返回状态值来确定要加载共享链接库的文件绝对路径。load_system_driver() 和 checkGlesEmulationStatus() 函数代码如下所示:
1
2
3
4
5
6
7
8
9
10
11
12
13
14
15
16
17
18
19
20
21
22
23
24
25
26
27
28
29
30
31
32
33
34
35
36
37
38
39
40
41
42
43
44
45
46static void* load_system_driver(const char* kind) {
ATRACE_CALL();
class MatchFile {
public:
//这个函数作用是返回需要加载打开的 OpenGL ES 和 EGL API 实现库文件的绝对路径
static String8 find(const char* kind) {
String8 result;
int emulationStatus = checkGlesEmulationStatus(); //检查 Android 系统是否运行在模拟器中,以及在模拟器中是否启用了主机硬件加速的功能
switch (emulationStatus) {
case 0: //Android 运行在模拟器中,使用系统软件模拟实现的 OpenGL ES API 库 libGLES_android.so
#if defined(__LP64__)
result.setTo("/system/lib64/egl/libGLES_android.so");
#else
result.setTo("/system/lib/egl/libGLES_android.so");
#endif
return result;
case 1: // Android 运行在模拟器中,通过主机系统中实现 OpenGL ES 加速渲染,通过 libGLES_emulation.so 库将 OpenGL ES API 指令重定向到 host 中执行
// Use host-side OpenGL through the "emulation" library
#if defined(__LP64__)
result.appendFormat("/system/lib64/egl/lib%s_emulation.so", kind);
#else
result.appendFormat("/system/lib/egl/lib%s_emulation.so", kind);
#endif
return result;
default:
// Not in emulator, or use other guest-side implementation
break;
}
// 如果不是上面两种情况,就根据库的命名规则去找到厂商实现库文件的绝对路径
String8 pattern;
pattern.appendFormat("lib%s", kind);
const char* const searchPaths[] = {
#if defined(__LP64__)
"/vendor/lib64/egl",
"/system/lib64/egl"
#else
"/vendor/lib/egl",
"/system/lib/egl"
#endif
};
......
}
}
1 | static int |
- 总结一下上面代码的功能就是,首先判断 Android 是否在 qemu 虚拟机中运行,如果不是,那么就直接去加载厂商存放库的路径中去加载 OpenGL ES 实现库(不管是硬件加速实现的,还是软件模拟实现的);如果是在 qemu 中运行,那么就要根据返回的 emulationStatus 值 来确定是加软件模拟实现的 OpenGL ES API 库 libGLES_android.so,还是加载 libGLES_emulation.so库将 OpenGL ES 指令重定向到 Host 系统中去执行。
OpenGL ES/EGL 库加载和解析过程
正如Android 系统图形栈: OpenGL ES 和 EGL 介绍这篇文章中分析的那样,在进行 OpenGL 编程时,最先开始需要获取 Display,这将调用 eglgGetDisplay() 函数被调用。在 eglGetDisplay() 里则会调用 egl_init_drivers() 初始化驱动:装载各个库进行解析,将 OpenGL ES/EGL API 函数接口和具体的实现绑定在一起,并将结果保存在 egl_connection_t 类型的全局变量 gEGLImpl 的结构体的成员变量中。
下面以 SurfaceFlinger 进程为例进行分析,整个 OpenGL ES/EGL 库的加载和解析流程如下所示:
1 | st=>start: Start |
gEGLImpl 全局变量 struct egl_connection_t 类型的 gEGLImpl 全局变量是一个非常重要变量,它里面的成员指向了打开的 OpenGL ES/EGL Wrapper 库和 OpenGL ES/EGL 实现库: /frameworks/native/opengl/libs/EGL/egl.cpp
1 | egl_connection_t gEGLImpl; |
其中 egl_connection_t 的定义: /frameworks/native/opengl/libs/EGL/egldefs.h
1 | struct egl_connection_t { |
下面就对其中的主要成员进行一个说明:
- hooks:这是一个 gl_hook_t* 类型的指针数组,它最终将 OpenGL ES API 和实现库钩在一起。
- egl:这是一个 egl_t 类型的成员变量,它最终将 EGL API 和 EGL 实现库了钩在一起。 那么 gl_hook_t 和 egl_t 是什么呢?
gl_hook_t 和 egl_t 的定义如下所示: /frameworks/native/opengl/libs/hooks.h
1 | #define GL_ENTRY(_r, _api, ...) _r (*_api)(__VA_ARGS__); |
从上面的定义中我们发现,egl_t 和 gl_hooks_t 这两个结构体中主要就是一个 include 语句,那么它们包含的是什么呢?
#include “EGL/egl_entries.in 包含的文件路径如下所示: /frameworks/native/opengl/libs/EGL/egl_entries.in
1 | EGL_ENTRY(EGLDisplay, eglGetDisplay, NativeDisplayType) |
在这个文件中,我们可以看到所有的内容都是 EGL_ENTRY 宏定义的,根据 EGL_ENTRY 宏定义: /frameworks/native/opengl/libs/EGL/hooks.h
1 | //下面的两个宏定义分别是 OpenGL 和 EGL API 函数的函数指针变量 |
我们可以将下面的这个宏定义展开成如下的形式:
1 | EGL_ENTRY(EGLDisplay, eglGetDisplay, NativeDisplayType) |
#include “entries.in” 包含的文件路径为: /frameworks/native/opengl/libs/entries.in
1 | ... |
和上面的 EGL_ENTRY 一样,GL_ENTRY 都是通过宏定义的形式来将 OpenGL ES 的 API 函数接口进行声明,例如,上面的宏定义声明可以展开成下面的形式:
1 | GL_ENTRY(void, glReadPixels, GLint x, GLint y, GLsizei width, GLsizei height, GLenum format, GLenum type, void * pixels) |
最后,通过 entries.in 和 egl_entries.in 这两个文件,我们就可以得到 OpenGL ES 和 EGL 中的所有 API 函数接口的说明。
SurfaceFlinger 初始化成员变量 mEGLDisplay 在 SurfaceFlinger 类中有一个 EGLDisplay 类型的成员变量 mEGLDisplay,它是 EGL 中用来构建 OpenGL ES 渲染环境所需的参数。
SurfaceFlinger 中调用 eglGetDisplay() 初始化 mEGLDisplay 的代码如下: /frameworks/native/services/surfaceflinger/SurfaceFlinger.cpp
1 | void SurfaceFlinger::init() { |
紧接着在 eglGetDisplay() 中调用 egl_init_drivers() /frameworks/native/opengl/libs/EGL/eglApi.cpp
1 | EGLDisplay eglGetDisplay(EGLNativeDisplayType display) |
最后,egl_init_drivers() 函数中使用了 pthread_mutex_lock 上锁保护,继续调用 egl_init_drivers_locked() 函数 /frameworks/native/opengl/libs/EGL/egl.cpp
1 | EGLBoolean egl_init_drivers() { |
下面就是对 egl_init_drivers_locked() 函数进行一个分析:
egl_init_drivers_locked() 函数代码如下所示: /frameworks/native/opengl/libs/EGL/egl.cpp
1 | //在该文件起始位置定义的全局变量 |
在这个函数中,有一个非常关键的 egl_connection_t 指针指向一个全局变量 gEGLImpl,当第一次初始化加载 OpenGL ES 实现库和 EGL 实现库时,还需要将 gEGLImpl 中的 hooks 数组中的两个指针指向一个全局的 gl_hooks_t 数组 gHooks(这就是两个指针钩子,最终初始化完成后将分别勾住 OpenGL ES 1.0 和 OpenGL ES 2.0 的实现库),接着调用 Loader 类的实例的 open() 函数完成从 OpenGL ES 实现库中完成符号解析工作。
通过 Loader 类加载和解析 OpenGL ES 库和 EGL 库 Loader::open() 函数的代码如下所示: /frameworks/native/opengl/libs/EGL/Loader.cpp
1 | // >= Loader 类对象构造完成后,就在 /EGL/egl.cpp 文件中的 egl_init_drivers_locked() 中被调用 |
open() 函数主要负责 OpenGL ES 库加载前的准备工作,具体的加载细节,则是通过调用 load_driver() 去完成的。
Loader::load_driver() 函数代码如下所示: /frameworks/native/opengl/libs/EGL/Loader.cpp
1 | void *Loader::load_driver(const char* kind, |
Loader::load_driver() 它主要实现了两个功能:
通过 load_system_driver() 函数查找 OpenGL ES/EGL 实现库,并在指定的存放路径中找到共享链接库文件并打开它。 调用 init_api()解析打开的 OpenGL ES/EGL 共享链接库,将 OpenGL ES/EGL API 函数指针和共享链接库中实现的对应的函数符号绑定在一起,这样调用 OpenGL ES/EGL API 就会调用到具体实现的OpenGL ES/EGL 共享链接库中对应函数。 具体 load_system_driver() 函数和 init_api() 函数的实现就不一一展开了,大家可以到 /frameworks/native/opengl/libs/EGL/Loader.cpp 文件中查看,应该写得非常直接清楚了。
整个加载和解析的目的就是将 OpenGL ES/EGL API 和具体实现函数绑定在一起,这样当程序调用 OpenGL ES/EGL API 时,就会调用到实际的实现函数了。然后,在硬件平台上的 Android 系统加载的是硬件厂商提供的 OpenGL ES/EGL 实现库,而在 qemu 模拟器中运行的 Android 系统中加载的则是软件模拟实现的 OpenGL ES/EGL 库或者是将 OpenGL ES 重定向到主机系统中进行硬件加速的库。
Android 系统图形栈(二):OpenGL ES 库和 EGL 库加载过程 How Android finds OpenGL libraries, and the death of egl.cfg
eglSwapBuffers接口实现说明
一般性嵌入式平台
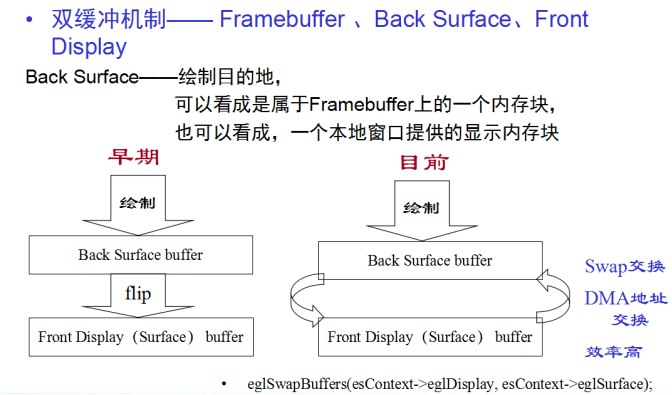
利用双缓冲进行Swap的时候,Display和Surface进行实际意义上的地址交换,来实现eglSwapBuffers的标准, 如上图的右侧所示。上图的左侧表示,单缓冲Framebuffer的形式,Surface永远都在后端, 显示的永远是Display,在GPU出现后已不使用。
Android平台: 为了实现eglSwapBuffers, eglSurface其实代表了一个从NativeWindow 申请到的一个Buffer(Dequeue操作)。当调用eglSwapBuffers时,对于一般应用窗口而言,NativeWindow将该Surface的Buffer 提交回去给SurfaceFlinger(Queue操作),然后又重新从NativeWindow中重新Dequeue出来一个新的Buffer给eglSurface。而eglDisplay并不代表实际的意义。我们只是从接口上感觉是,surface和display进行了交换。