老司机种菜


  • 首页

  • 分类

  • 关于

  • 归档

  • 标签

  • 公益404

  • 搜索

jni介绍

发表于 2017-06-07

NDK技巧

  1. 加快ndk-build编译速度 NDK编译时加上-j参数,如:
    1
    ndk-build -j4 # -j4,让make最多允许4个编译命令同时执行

测试后编译速度至少可以提高一倍

native崩溃分析

定位crash错误位置

首先我们要先把Logcat里的show only selected application选项改成No Filters, 这时就能看到系统打印出的DEBUG信息. 在DEBUG信息里找到backtrace, 这段就是系统给出的造成崩溃的信息, 但仅仅给出了是哪个函数, 而没有准确给出是那一行代码造成的崩溃. 记下#00 pc 00013122(红框3)这个信息, 这个信息就是用来定位崩溃代码的地址

1
2
3
4
5
6
7
8
9
10
11
12
13
14
15
16
17
18
19
20
21
22
23
12-27 10:45:41.580 6189-6761/com.wodekouwei.demo E/HwDecodeWrapper: dequeueOutputBuffer = -1
12-27 10:45:41.580 6189-6761/com.wodekouwei.demo E/mediacodec: [oar_mediacodec_receive_frame():266]outbufidx:-1
12-27 10:45:41.590 6189-6761/com.wodekouwei.demo E/HwDecodeWrapper: dequeueOutputBuffer = -1
12-27 10:45:41.590 6189-6761/com.wodekouwei.demo E/mediacodec: [oar_mediacodec_receive_frame():266]outbufidx:-1
12-27 10:45:41.595 4901-4901/? I/DEBUG: *** *** *** *** *** *** *** *** *** *** *** *** *** *** *** ***
12-27 10:45:41.595 4901-4901/? I/DEBUG: Build fingerprint: 'Huawei/H60-L03/hwH60:5.1.1/HDH60-L03/C01B535:user/release-keys'
12-27 10:45:41.595 4901-4901/? I/DEBUG: Revision: '0'
12-27 10:45:41.595 4901-4901/? I/DEBUG: ABI: 'arm'
12-27 10:45:41.595 4901-4901/? I/DEBUG: pid: 6189, tid: 6762, name: Thread-4510 >>> com.wodekouwei.demo <<<
12-27 10:45:41.595 4901-4901/? I/DEBUG: signal 11 (SIGSEGV), code 2 (SEGV_ACCERR), fault addr 0x428d738d
12-27 10:45:41.610 4901-4901/? I/DEBUG: r0 428d737d r1 b86eae00 r2 00000001 r3 00000000
12-27 10:45:41.610 4901-4901/? I/DEBUG: r4 b8836580 r5 b88365c0 r6 b8836580 r7 9e4e0d48
12-27 10:45:41.610 4901-4901/? I/DEBUG: r8 b8836588 r9 b8836588 sl b6da8871 fp 9e4e0dd0
12-27 10:45:41.610 4901-4901/? I/DEBUG: ip a1ca2c90 sp 9e4e0cc0 lr a1c358c7 pc a1c35b4c cpsr 200f0030
12-27 10:45:41.610 4901-4901/? I/DEBUG: backtrace:
12-27 10:45:41.610 4901-4901/? I/DEBUG: #00 pc 000ccb4c /data/app/com.wodekouwei.demo-1/lib/arm/liboarp-lib.so
12-27 10:45:41.610 4901-4901/? I/DEBUG: #01 pc 000cc8c3 /data/app/com.wodekouwei.demo-1/lib/arm/liboarp-lib.so (oar_player_gl_thread+214)
12-27 10:45:41.610 4901-4901/? I/DEBUG: #02 pc 0001688f /system/lib/libc.so (__pthread_start(void*)+30)
12-27 10:45:41.610 4901-4901/? I/DEBUG: #03 pc 000148a3 /system/lib/libc.so (__start_thread+6)
12-27 10:45:42.005 3655-3655/? E/Thermal-daemon: [ap] temp_new :34 temp_old :33
12-27 10:45:42.385 5083-5397/? E/WifiStateMachine: ConnectedState !CMD_RSSI_POLL 16 0 "wonxing-H3C" 3c:8c:40:e1:dd:b1 rssi=-50 f=2437 sc=100 link=72 tx=5.5, 0.0, 0.0 rx=1.0 bcn=0 [on:0 tx:0 rx:0 period:3001] from screen [on:0 period:-1780713098] gl hn u24 rssi=-45 ag=0 hr ticks 0,1,56 ls-=0 [56,56,60,60,65] brc=0 lrc=0
12-27 10:45:42.385 5083-5397/? E/WifiStateMachine: L2ConnectedState !CMD_RSSI_POLL 16 0 "wonxing-H3C" 3c:8c:40:e1:dd:b1 rssi=-50 f=2437 sc=100 link=72 tx=5.5, 0.0, 0.0 rx=1.0 bcn=0 [on:0 tx:0 rx:0 period:1] from screen [on:0 period:-1780713097] gl hn u24 rssi=-45 ag=0 hr ticks 0,1,56 ls-=0 [56,56,60,60,65] brc=0 lrc=0
12-27 10:45:42.390 5083-5397/? E/WifiStateMachine: fetchRssiLinkSpeedAndFrequencyNative rssi=-49 linkspeed=26 SSID="wonxing-H3C"

想要准确定位崩溃代码的地址的话我们就需要用到ndk工具包里的adrr2line这个工具了 首先先找到这个工具, linux系统这个工具在如下位置

1
/home/gavinandre/Documents/Android/android-sdk-linux/ndk-bundle/toolchains/arm-linux-androideabi-4.9/prebuilt/linux-x86_64/bin/arm-linux-androideabi-addr2line

在该目录下做个软链接后就能在任何目录使用这个命令了

1
sudo ln -s arm-linux-androideabi-addr2line /usr/local/bin/addr2line

找到造成崩溃的so文件地址, 在app目录下搜索so文件

1
2
3
4
5
6
7
find . -name "liboarp-lib.so"                                                                                           ✘
./app/build/intermediates/transforms/mergeJniLibs/debug/0/lib/armeabi-v7a/liboarp-lib.so
./app/build/intermediates/transforms/stripDebugSymbol/debug/0/lib/armeabi-v7a/liboarp-lib.so
./srsrtmpplayer/build/intermediates/cmake/debug/obj/armeabi-v7a/liboarp-lib.so
./srsrtmpplayer/build/intermediates/transforms/mergeJniLibs/debug/0/lib/armeabi-v7a/liboarp-lib.so
./srsrtmpplayer/build/intermediates/transforms/stripDebugSymbol/debug/0/lib/armeabi-v7a/liboarp-lib.so
./srsrtmpplayer/build/intermediates/intermediate-jars/debug/jni/armeabi-v7a/liboarp-lib.so

可以看到android studio编译后生成了许多so文件, 以我的经验正确的so文件一般是这个文件:./srsrtmpplayer/build/intermediates/transforms/mergeJniLibs/debug/0/lib/armeabi-v7a/liboarp-lib.so 然后就可以使用addrline命令了, 格式是addr2line -e 文件位置 崩溃地址:

1
addr2line -e ./srsrtmpplayer/build/intermediates/transforms/mergeJniLibs/debug/0/lib/armeabi-v7a/liboarp-lib.so 000ccb4c

如果so文件正确的话会打印如下信息,oar_player_gl_thread.c就是崩溃的cpp文件, 152, 然后检查下定位出来的位置是否在DEBUG信息里给出的函数里

1
oar_player_gl_thread.c:152

如果so文件错误的话会打印问号或者一个不对的位置, 这时就要换so文件多尝试了

C回调JAVA

  1. c中返回一个字符串

    1
    (*env)->NewStringUTF(env,"Huazi 华仔");
  2. c中返回一个数组

    1
    2
    3
    4
    5
    6
    7
    8
    9
    10
    .....................  
    int i = 0;
    jintArray array;
    array =(*env)->NewIntArray(env,8);
    for(;i<8;i++)

    // 赋值成 0 ~ 7
    (*env)->SetObjectArrayElement(env,array,i,i);
    }
    return array;
  3. c中使用调用传入的参数是数组array 是传入的数组

    1
    2
    3
    4
    5
    6
    7
    8
    9
    .........  
    int sum =0, i;
    int len = (*env)->GetArrayLength(env,array);
    jint *element =(*env)->GetIntArrayElement(env,array,0);
    for(i=0;i<len;i++)
    {
    sum+= *(element+i);
    }
    return sum;
  4. c中调用java中类的方法 没有参数 只有返回值String

    1
    2
    3
    4
    5
    6
    7
    //()Ljava/lang/String;" 表示参数为空 返回值是String类型  
    JNIEXPORT jstring JNICALLJava_com_huazi_Demo_getCallBack(JNIENV env,jobject object){
    jmethodID mid;
    jclass cls =(*env)->FindClass(env,"com/huazi/Demo"); //后面是包名+类名
    mid =(*env)->GetMethodID(env,cls,"TestMethod","()Ljava/lang/String;");//TestMethod java中的方法名
    jstring msg =(*env)->CallObjectMethod(env,object,mid); //object 注意下是jni传过来的jobject
    return msg;
  5. c中调用java中类的静态方法 没有参数 只有返回值String

    1
    2
    3
    4
    5
    6
    7
    8
    //@"()Ljava/lang/String;" 表示参数为空 返回值是String类型
    JNIEXPORT jstring JNICALLJava_com_huazi_Demo_getCallBack(JNIENV env,jobject object){
    jmethodID mid;
    jclass cls =(*env)->FindClass(env,"com/huazi/Demo"); //后面是包名+类名
    mid =(*env)->GeStatictMethodID(env,cls,"TestMethod","()Ljava/lang/String;");// TestMethod java中的方法名
    jstring msg =(*env)->CallStaticObjectMethod(env,cls,mid); //object 注意下是jni传过来的jobject
    return msg;
    }

FFMPEG编译之Mac

发表于 2017-06-07 | 分类于 FFMPEG

Mac下FFMPEG使用

There are a few ways to get FFmpeg on OS X.

  1. One is to build it yourself. Compiling on Mac OS X is as easy as any other *nix machine, there are just a few caveats(警告). The general procedure is get the source, then ./configure ; make && sudo make install, though specific configure flags are possible.
  2. Another is to use some “build helper” tool, to install it for you. For example, homebrew or macports, see the homebrew section in this document.
  3. Alternatively, if you are unable to compile, or do not want to install homebrew, you can simply download a static build for OS X, but it may not contain the features you want. Typically this involves unzipping an FFmpeg distribution file [like .zip file], then running it from within the newly extracted files/directories.

手动编译FFMPEG

1.下载FFMPEG源码

使用git clone https://github.com/FFmpeg/FFmpeg从github下载ffmpeg源码,切换到要使用的目标分支(这里使用release/3.3):git checkout -b r3.3 origin/release/3.3,或者直接从github下载分支release/3.3的压缩包,解压.

2.准备Xcode

Starting with Lion 10.7, Xcode is available for free from the Mac App Store and is required to compile anything on your Mac. Make sure you install the Command Line Tools from Preferences > Downloads > Components. Older versions are still available with an AppleID and free Developer account at ​developer.apple.com.

3.准备HomeBrew工具

To get ffmpeg for OS X, you first have to install ​Homebrew. If you don’t want to use Homebrew, see the section below.

1
ruby -e "$(curl -fsSL https://raw.githubusercontent.com/Homebrew/install/master/install)"

Then:

1
2
brew install automake fdk-aac git lame libass libtool libvorbis libvpx \
opus sdl shtool texi2html theora wget x264 x265 xvid yasm

Mac OS X Lion comes with Freetype already installed (older versions may need ‘X11’ selected during installation), but in an atypical location: /usr/X11. Running freetype-config in Terminal can give the locations of the individual folders, like headers, and libraries, so be prepared to add lines like CFLAGS=freetype-config --cflags LDFLAGS=freetype-config --libs PKG_CONFIG_PATH=$PKG_CONFIG_PATH:/usr/local/lib/pkgconfig:/usr/lib/pkgconfig:/usr/X11/lib/pkgconfig before ./configure or add them to your $HOME/.profile file.

4.编译

Once you have compiled all of the codecs/libraries you want, you can now download the FFmpeg source either with Git or the from release tarball links on the website. Study the output of ./configure –help and make sure you’ve enabled all the features you want, remembering that –enable-nonfree and –enable-gpl will be necessary for some of the dependencies above. A sample command is:

1
2
3
4
5
6
git clone http://source.ffmpeg.org/git/ffmpeg.git ffmpeg
cd ffmpeg
./configure --prefix=/usr/local/ffmpeg --enable-gpl --enable-nonfree --enable-libass \
--enable-libfdk-aac --enable-libfreetype --enable-libmp3lame \
--enable-libtheora --enable-libvorbis --enable-libvpx --enable-libx264 --enable-libx265 --enable-libopus --enable-libxvid
make && sudo make install

--prefix指定编译完成后安装路径,这里指定到/usr/local/ffmpeg,安装完成会在/usr/local/ffmpeg下生成:bin,include,lib,share四个目录

安装环境介绍

A package consists of several related files which are installed in several directories. The configure step usually allows the user to specify the so-called install prefix, and is usually specified through the configure option configure –prefix=PREFIX, where PREFIX usually is by default /usr/local. The prefix specifies the common directory where all the components are installed.

The following directories are usually involved in the installation:

  • PREFIX/bin: contains the generated binaries (e.g. ffmpeg, ffplay, ffprobe etc. in the case of FFmpeg)
  • PREFIX/include: contains the library headers (e.g. libavutil/avstring.h, libavcodec/avcodec.h, libavformat/avformat.h etc. in case of FFmpeg) required to compile applications linked against the package libraries
  • PREFIX/lib: contains the generated libraries (e.g. libavutil, libavcodec, libavformat etc. in the case of FFmpeg)
  • PREFIX/share: contains various system-independent components; especially documentation files and examples By specifying the prefix it is possible to define the installation layout.

By using a shared prefix like /usr/local/, different packages will be installed in the same directory, so in general it will be more difficult to revert the installation.

Using a prefix like /opt/PROJECT/, the project will be installed in a dedicated directory, and to remove from the system you can simply remove the /opt/PREFIX path. On the other hand, such installation will require to edit all the environment variables to point to the custom path.

Environment variables

Several variables defined in the environment affect your package install. In particular, depending on your installation prefix, you may need to update some of these variables in order to make sure that the installed components can be found by the system tools.

The list of environment variables can be shown through the command env.

A list of the affected variables follows:

  • PATH: defines the list of :-separated paths where the system looks for binaries. For example if you install your package in /usr/local/, you should update the PATH so that it will contain /usr/local/bin. This can be done for example through the command export PATH=/usr/local/bin:$PATH.
  • LD_LIBRARY_PATH: contains the :-separated paths where the system looks for libraries. For example if you install your package in /usr/local/, you should update the LD_LIBRARY_PATH so that it will contain /usr/local/lib. This can be done for example through the command export LD_LIBRARY_PATH=/usr/local/lib:$LD_LIBRARY_PATH. This variable is sometimes deprecated in favor of the use of ldconfig.
  • CFLAGS: contains flags used by the C compiler, and usually includes preprocessing directives like -IPREFIX/include or compilation flags. Custom CFLAGS are usually prefixed to the source package compiler flags by the source package build system. Alternatively many build systems allow to specify the configure option -extra-cflags.
  • LDFLAGS: these are directives used by the linker, and usually include linking directives like -LPREFIX/lib needed to find libraries installed in custom paths. Custom LDFLAGS are usually prefixed to the source package linker flags by the source package build system. Alternatively, many build systems allow to specify the configure option -extra-ldflags.
  • PKG_CONFIG_PATH: contains the :-separated paths used by pkg-config to detect the pkg-config files used by many build systems to detect the custom CFLAGS/LDFLAGS used by a specific library. In case you installed a package in a non standard path, you need to update these environment libraries so that system tools will be able to detect the package components. This is especially required when running a configure script for a package relying on other installed libraries/headers/tools.

Environment variables are usually defined in the profile file, for example .profile defined in the user directory for sh/bash users, and in /etc/profile. This file can be edited to permanently set the custom environment. Alternatively, the variables can be set in a script or in a particular shell session.

Remember to export the variables to the child process, e.g. using the export command. Read the fine documentation of your shell for more detailed information.

MAC下的动态链接库

扩展名

Windows下.DLL,Linux下.so,Mac OS X下的扩展名是.dylib。 .dylib是Mach-O格式,也就是Mac OS X下的二进制文件格式。Mac OS X提供了一系列 工具,用于创建和访问动态链接库。

  • 编译器/usr/bin/cc,也就是gcc了,Apple改过的。这个主要还是一个壳,去调用其他 的一些部件。当然同时还有/usr/bin/c++,等等。
  • 汇编器/usr/bin/as
  • 链接器/usr/bin/ld

MAC下创建动态链接库步骤:

  1. 首先是生成module文件,也就是.o文件。这跟一般的unix没什么区别。例如cc -c a.c b.c,就得到a.o和b.o
  2. 可以用ld来合并.o文件,比如ld -r -o c.o a.o b.o
  3. 然后可以用libtool来创建动态链接库:libtool -dynamic -o c.dylib a.o b.o.( 这里也可以用libtool -static -o c.a a.o b.o就创建静态库)

如果用gcc直接编译,我记得linux下一般是可以: gcc -shared -o c.so a.c b.c 而在Mac OS X下需要: gcc -dynamiclib -o c.dylib a.c b.c

动态链接库的工具

nm是最常用的,这个用法跟linux下差不多:nm c.dylib,可以看到导出符号表,等等。 另一个常用的工具是otool,这个是Mac OS X独有的。比如想看看c.dylib的依赖关系otool -L c.dylib

官网方法

  • CompilationGuide-Generic
  • CompilationGuide-MacOSX

编译ffmpeg3.3结果没有ffplay

因为系统没有sdl环境或sdl版本不匹配,ffmpeg3.3需要sdl2

http://www.libsdl.org/download-2.0.php 下载Source Code SDL2-2.0.5.zip - GPG signed,解压缩,执行命令:

1
2
3
./configure  
make
sudo make install

进行编译

OpenGL Frame Buffer Object(FBO)

发表于 2017-06-03 | 分类于 OpenGL

Update: Framebuffer object extension is promoted as a core feature of OpenGL version 3.0, and is approved by ARB combining the following extensions;

  • EXT_framebuffer_object
  • EXT_framebuffer_blit
  • EXT_framebuffer_multisample
  • EXT_packed_depth_stencil

Overview

In OpenGL rendering pipeline, the geometry data and textures are transformed and passed several tests, and then finally rendered onto a screen as 2D pixels. The final rendering destination of the OpenGL pipeline is called framebuffer. Framebuffer is a collection of 2D arrays or storages utilized by OpenGL; colour buffers, depth buffer, stencil buffer and accumulation buffer. By default, OpenGL uses the framebuffer as a rendering destination that is created and managed entirely by the window system. This default framebuffer is called window-system-provided framebuffer. 在OpenGL渲染管线中,几何数据和纹理经过多次转化和多次测试,最后以二维像素的形式显示在屏幕上。OpenGL管线的最终渲染目的地被称作帧缓存(framebuffer)。帧缓冲是一些二维数组和OpenG所使用的存储区的集合:颜色缓存、深度缓存、模板缓存和累计缓存。一般情况下,帧缓存完全由window系统生成和管理,由OpenGL使用。这个默认的帧缓存被称作“window系统生成”(window-system-provided)的帧缓存。

The OpenGL extension, GL_ARB_framebuffer_object provides an interface to create additional non-displayable framebuffer objects (FBO). This framebuffer is called application-created framebuffer in order to distinguish from the default window-system-provided framebuffer. By using framebuffer object (FBO), an OpenGL application can redirect the rendering output to the application-created framebuffer object (FBO) other than the traditional window-system-provided framebuffer. And, it is fully controlled by OpenGL. 在OpenGL扩展中,GL_EXT_framebuffer_object提供了一种创建额外的不能显示的帧缓存对象的接口。为了和默认的“window系统生成”的帧缓存区别,这种帧缓冲成为应用程序帧缓存(application-createdframebuffer)。通过使用帧缓存对象(FBO),OpenGL可以将显示输出到引用程序帧缓存对象,而不是传统的“window系统生成”帧缓存。而且,它完全受OpenGL控制。

Similar to window-system-provided framebuffer, a FBO contains a collection of rendering destinations; color, depth and stencil buffer. (Note that accumulation buffer is not defined in FBO.) These logical buffers in a FBO are called framebuffer-attachable images, which are 2D arrays of pixels that can be attached to a framebuffer object. 相似于window系统提供的帧缓存,一个FBO也包含一些存储颜色、深度和模板数据的区域。(注意:没有累积缓存)我们把FBO中这些逻辑缓存称之为“帧缓存关联图像”,它们是一些能够和一个帧缓存对象关联起来的二维数组像素。

There are two types of framebuffer-attachable images; texture images and renderbuffer images. If an image of a texture object is attached to a framebuffer, OpenGL performs “render to texture”. And if an image of a renderbuffer object is attached to a framebuffer, then OpenGL performs “offscreen rendering”. 有两种类型的“帧缓存关联图像”:纹理图像(texture images)和渲染缓存图像(renderbuffer images)。如果纹理对象的图像数据关联到帧缓存,OpenGL执行的是“渲染到纹理”(render to texture)操作。如果渲染缓存的图像数据关联到帧缓存,OpenGL执行的是离线渲染(offscreen rendering)。

By the way, renderbuffer object is a new type of storage object defined in GL_ARB_framebuffer_object extension. It is used as a rendering destination for a single 2D image during rendering process. 这里要提到的是,渲染缓存对象是在GL_EXT_framebuffer_object扩展中定义的一种新的存储类型。在渲染过程中它被用作存储单幅二维图像。

The following diagram shows the connectivity among the framebuffer object, texture object and renderbuffer object. Multiple texture objects or renderbuffer objects can be attached to a framebuffer object through the attachment points. 下面这幅图显示了帧缓存对象、纹理对象和渲染缓存对象之间的联系。多多个纹理对象或者渲染缓存对象能够通过关联点关联到一个帧缓存对象上。

image There are multiple color attachment points (GL_COLOR_ATTACHMENT0,…, GL_COLOR_ATTACHMENTn), one depth attachment point (GL_DEPTH_ATTACHMENT), and one stencil attachment point (GL_STENCIL_ATTACHMENT) in a framebuffer object. The number of color attachment points is implementation dependent, but each FBO must have at least one color attachement point. You can query the maximum number of color attachement points with GL_MAX_COLOR_ATTACHMENTS, which are supported by a graphics card. The reason that a FBO has multiple color attachement points is to allow to render the color buffer to multiple destinations at the same time. This “multiple render targets” (MRT) can be accomplished by GL_ARB_draw_buffers extension. Notice that the framebuffer object itself does not have any image storage(array) in it, but, it has only multiple attachment points. 在一个帧缓存对象中有多个颜色关联点(GL_COLOR_ATTACHMENT0_EXT,…,GL_COLOR_ATTACHMENTn_EXT),一个深度关联点(GL_DEPTH_ATTACHMENT_EXT),和一个模板关联点(GL_STENCIL_ATTACHMENT_EXT)。每个FBO中至少有一个颜色关联点,其数目与实体显卡相关。可以通过GL_MAX_COLOR_ATTACHMENTS_EXT来查询颜色关联点的最大数目。FBO有多个颜色关联点的原因是这样可以同时将颜色而换成渲染到多个FBO关联区。这种“多渲染目标”(multiple rendertargets,MRT)可以通过GL_ARB_draw_buffers扩展实现。需要注意的是:FBO本身并没有任何图像存储区,只有多个关联点。

Framebuffer object (FBO) provides an efficient switching mechanism; detach the previous framebuffer-attachable image from a FBO, and attach a new framebuffer-attachable image to the FBO. Switching framebuffer-attachable images is much faster than switching between FBOs. FBO provides glFramebufferTexture2D() to switch 2D texture objects, and glFramebufferRenderbuffer() to switch renderbuffer objects. FBO提供了一种高效的切换机制;将前面的帧缓存关联图像从FBO分离,然后把新的帧缓存关联图像关联到FBO。在帧缓存关联图像之间切换比在FBO之间切换要快得多。FBO提供了glFramebufferTexture2DEXT()来切换2D纹理对象和glFramebufferRenderbufferEXT()来切换渲染缓存对象。


Creating Frame Buffer Object (FBO)

Creating framebuffer objects is similar to generating vertex buffer objects (VBO). 创建FBO和产生VBO类似。

1
2
void glGenFramebuffers(GLsizei n, GLuint* ids)
void glDeleteFramebuffers(GLsizei n, const GLuint* ids)

glGenFramebuffers() requires 2 parameters; the first one is the number of framebuffers to create, and the second parameter is the pointer to a GLuint variable or an array to store a single ID or multiple IDs. It returns the IDs of unused framebuffer objects. ID 0 means the default framebuffer, which is the window-system-provided framebuffer. glGenFramebuffersEXT()需要两个参数:第一个是要创建的帧缓存的数目,第二个是指向存储一个或者多个ID的变量或数组的指针。它返回未使用的FBO的ID。ID为0表示默认帧缓存,即window系统提供的帧缓存。

And, FBO may be deleted by calling glDeleteFramebuffers() when it is not used anymore. 当FBO不再被使用时,FBO可以通过调用glDeleteFrameBuffersEXT()来删除。

1
glBindFramebuffer()

Once a FBO is created, it has to be bound before using it. 一旦一个FBO被创建,在使用它之前必须绑定。

1
void glBindFramebuffer(GLenum target, GLuint id)

The first parameter, target, should be GL_FRAMEBUFFER, and the second parameter is the ID of a framebuffer object. Once a FBO is bound, all OpenGL operations affect onto the current bound framebuffer object. The object ID 0 is reserved for the default window-system provided framebuffer. Therefore, in order to unbind the current framebuffer (FBO), use ID 0 in glBindFramebuffer(). 第一个参数target应该是GL_FRAMEBUFFER_EXT,第二个参数是FBO的ID号。一旦FBO被绑定,之后的所有的OpenGL操作都会对当前所绑定的FBO造成影响。ID号为0表示缺省帧缓存,即默认的window提供的帧缓存。因此,在glBindFramebufferEXT()中将ID号设置为0可以解绑定当前FBO。


Renderbuffer Object

In addition, renderbuffer object is newly introduced for offscreen rendering. It allows to render a scene directly to a renderbuffer object, instead of rendering to a texture object. Renderbuffer is simply a data storage object containing a single image of a renderable internal format. It is used to store OpenGL logical buffers that do not have corresponding texture format, such as stencil or depth buffer.

另外,渲染缓存是为离线渲染而新引进的。它允许将一个场景直接渲染到一个渲染缓存对象中,而不是渲染到纹理对象中。渲染缓存对象是用于存储单幅图像的数据存储区域。该图像按照一种可渲染的内部格式存储。它用于存储没有相关纹理格式的OpenGL逻辑缓存,比如模板缓存或者深度缓存。

glGenRenderbuffers()

1
2
void glGenRenderbuffers(GLsizei n, GLuint* ids)
void glDeleteRenderbuffers(GLsizei n, const Gluint* ids)

Once a renderbuffer is created, it returns non-zero positive integer. ID 0 is reserved for OpenGL. 一旦一个渲染缓存被创建,它返回一个非零的正整数。ID为0是OpenGL保留值。

glBindRenderbuffer()

1
void glBindRenderbuffer(GLenum target, GLuint id)

Same as other OpenGL objects, you have to bind the current renderbuffer object before referencing it. The target parameter should be GL_RENDERBUFFER for renderbuffer object. 和OpenGL中其他对象一样,在引用渲染缓存之前必须绑定当前渲染缓存对象。他target参数应该是GL_RENDERBUFFER_EXT。

glRenderbufferStorage()

1
2
3
4
void glRenderbufferStorage(GLenum  target,
GLenum internalFormat,
GLsizei width,
GLsizei height)

When a renderbuffer object is created, it does not have any data storage, so we have to allocate a memory space for it. This can be done by using glRenderbufferStorage(). The first parameter must be GL_RENDERBUFFER. The second parameter would be color-renderable (GL_RGB, GL_RGBA, etc.), depth-renderable (GL_DEPTH_COMPONENT), or stencil-renderable formats (GL_STENCIL_INDEX). The width and height are the dimension of the renderbuffer image in pixels. 当一个渲染缓存被创建,它没有任何数据存储区域,所以我们还要为他分配空间。这可以通过用glRenderbufferStorageEXT()实现。第一个参数必须是GL_RENDERBUFFER_EXT。第二个参数可以是用于颜色的(GL_RGB,GL_RGBA,etc.),用于深度的(GL_DEPTH_COMPONENT),或者是用于模板的格式(GL_STENCIL_INDEX)。Width和height是渲染缓存图像的像素维度。 The width and height should be less than GL_MAX_RENDERBUFFER_SIZE, otherwise, it generates GL_INVALID_VALUE error. width和height必须比GL_MAX_RENDERBUFFER_SIZE_EXT小,否则将会产生GL_UNVALID_VALUE错误。

glGetRenderbufferParameteriv()

1
2
3
void glGetRenderbufferParameteriv(GLenum target,
GLenum param,
GLint* value)

You also get various parameters of the currently bound renderbuffer object. target should be GL_RENDERBUFFER, and the second parameter is the name of parameter. The last is the pointer to an integer variable to store the returned value. The available names of the renderbuffer parameters are; 我们也可以得到当前绑定的渲染缓存对象的一些参数。Target应该是GL_RENDERBUFFER_EXT,第二个参数是所要得到的参数名字。最后一个是指向存储返回值的整型量的指针。渲染缓存的变量名有如下:

1
2
3
4
5
6
7
8
9
10

GL_RENDERBUFFER_WIDTH
GL_RENDERBUFFER_HEIGHT
GL_RENDERBUFFER_INTERNAL_FORMAT
GL_RENDERBUFFER_RED_SIZE
GL_RENDERBUFFER_GREEN_SIZE
GL_RENDERBUFFER_BLUE_SIZE
GL_RENDERBUFFER_ALPHA_SIZE
GL_RENDERBUFFER_DEPTH_SIZE
GL_RENDERBUFFER_STENCIL_SIZE

Attaching images to FBO

FBO itself does not have any image storage(buffer) in it. Instead, we must attach framebuffer-attachable images (texture or renderbuffer objects) to the FBO. This mechanism allows that FBO quickly switch (detach and attach) the framebuffer-attachable images in a FBO. It is much faster to switch framebuffer-attachable images than to switch between FBOs. And, it saves unnecessary data copies and memory consumption. For example, a texture can be attached to multiple FBOs, and its image storage can be shared by multiple FBOs. FBO本身没有图像存储区。我们必须帧缓存关联图像(纹理或渲染对象)关联到FBO。这种机制允许FBO快速地切换(分离和关联)帧缓存关联图像。切换帧缓存关联图像比在FBO之间切换要快得多。而且,它节省了不必要的数据拷贝和内存消耗。比如,一个纹理可以被关联到多个FBO上,图像存储区可以被多个FBO共享。

Attaching a 2D texture image to FBO

1
2
3
4
5
glFramebufferTexture2D(GLenum target,
GLenum attachmentPoint,
GLenum textureTarget,
GLuint textureId,
GLint level)

glFramebufferTexture2D() is to attach a 2D texture image to a FBO. The first parameter must be GL_FRAMEBUFFER, and the second parameter is the attachment point where to connect the texture image. A FBO has multiple color attachment points (GL_COLOR_ATTACHMENT0, …, GL_COLOR_ATTACHMENTn), GL_DEPTH_ATTACHMENT, and GL_STENCIL_ATTACHMENT. The third parameter, “textureTarget” is GL_TEXTURE_2D in most cases. The fourth parameter is the identifier of the texture object. The last parameter is the mipmap level of the texture to be attached. glFramebufferTexture2DEXT()把一幅纹理图像关联到一个FBO。第一个参数一定是GL_FRAMEBUFFER_EXT,第二个参数是关联纹理图像的关联点。第三个参数textureTarget在多数情况下是GL_TEXTURE_2D。第四个参数是纹理对象的ID号。最后一个参数是要被关联的纹理的mipmap等级 If the textureId parameter is set to 0, then, the texture image will be detached from the FBO. If a texture object is deleted while it is still attached to a FBO, then, the texture image will be automatically detached from the currently bound FBO. However, if it is attached to multiple FBOs and deleted, then it will be detached from only the bound FBO, but will not be detached from any other un-bound FBOs. 如果参数textureId被设置为0,那么纹理图像将会被从FBO分离。如果纹理对象在依然关联在FBO上时被删除,那么纹理对象将会自动从当前帮的FBO上分离。然而,如果它被关联到多个FBO上然后被删除,那么它将只被从绑定的FBO上分离,而不会被从其他非绑定的FBO上分离。

Attaching a Renderbuffer image to FBO

1
2
3
4
void glFramebufferRenderbuffer(GLenum target,
GLenum attachmentPoint,
GLenum renderbufferTarget,
GLuint renderbufferId)

A renderbuffer image can be attached by calling glFramebufferRenderbuffer(). The first and second parameters are same as glFramebufferTexture2D(). The third parameter must be GL_RENDERBUFFER, and the last parameter is the ID of the renderbuffer object. 通过调用glFramebufferRenderbufferEXT()可以关联渲染缓存图像。前两个参数和glFramebufferTexture2DEXT()一样。第三个参数只能是GL_RENDERBUFFER_EXT,最后一个参数是渲染缓存对象的ID号。 If renderbufferId parameter is set to 0, the renderbuffer image will be detached from the attachment point in the FBO. If a renderbuffer object is deleted while it is still attached in a FBO, then it will be automatically detached from the bound FBO. However, it will not be detached from any other non-bound FBOs. 如果参数renderbufferId被设置为0,渲染缓存图像将会从FBO的关联点分离。如果渲染缓存图像在依然关联在FBO上时被删除,那么纹理对象将会自动从当前绑定的FBO上分离,而不会从其他非绑定的FBO上分离。


FBO with MSAA (Multi Sample Anti Aliasing)

When you render to a FBO, anti-aliasing is not automatically enabled even if you properly create a OpenGL rendering context with the multisampling attribute (SAMPLEBUFFERS_ARB) for window-system-provided framebuffer.

In order to activate multisample anti-aliasing mode for rendering to a FBO, you need to prepare and attach multisample images to a FBO’s color and/or depth attachement points.

FBO extension provides glRenderbufferStorageMultisample() to create a renderbuffer image for multisample anti-aliasing rendering mode.

1
2
3
4
5
void glRenderbufferStorageMultisample(GLenum  target,
GLsizei samples,
GLenum internalFormat,
GLsizei width,
GLsizei height)

It adds new parameter, samples on top of glRenderbufferStorage(), which is the number of multisamples for anti-aliased rendering mode. If it is 0, then no MSAA mode is enabled and glRenderbufferStorage() is called instead. You can query the maximum number of samples with GL_MAX_SAMPLES token in glGetIntegerv().

The following code is to create a FBO with multisample colorbuffer and depthbuffer images. Note that if multiple images are attached to a FBO, then all images must have the same number of multisamples. Otherwise, the FBO status is incomplete.

1
2
3
4
5
6
7
8
9
10
11
12
13
14
15
16
17
18
19
20
21
22
23
24
25
26
27
28
29
30
31
32
33
34
// create a 4x MSAA renderbuffer object for colorbuffer
int msaa = 4;
GLuint rboColorId;
glGenRenderbuffers(1, &rboColorId);
glBindRenderbuffer(GL_RENDERBUFFER, rboColorId);
glRenderbufferStorageMultisample(GL_RENDERBUFFER, msaa, GL_RGB8, width, height);

// create a 4x MSAA renderbuffer object for depthbuffer
GLuint rboDepthId;
glGenRenderbuffers(1, &rboDepthId);
glBindRenderbuffer(GL_RENDERBUFFER, rboDepthId);
glRenderbufferStorageMultisample(GL_RENDERBUFFER, msaa, GL_DEPTH_COMPONENT, width, height);

// create a 4x MSAA framebuffer object
GLuint fboId;
glGenFramebuffers(1, &fboMsaaId);
glBindFramebuffer(GL_FRAMEBUFFER, fboMsaaId);

// attach colorbuffer image to FBO
glFramebufferRenderbuffer(GL_FRAMEBUFFER, // 1. fbo target: GL_FRAMEBUFFER
GL_COLOR_ATTACHMENT0, // 2. color attachment point
GL_RENDERBUFFER, // 3. rbo target: GL_RENDERBUFFER
rboColorId); // 4. rbo ID

// attach depthbuffer image to FBO
glFramebufferRenderbuffer(GL_FRAMEBUFFER, // 1. fbo target: GL_FRAMEBUFFER
GL_DEPTH_ATTACHMENT, // 2. depth attachment point
GL_RENDERBUFFER, // 3. rbo target: GL_RENDERBUFFER
rboDepthId); // 4. rbo ID

// check FBO status
GLenum status = glCheckFramebufferStatus(GL_FRAMEBUFFER);
if(status != GL_FRAMEBUFFER_COMPLETE)
fboUsed = false;

It is important to know that glRenderbufferStorageMultisample() only enables MSAA rendering to FBO. However, you cannot directly use the result from MSAA FBO. If you need to transfer the result to a texture or other non-multisampled framebuffer, you have to convert (downsample) the result to single-sample image using glBlitFramebuffer().

1
2
3
4
void glBlitFramebuffer(GLint srcX0, GLint srcY0, GLint srcX1, GLint srcY1, // source rectangle
GLint dstX0, GLint dstY0, GLint dstX1, GLint dstY1, // destination rect
GLbitfield mask,
GLenum filter)

glBlitFramebuffer() copies a rectangle of images from the source (GL_READ_BUFFER) to the destination framebuffer (GL_DRAW_BUFFER). The “mask” parameter is to specify which buffers are copied, GL_COLOR_BUFFER_BIT, GL_DEPTH_BUFFER_BIT and/or GL_STENCIL_BUFFER_BIT. The last parameter, “filter” is to specify the interpolation mode if the source and destination rectangles are not same. It is either GL_NEAREST or GL_LINEAR.

The following code is to transfer a multisampled image from a FBO to another non-multisampled FBO. Notice it requires an additional FBO to get the result of MSAA rendering. Please see fboMsaa.zip for details to perform render-to-texture with MSAA.

1
2
3
4
5
6
7
8
9
10
// copy rendered image from MSAA (multi-sample) to normal (single-sample)
// NOTE: The multi samples at a pixel in read buffer will be converted
// to a single sample at the target pixel in draw buffer.
glBindFramebuffer(GL_READ_FRAMEBUFFER, fboMsaaId); // src FBO (multi-sample)
glBindFramebuffer(GL_DRAW_FRAMEBUFFER, fboId); // dst FBO (single-sample)

glBlitFramebuffer(0, 0, width, height, // src rect
0, 0, width, height, // dst rect
GL_COLOR_BUFFER_BIT, // buffer mask
GL_LINEAR); // scale filter

Checking FBO Status

Once attachable images (textures and renderbuffers) are attached to a FBO and before performing FBO operation, you must validate if the FBO status is complete or incomplete by using glCheckFramebufferStatus(). If the FBO is not complete, then any drawing and reading command (glBegin(), glCopyTexImage2D(), etc) will be failed.

一旦关联图像(纹理和渲染缓存)被关联到FBO上,在执行FBO的操作之前,你必须检查FBO的状态,这可以通过调用glCheckFramebufferStatusEXT()实现。如果这个FBObuilding完整,那么任何绘制和读取命令(glBegin(),glCopyTexImage2D(), etc)都会失败。

1
GLenum glCheckFramebufferStatus(GLenum target)

glCheckFramebufferStatus() validates all its attached images and framebuffer parameters on the currently bound FBO. And, this function cannot be called within glBegin()/glEnd() pair. The target parameter should be GL_FRAMEBUFFER. It returns non-zero value after checking the FBO. If all requirements and rules are satisfied, then it returns GL_FRAMEBUFFER_COMPLETE. Otherwise, it returns a relevant error value, which tells what rule is violated. glCheckFramebufferStatusEXT()检查当前帧缓存的关联图像和帧缓存参数。这个函数不能在glBegin()/glEnd()之间调用。Target参数必须为GL_FRAMEBUFFER_EXT。它返回一个非零值。如果所有要求和准则都满足,它返回GL_FRAMEBUFFER_COMPLETE_EXT。否则,返回一个相关错误代码告诉我们哪条准则没有满足。

The rules of FBO completeness are:

  • The width and height of framebuffer-attachable image must be not zero.
  • If an image is attached to a color attachment point, then the image must have a color-renderable internal format. (GL_RGBA, GL_DEPTH_COMPONENT, GL_LUMINANCE, etc)
  • If an image is attached to GL_DEPTH_ATTACHMENT, then the image must have a depth-renderable internal format. (GL_DEPTH_COMPONENT, GL_DEPTH_COMPONENT24, etc)
  • If an image is attached to GL_STENCIL_ATTACHMENT, then the image must have a stencil-renderable internal format. (GL_STENCIL_INDEX, GL_STENCIL_INDEX8, etc)
  • FBO must have at least one image attached.
  • All images attached a FBO must have the same width and height.
  • All images attached the color attachment points must have the same internal format.

FBO完整性准则有:

  1. 帧缓存关联图像的宽度和高度必须非零。
  2. 如果一幅图像被关联到一个颜色关联点,那么这幅图像必须有颜色可渲染的内部格式(GL_RGBA, GL_DEPTH_COMPONENT, GL_LUMINANCE, etc)。
  3. 如果一幅被图像关联到GL_DEPTH_ATTACHMENT_EXT,那么这幅图像必须有深度可渲染的内部格式(GL_DEPTH_COMPONENT,GL_DEPTH_COMPONENT24_EXT, etc)。
  4. 如果一幅被图像关联到GL_STENCIL_ATTACHMENT_EXT,那么这幅图像必须有模板可渲染的内部格式(GL_STENCIL_INDEX,GL_STENCIL_INDEX8_EXT, etc)。
  5. FBO至少有一幅图像关联。
  6. 被关联到FBO的缩影图像必须有相同的宽度和高度。
  7. 被关联到颜色关联点上的所有图像必须有相同的内部格式。

Note that even though all of the above conditions are satisfied, your OpenGL driver may not support some combinations of internal formats and parameters. If a particular implementation is not supported by OpenGL driver, then glCheckFramebufferStatus() returns GL_FRAMEBUFFER_UNSUPPORTED. 注意:即使以上所有条件都满足,你的OpenGL驱动也可能不支持某些格式和参数的组合。如果一种特别的实现不被OpenGL驱动支持,那么glCheckFramebufferStatusEXT()返回GL_FRAMEBUFFER_UNSUPPORTED_EXT。

The sample code provides some utility functions to report the information of the current FBO; printFramebufferInfo() and checkFramebufferStatus().

Java Code Examples for javax.media.opengl.GL.GL_FRAMEBUFFER_COMPLETE_EXT


GL_EXT_discard_framebuffer

Overview

This extension provides a new command, DiscardFramebufferEXT, which causes the contents of the named framebuffer attachable images to become undefined. The contents of the specified buffers are undefined until a subsequent operation modifies the content, and only the modified region is guaranteed to hold valid content. Effective usage of this command may provide an implementation with new optimization opportunities. Some OpenGL ES implementations cache framebuffer images in a small pool of fast memory. Before rendering, these implementations must load the existing contents of one or more of the logical buffers (color, depth, stencil, etc.) into this memory. After rendering, some or all of these buffers are likewise stored back to external memory so their contents can be used again in the future. In many applications, some or all of the logical buffers are cleared at the start of rendering. If so, the effort to load or store those buffers is wasted.

Even without this extension, if a frame of rendering begins with a full-screen Clear, an OpenGL ES implementation may optimize away the loading of framebuffer contents prior to rendering the frame. With this extension, an application can use DiscardFramebufferEXT to signal that framebuffer contents will no longer be needed. In this case an OpenGL ES implementation may also optimize away the storing back of framebuffer contents after rendering the frame.

Issues

1) Should DiscardFramebufferEXT’s argument be a list of COLOR_ATTACHMENTx enums, or should it use the same bitfield from Clear and BlitFramebuffer?

RESOLVED: We’ll use a sized list of framebuffer attachments. This will give us some future-proofing for when MRTs and multisampled FBOs are supported.

2) What happens if the app discards only one of the depth and stencil attachments, but those are backed by the same packed_depth_stencil buffer? a) Generate an error b) Both images become undefined c) Neither image becomes undefined d) Only one of the images becomes undefined RESOLVED: (b) which sort of falls out of Issue 4.

3) How should DiscardFramebufferEXT interact with the default framebuffer? a) Generate an error b) Ignore the hint silently c) The contents of the specified attachments become undefined RESOLVED: (c), with appropriate wording to map FBO attachments to the corresponding default framebuffer’s logical buffers

4) What happens when you discard an attachment that doesn’t exist? This is the case where a framebuffer is complete but doesn’t have, for example, a stencil attachment, yet the app tries to discard the stencil attachment. a) Generate an error b) Ignore the hint silently

RESOLVED: (b) for two reasons. First, this is just a hint anyway, and if we required error detection, then suddenly an implementation can’t trivially ignore it. Second, this is consistent with Clear, which ignores specified buffers that aren’t present.


Example: Render To Texture

Sometimes, you need to generate dynamic textures on the fly. The most common examples are generating mirroring/reflection effects, dynamic cube/environment maps and shadow maps. Dynamic texturing can be accomplished by rendering the scene to a texture. A traditional way of render-to-texture is to draw a scene to the framebuffer as normal, and then copy the framebuffer image to a texture by using glCopyTexSubImage2D(). 有时候,你需要产生动态纹理。比较常见的例子是产生镜面反射效果、动态环境贴图和阴影等效果。动态纹理可以通过把场景渲染到纹理来实现。渲染到纹理的一种传统方式是将场景绘制到普通的帧缓存上,然后调用glCopyTexSubImage2D()拷贝帧缓存图像至纹理。

Using FBO, we can render a scene directly onto a texture, so we don’t have to use the window-system-provided framebuffer at all. Further more, we can eliminate an additional data copy (from framebuffer to texture). 使用FBO,我们能够将场景直接渲染到纹理,所以我们不必使用window系统提供的帧缓存。并且,我们能够去除额外的数据拷贝(从帧缓存到纹理);。

This demo program performs render to texture operation with/without FBO, and compares the performance difference. Other than performance gain, there is another advantage of using FBO. If the texture resolution is larger than the size of the rendering window in traditional render-to-texture mode (without FBO), then the area out of the window region will be clipped. However, FBO does not suffer from this clipping problem. You can create a framebuffer-renderable image larger than the display window. 这个demo实现了使用FBO和不使用FBO两种情况下渲染到纹理的操作,并且比较了性能差异。除了能够获得性能上的提升,使用FBO的还有另外一个优点。在传统的渲染到纹理的模式中(不使用FBO),如果纹理分辨率比渲染窗口的尺寸大,超出窗口区域的部分将被剪切掉。然后,使用FBO就不会有这个问题。你可以产生比显示窗口大的帧缓存渲染图像。

The following codes is to setup a FBO and framebuffer-attachable images before the rendering loop is started. Note that not only a texture image is attached to the FBO, but also, a renderbuffer image is attached to the depth attachment point of the FBO. We do not actually use this depth buffer, however, the FBO itself needs it for depth test. If we don’t attach this depth renderable image to the FBO, then the rendering output will be corrupted because of missing depth test. If stencil test is also required during FBO rendering, then additional renderbuffer image should be attached to GL_STENCIL_ATTACHMENT. 以下代码在渲染循环开始之前,对FBO和帧缓存关联图像进行了初始化。注意只有一幅纹理图像被关联到FBO,但是,一个深度渲染图像被关联到FBO的深度关联点。实际上我们并没有使用这个深度缓存,但是FBO本身需要它进行深度测试。如果我们不把这个深度可渲染的图像关联到FBO,那么由于缺少深度测试渲染输出结果是不正确的。如果在FBO渲染期间模板测试也是必要的,那么也需要把额外的渲染图像和GL_STENCIL_ATTACHMENT_EXT关联起来。

1
2
3
4
5
6
7
8
9
10
11
12
13
14
15
16
17
18
19
20
21
22
23
24
25
26
27
28
29
30
31
32
33
34
35
36
37
38
39
40
41
42
43
44
45
46
47
48
...
// create a texture object
GLuint textureId;
glGenTextures(1, &textureId);
glBindTexture(GL_TEXTURE_2D, textureId);
glTexParameterf(GL_TEXTURE_2D, GL_TEXTURE_MAG_FILTER, GL_LINEAR);
glTexParameterf(GL_TEXTURE_2D, GL_TEXTURE_MIN_FILTER, GL_LINEAR_MIPMAP_LINEAR);
glTexParameterf(GL_TEXTURE_2D, GL_TEXTURE_WRAP_S, GL_CLAMP_TO_EDGE);
glTexParameterf(GL_TEXTURE_2D, GL_TEXTURE_WRAP_T, GL_CLAMP_TO_EDGE);
glTexParameteri(GL_TEXTURE_2D, GL_GENERATE_MIPMAP, GL_TRUE); // automatic mipmap
glTexImage2D(GL_TEXTURE_2D, 0, GL_RGBA8, TEXTURE_WIDTH, TEXTURE_HEIGHT, 0,
GL_RGBA, GL_UNSIGNED_BYTE, 0);
glBindTexture(GL_TEXTURE_2D, 0);

// create a renderbuffer object to store depth info
GLuint rboId;
glGenRenderbuffers(1, &rboId);
glBindRenderbuffer(GL_RENDERBUFFER, rboId);
glRenderbufferStorage(GL_RENDERBUFFER, GL_DEPTH_COMPONENT,
TEXTURE_WIDTH, TEXTURE_HEIGHT);
glBindRenderbuffer(GL_RENDERBUFFER, 0);

// create a framebuffer object
GLuint fboId;
glGenFramebuffers(1, &fboId);
glBindFramebuffer(GL_FRAMEBUFFER, fboId);

// attach the texture to FBO color attachment point
glFramebufferTexture2D(GL_FRAMEBUFFER, // 1. fbo target: GL_FRAMEBUFFER
GL_COLOR_ATTACHMENT0, // 2. attachment point
GL_TEXTURE_2D, // 3. tex target: GL_TEXTURE_2D
textureId, // 4. tex ID
0); // 5. mipmap level: 0(base)

// attach the renderbuffer to depth attachment point
glFramebufferRenderbuffer(GL_FRAMEBUFFER, // 1. fbo target: GL_FRAMEBUFFER
GL_DEPTH_ATTACHMENT, // 2. attachment point
GL_RENDERBUFFER, // 3. rbo target: GL_RENDERBUFFER
rboId); // 4. rbo ID

// check FBO status
GLenum status = glCheckFramebufferStatus(GL_FRAMEBUFFER);
if(status != GL_FRAMEBUFFER_COMPLETE)
fboUsed = false;

// switch back to window-system-provided framebuffer
glBindFramebuffer(GL_FRAMEBUFFER, 0);
...

The rendering procedure of render-to-texture is almost same as normal drawing. We only need to switch the rendering destination from the window-system-provided to the non-displayable, application-created framebuffer (FBO). 渲染到纹理的过程和普通的绘制过程基本一样。我们只需要把渲染的目的地由window系统提供的帧缓存改成不可显示的应用程序创建的帧缓存(FBO)就可以了。

1
2
3
4
5
6
7
8
9
10
11
12
13
14
15
16
17
18
19
20
21
...
// set rendering destination to FBO
glBindFramebuffer(GL_FRAMEBUFFER, fboId);

// clear buffers
glClear(GL_COLOR_BUFFER_BIT | GL_DEPTH_BUFFER_BIT);

// draw a scene to a texture directly
draw();

// unbind FBO
glBindFramebuffer(GL_FRAMEBUFFER, 0);

// trigger mipmaps generation explicitly
// NOTE: If GL_GENERATE_MIPMAP is set to GL_TRUE, then glCopyTexSubImage2D()
// triggers mipmap generation automatically. However, the texture attached
// onto a FBO should generate mipmaps manually via glGenerateMipmap().
glBindTexture(GL_TEXTURE_2D, textureId);
glGenerateMipmap(GL_TEXTURE_2D);
glBindTexture(GL_TEXTURE_2D, 0);
...

Note that glGenerateMipmap() is also included as part of FBO extension in order to generate mipmaps explicitly after modifying the base level texture image. If GL_GENERATE_MIPMAP is set to GL_TRUE, then glTex{Sub}Image2D() and glCopyTex{Sub}Image2D() trigger automatic mipmap generation (in OpenGL version 1.4 or greater). However, FBO operation does not generate its mipmaps automatically when the base level texture is modified because FBO does not call glCopyTex{Sub}Image2D() to modify the texture. Therefore, glGenerateMipmap() must be explicitly called for mipmap generation. 注意到,glGenerateMipmapEXT()也是作为FBO扩展的一部分,用来在改变了纹理图像的基级之后显式生成mipmap的。如果GL_GENERATE_MIPMAP被设置为GL_TRUE,那么glTex{Sub}Image2D()和 glCopyTex{Sub}Image2D()将会启用自动mipmap生成(在OpenGL版本1.4或者更高版本中)。然后,当纹理基级被改变时,FBO操作不会自动产生mipmaps。因为FBO不会调用glCopyTex{Sub}Image2D()来修改纹理。因此,要产生mipmap,glGenerateMipmapEXT()必须被显示调用。

If you need to a post processing of the texture, it is possible to combine with Pixel Buffer Object (PBO) to modify the texture efficiently.

PBuffer vs FBO

opengles2.0渲染到纹理的方法有三种:

  1. 使用glCopyTexImage2D或者glCopyTexSubImage2D,这两个函数,复制framebuffer中的像素到纹理缓存里面,但这两个函数性能比较低下,并且要求纹理的尺寸必须小于等于framebuffer的尺寸。
  2. 使用一个附加到纹理的pbuffer,来执行渲染到纹理的操作。我们知道,窗口系统为我们提供的surface必须添加到一个渲染环境里面,但是,在某些平台上要求每个pbuffer和窗口系统提供的surface都需要一个单独的context,所以如果要渲染到pbuffer里面的话,就会发生context的切换,这种切换操作时很耗时的。
  3. 使用fbo,rbo等,这种是最高效的。

pbuffer跟framebuffer功能是一样的,都是用来做渲染到一个off-screen surface上的,但是如果要做的是渲染到一个纹理上,还是使用framebuffer,效率高些。pbuffer的用途是:渲染到纹理上,随后这个纹理可以给其他API用的,比如openVG。创建pbuffer的过程跟创建窗口surface差不多的:

1
EGLSurface eglCreatePbufferSurface(EGLDisplay display,EGLConfig config,const EGLint *attribList);

需要在attribList指定一些pbuffer的属性。选择config的时候需要指定:EGL_SURFACE_TYPE:EGL_PBUFFER_BIT

频繁的在自己创建的fbo和窗口系统创建的vbo之间切换,比较影响性能。不要在每一帧都去创建,销毁fbo,vbo对象。要一次创建多次使用。如果一个纹理attach到一个fbo的attachment point,就要尽量避免调用glTexImage2D或glTexSubImage2D,glCopyTexImage2D等去修改纹理的值。

Presumably eglSwapBuffers has no effect on PBufferSurface (since it is not double-buffer surface) but if it is you would try to read pixels from undefined buffer, with undefined result..

FBO与PBuffer区别

两者提供同一的功能,不过PBuffer是一个真正的off-ilne window,它拥有一个render target应有的独立设定,例如depth buffer, model-view matrix, projection matric等.而FBO也可当作off-line window使用,但是,它并不拥有render target的独立设定,反之,这些设定会承接现有的设定值.

总结: 用做离屏渲染的是Pbuffers,一般通过EGL获得(eglCreatePbufferSurface),如果仅仅是在opengl里做离屏渲染,那完全可以用fbo来代替,效率更高。Pbuffers独特的价值也是有的,比如说用pbuffers做off-screen render时,然后在另外的绘图API里,比如OpenVG里,作为texture来使用。这种情况下是不可以使用fbo的。其实大部分情况下用fbo就行了

引用

原文 译文

GL_EXT_discard_framebuffer

android textureview处理预览摄像头变形问题

发表于 2017-05-04 | 分类于 Android

当TextureView的大小和匹配到的摄像头PreviewSize宽高比例不完全一致时,TextureView可通过setTransform函数对预览画面进行处理后再显示到TextureView,如下对图形居中裁剪:

1
2
3
4
5
6
7
8
9
10
11
12
13
14
15
16
17
18
19
20
21
22
23
24
25
26
27
28
29
30
31
32
33
34
35
36
37
38
public void sizeNotify(Camera.Size size) {
float viewWidth = getWidth();
float viewHeight = getHeight();

float scaleX = 1.0f;
float scaleY = 1.0f;
int mPreviewWidth = size.width;
int mPreviewHeight = size.height;
if(viewWidth < viewHeight) {
mPreviewWidth = size.height;
mPreviewHeight = size.width;
}


if (mPreviewWidth > viewWidth && mPreviewHeight > viewHeight) {
scaleX = mPreviewWidth / viewWidth;
scaleY = mPreviewHeight / viewHeight;
} else if (mPreviewWidth < viewWidth && mPreviewHeight < viewHeight) {
scaleY = viewWidth / mPreviewWidth;
scaleX = viewHeight / mPreviewHeight;
} else if (viewWidth > mPreviewWidth) {
scaleY = (viewWidth / mPreviewWidth) / (viewHeight / mPreviewHeight);
} else if (viewHeight > mPreviewHeight) {
scaleX = (viewHeight / mPreviewHeight) / (viewWidth / mPreviewWidth);
}

// Calculate pivot points, in our case crop from center
int pivotPointX = (int) (viewWidth / 2);
int pivotPointY = (int) (viewHeight / 2);

Matrix matrix = new Matrix();
matrix.setScale(scaleX, scaleY, pivotPointX, pivotPointY);
/*Log.e(TAG, "viewsize:" + viewWidth + " * " + viewHeight +
";prviewSize:" + mPreviewWidth + " * " + mPreviewHeight +
";scale:" + scaleX + " * " + scaleY +
";pivot:" + pivotPointX + " * " + pivotPointY);*/
setTransform(matrix);
}

TextureView中setTransform函数说明: Sets the transform to associate with this texture view. The specified transform applies to the underlying surface texture and does not affect the size or position of the view itself, only of its content.

Some transforms might prevent the content from drawing all the pixels contained within this view’s bounds. In such situations, make sure this texture view is not marked opaque.

webrtc之Native APIs

发表于 2017-05-03 | 分类于 webrtc

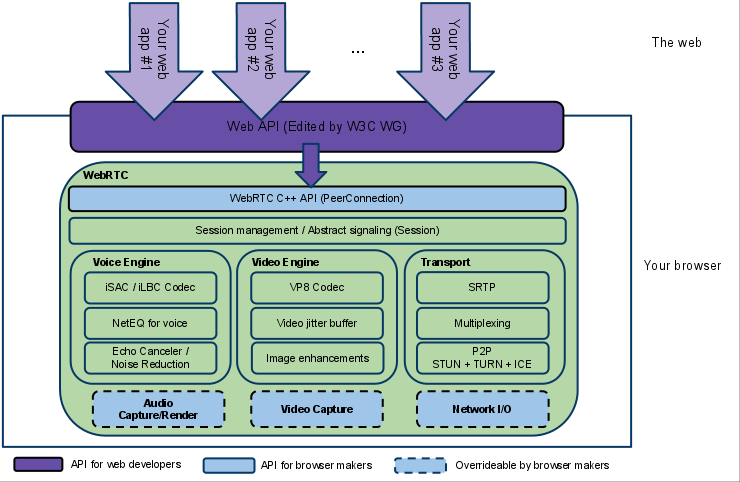
Block diagram

image

Calling sequences

Set up a call

image

Receive a call

image

Close down a call

image

Threading model

WebRTC native APIs use two globally available threads: the signaling thread and the worker thread. Depending on how the PeerConnection factory is created, the application can either provide those 2 threads or just let them be created internally.

The calls to the Stream APIs and the PeerConnection APIs will be proxied to the signaling thread which means that the application can call those APIs from whatever thread.

All callbacks will be made on the signaling thread. The application should return the callback as quickly as possible to avoid blocking the signaling thread. Resource intensive processes should be posted to a different thread.

The worker thread is used to handle more resource intensive processes such as data streaming.

https://sites.google.com/site/webrtc/native-code/native-apis

webrtc源码走读之api

发表于 2017-05-02 | 分类于 webrtc

api目录下封装了webrtc相关的供外部调用接口.

datachannel.h
1
2
3
// Including this file is deprecated. It is no longer part of the public API.
// This only includes the file in its new location for backwards compatibility.
#include "webrtc/pc/datachannel.h"
datachannelinterface.h
  • DataChannelObserver:Used to implement RTCDataChannel events.The code responding to these callbacks should unwind the stack before using any other webrtc APIs; re-entrancy is not supported.
  • DataChannelInterface:
dtmfsenderinterface.h
  • DtmfSenderObserverInterface:DtmfSender callback interface, used to implement RTCDtmfSender events.Applications should implement this interface to get notifications from the DtmfSender.
  • DtmfSenderInterface:The interface of native implementation of the RTCDTMFSender defined by the WebRTC W3C Editor’s Draft.
fakemetricsobserver.h/cc
  • FakeMetricsObserver
jsep.h
  • IceCandidateInterface:Class representation of an ICE candidate.An instance of this interface is supposed to be owned by one class at a time and is therefore not expected to be thread safe.An instance can be created by CreateIceCandidate.
  • IceCandidateCollection:This class represents a collection of candidates for a specific m= section.Used in SessionDescriptionInterface.
  • SessionDescriptionInterface:Class representation of an SDP session description.An instance of this interface is supposed to be owned by one class at a time and is therefore not expected to be thread safe.An instance can be created by CreateSessionDescription.
  • CreateSessionDescriptionObserver:CreateOffer and CreateAnswer callback interface.
  • SetSessionDescriptionObserver:SetLocalDescription and SetRemoteDescription callback interface.
jsepicecandidate.h
  • JsepIceCandidate:继承自IceCandidateInterface
  • JsepCandidateCollection:继承自IceCandidateCollection
jsepsessiondescription.h
  • JsepSessionDescription:Implementation of SessionDescriptionInterface.
mediaconstraintsinterface.h/cc
  • MediaConstraintsInterface:Interface used for passing arguments about media constraints to the MediaStream and PeerConnection implementation.Constraints may be either “mandatory”, which means that unless satisfied,the method taking the constraints should fail, or “optional”, which means they may not be satisfied..
mediastream.h
1
2
3
// Including this file is deprecated. It is no longer part of the public API.
// This only includes the file in its new location for backwards compatibility.
#include "webrtc/pc/mediastream.h"
mediastreaminterface.h/cc
  • OberverInterface
  • NotifierInterface
  • MediaSourceInterface:Base class for sources. A MediaStreamTrack has an underlying source that provides media. A source can be shared by multiple tracks.继承自notifierInterface
  • MediaStreamTrackInterface:继承自notifierInterface
  • VideoTrackSourceInterface:VideoTrackSourceInterface is a reference counted source used for VideoTracks. The same source can be used by multiple VideoTracks.继承自MediaSourceinterface与VideoSourceInterface
  • VideoTrackInterface: 继承自MediaStreamTrackInterface与VideoSourceInterface
  • AudioTrackSinkinterface:
  • AudioSourceInterface:AudioSourceInterface is a reference counted source used for AudioTracks.The same source can be used by multiple AudioTracks.继承自MediaSourceInterface.
  • AudioProcessorInterface:Interface of the audio processor used by the audio track to collect statistics.
  • AudioTrackInterface:继承自MediaStreamTrackInterface
  • MediaStreamInterface: A major difference is that remote audio/video tracks (received by a PeerConnection/RtpReceiver) are not synchronized simply by adding them to the same stream; a session description with the correct “a=msid” attributes must be pushed down.Thus, this interface acts as simply a container for tracks.
mediastreamproxy.h

Move this to .cc file and out of api/. What threads methods // are called on is an implementation detail.

mediastreamtrack.h
1
2
3
// Including this file is deprecated. It is no longer part of the public API.
// This only includes the file in its new location for backwards compatibility.
#include "webrtc/pc/mediastreamtrack.h"
mediatypes.h/cc

mediatype到string转换

notifier.h
  • Notifier:
peerconnectionfactoryproxy.h
peerconnectioninterface.h
1
2
3
4
5
6
7
8
9
10
11
12
13
14
15
16
17
18
19
20
21
22
23
24
25
26
27
28
29
30
31
32
33
34
35
36
37
38
39
40
41
42
43
44
45
46
47
48
49
50
51
52
53
54
55
// This file contains the PeerConnection interface as defined in
// http://dev.w3.org/2011/webrtc/editor/webrtc.html#peer-to-peer-connections.
//
// The PeerConnectionFactory class provides factory methods to create
// PeerConnection, MediaStream and MediaStreamTrack objects.
//
// The following steps are needed to setup a typical call using WebRTC:
//
// 1. Create a PeerConnectionFactoryInterface. Check constructors for more
// information about input parameters.
//
// 2. Create a PeerConnection object. Provide a configuration struct which
// points to STUN and/or TURN servers used to generate ICE candidates, and
// provide an object that implements the PeerConnectionObserver interface,
// which is used to receive callbacks from the PeerConnection.
//
// 3. Create local MediaStreamTracks using the PeerConnectionFactory and add
// them to PeerConnection by calling AddTrack (or legacy method, AddStream).
//
// 4. Create an offer, call SetLocalDescription with it, serialize it, and send
// it to the remote peer
//
// 5. Once an ICE candidate has been gathered, the PeerConnection will call the
// observer function OnIceCandidate. The candidates must also be serialized and
// sent to the remote peer.
//
// 6. Once an answer is received from the remote peer, call
// SetRemoteDescription with the remote answer.
//
// 7. Once a remote candidate is received from the remote peer, provide it to
// the PeerConnection by calling AddIceCandidate.
//
// The receiver of a call (assuming the application is "call"-based) can decide
// to accept or reject the call; this decision will be taken by the application,
// not the PeerConnection.
//
// If the application decides to accept the call, it should:
//
// 1. Create PeerConnectionFactoryInterface if it doesn't exist.
//
// 2. Create a new PeerConnection.
//
// 3. Provide the remote offer to the new PeerConnection object by calling
// SetRemoteDescription.
//
// 4. Generate an answer to the remote offer by calling CreateAnswer and send it
// back to the remote peer.
//
// 5. Provide the local answer to the new PeerConnection by calling
// SetLocalDescription with the answer.
//
// 6. Provide the remote ICE candidates by calling AddIceCandidate.
//
// 7. Once a candidate has been gathered, the PeerConnection will call the
// observer function OnIceCandidate. Send these candidates to the remote peer.
  • StreamCollectionInterface
  • StatsObserver
  • PeerConnectionInterface
  • PeerConnectionObserver:PeerConnection callback interface, used for RTCPeerConnection events. Application should implement these methods.
  • PeerConnectionFactoryInterface:PeerConnectionFactoryInterface is the factory interface used for creating PeerConnection, MediaStream and MediaStreamTrack objects.The simplest method for obtaiing one, CreatePeerConnectionFactory will create the required libjingle threads, socket and network manager factory classes for networking if none are provided, though it requires that the application runs a message loop on the thread that called the method (see explanation below) If an application decides to provide its own threads and/or implementation of networking classes, it should use the alternate CreatePeerConnectionFactory method which accepts threads as input, and use the CreatePeerConnection version that takes a PortAllocator as an argument.
peerconnectionproxy.h
proxy.h
1
2
3
4
5
6
7
8
9
10
11
12
13
14
15
16
17
18
19
20
21
22
23
24
25
26
27
28
29
30
31
32
33
34
35
36
37
38
39
40
// This file contains Macros for creating proxies for webrtc MediaStream and
// PeerConnection classes.
// TODO(deadbeef): Move this to pc/; this is part of the implementation.

//
// Example usage:
//
// class TestInterface : public rtc::RefCountInterface {
// public:
// std::string FooA() = 0;
// std::string FooB(bool arg1) const = 0;
// std::string FooC(bool arg1) = 0;
// };
//
// Note that return types can not be a const reference.
//
// class Test : public TestInterface {
// ... implementation of the interface.
// };
//
// BEGIN_PROXY_MAP(Test)
// PROXY_SIGNALING_THREAD_DESTRUCTOR()
// PROXY_METHOD0(std::string, FooA)
// PROXY_CONSTMETHOD1(std::string, FooB, arg1)
// PROXY_WORKER_METHOD1(std::string, FooC, arg1)
// END_PROXY_MAP()
//
// Where the destructor and first two methods are invoked on the signaling
// thread, and the third is invoked on the worker thread.
//
// The proxy can be created using
//
// TestProxy::Create(Thread* signaling_thread, Thread* worker_thread,
// TestInterface*).
//
// The variant defined with BEGIN_SIGNALING_PROXY_MAP is unaware of
// the worker thread, and invokes all methods on the signaling thread.
//
// The variant defined with BEGIN_OWNED_PROXY_MAP does not use
// refcounting, and instead just takes ownership of the object being proxied.
rtcerror.h/cc
rtcerror_unittest.cc
rtpparameters.h
rtpreceiverinterface.h
rtpsender.h
rtpsenderinterface.h
statstypes.h/cc
streamcollection.h
umametrics.h
videosourceproxy.h
videotracksource.h
webrtcsdp.h
audio/audio_mixer.h
  • AudioMixer:This class is under development and is not yet intended for for use outside of WebRtc/Libjingle.
audio_codecs/audio_decoder.h/cc
  • AudioDecoder
audio_codecs/audio_decoder_factory.h
  • AudioDecoderFactory
audio_codecs/audio_encoder.h/cc

-AudioEncoder: his is the interface class for encoders in AudioCoding module. Each codec type must have an implementation of this class.

audio_codecs/audio_encoder_factory.h
  • AudioEncoderFactory
audio_codecs/audio_format.h/cc
audio_codecs/builtin_audio_encoder_factory.h/cc
audio_codecs/builtin_audio_decoder_factory.h/cc
call/audio_sink.h
call/transport.h
ortc/mediadescription.h/cc
ortc/mediadescription_unittest.cc
ortc/ortcfactoryinterface.h
ortc/ortcrtpreceiverinterface.h
ortc/ortcrtpsenderinterface.h
ortc/packettransportinterface.h
ortc/rtptransportcontrollerinterface.h
ortc/rtptransportinterface.h
ortc/sessiondecription.h/cc
ortc/sessiondescription_unittest.cc
ortc/srtptransportinerface.h
ortc/udptransportinterface.h

webrtc源码走读之base

发表于 2017-05-02 | 分类于 webrtc

src/webrtc/base是webrtc基础平台库,包括线程、锁、socket,智能指针等.

智能指针

refcount.h定义了rtc::RefCountInterface:

1
2
3
4
5
6
7
8
9
10
11
12
13
14
15
#include "webrtc/base/refcountedobject.h"

namespace rtc {

// Reference count interface.
class RefCountInterface {
public:
virtual int AddRef() const = 0;
virtual int Release() const = 0;

protected:
virtual ~RefCountInterface() {}
};

} // namespace rtc

refcountedobject.h下定义了RefCountedObject:

1
2
3
4
5
6
7
8
9
10
11
12
13
14
15
16
17
18
19
20
21
22
23
24
25
26
27
28
29
30
31
32
33
34
35
36
37
38
39
40
41
42
43
44
45
46
47
#include <utility>

#include "webrtc/base/atomicops.h"

namespace rtc {

template <class T>
class RefCountedObject : public T {
public:
RefCountedObject() {}

template <class P0>
explicit RefCountedObject(P0&& p0) : T(std::forward<P0>(p0)) {}

template <class P0, class P1, class... Args>
RefCountedObject(P0&& p0, P1&& p1, Args&&... args)
: T(std::forward<P0>(p0),
std::forward<P1>(p1),
std::forward<Args>(args)...) {}

virtual int AddRef() const { return AtomicOps::Increment(&ref_count_); }

virtual int Release() const {
int count = AtomicOps::Decrement(&ref_count_);
if (!count) {
delete this;
}
return count;
}

// Return whether the reference count is one. If the reference count is used
// in the conventional way, a reference count of 1 implies that the current
// thread owns the reference and no other thread shares it. This call
// performs the test for a reference count of one, and performs the memory
// barrier needed for the owning thread to act on the object, knowing that it
// has exclusive access to the object.
virtual bool HasOneRef() const {
return AtomicOps::AcquireLoad(&ref_count_) == 1;
}

protected:
virtual ~RefCountedObject() {}

mutable volatile int ref_count_ = 0;
};

} // namespace rtc

线程Thread

网络Socket

webrtc之sdp协议

发表于 2017-04-27 | 分类于 webrtc

Session Description Protocol(会话描述协议)

RFC定义SDP的协议有两个:

  • RFC3264: An Offer/Answer Model with the session Description Protocol(SDP),用来概述一个请求/响应模型
  • RFC2327: SDP:Session Description Protocol,描述数据格式.

1.RFC2327

1.1.概述

SDP 完全是一种会话描述格式 ― 它不属于传输协议 ― 它只使用不同的适当的传输协议,包括会话通知协议(SAP)、会话初始协议(SIP)、实时流协议(RTSP)、MIME 扩展协议的电子邮件以及超文本传输协议(HTTP)。SDP协议是也是基于文本的协议,这样就能保证协议的可扩展性比较强,这样就使其具有广泛的应用范围。SDP 不支持会话内容或媒体编码的协商,所以在流媒体中只用来描述媒体信息。媒体协商这一块要用RTSP来实现. SDP包括以下一些方面:

  • 会话的名称和目的
  • 会话存活时间
  • 包含在会话中的媒体信息,包括:
    • 媒体类型(video, audio, etc)
    • 传输协议(RTP/UDP/IP, H.320, etc)
    • 媒体格式(H.261 video, MPEG video, etc)
    • 多播或远端(单播)地址和端口
  • 为接收媒体而需的信息(addresses, ports, formats and so on)
  • 使用的带宽信息
  • 可信赖的接洽信息(Contact information)

1.2.SDP协议格式

SDP描述由许多文本行组成,文本行的格式为<类型>=<值>,<类型>是一个字母,<值>是结构化的文本串,其格式依<类型>而定。 <type>=[CRLF]

1.2.1.fields分类

  1. Seeesion Description
  • v(Protocol Version),mnd,The current protocol version.Always “0” using RFC4566
  • o(Origin),Mnd,The session originator’s name and session identifiers.
  • s(Session Name), Mnd,The textural session Name
  • i(Session Information), opt,Textural information about the session
  • u(Uri),opt, A pointer to supplemental session Information
  • e(Email Address), opt, Email contract information for the person responsible.
  • P(phone Address),opt,Phone contract information for the person responsible
  • c(Connection Data),C,The connection type and Address
  • b(Bandwidth),opt,Proposed bandwidth limits.
  • z(Time Zones), opt, Accounts for daylight saving information
  • k(Encryption Keys),opt,A simple mechanism for exchanging keys, Rarely used.
  1. Timing Description
  • t(Timing),mnd, start and end times.
  • r(Repeat Times),opt, Specified the duration and intervals for any session repeats.
  1. Media Description
  • m(Media Description),mnd, Media definitions including media type(e.g.”audio”),transport details and formats.
  • i(Session Information),opt
  • c(Connection Data),c
  • b(Bandwidth):opt
  • k( Encryption keys),opt
  • a(Attributes),opt

1.2.2.典型格式

1
2
3
4
5
6
7
8
9
10
11
12
13
14
15
16
17
18
19
20
21
22
23
24
25
26
Session description
v= (protocol version)
o= (owner/creator and session identifier)
s= (session name)
i=* (session information)
u=* (URI of description)
e=* (email address)
p=* (phone number)
c=* (connection information - not required if included in all media)
b=* (zero or more bandwidth information lines)
One or more time descriptions ("t=" and "r=" lines, see below)
z=* (time zone adjustments)
k=* (encryption key)
a=* (zero or more session attribute lines)
Zero or more media descriptions
Time description
t= (time the session is active)
r=* (zero or more repeat times)
Media description, if present
m= (media name and transport address)
i=* (media title)
c=* (connection information - optional if included at
session-level)
b=* (zero or more bandwidth information lines)
k=* (encryption key)
a=* (zero or more media attribute lines)

带"*"号的是可选的,其余的是必须的。一般顺序也按照上面的顺序来排列。

1.2.3.各type对应值的结构化文本串

  1. v= 其中:nettype是IN,代表internet,addrtype是IP4或IP6。unicast-address任务创建计算机的地址。 整个这个属性,是唯一表示一个任务。
  2. e=123@126.com 或 p=+1 616 555-6011 对于一个任务只能两者之中的一个,表示会议控制者的联系方式。邮件地址可以是[email]j.doe@example.com[/email] (Jane Doe)形式,括号里面的是描述联系人的名称,或者Jane Doe <[email]j.doe@example.com[/email]>,前面的是联系人的名称。
  3. c= 这个连接数据,可以是传话级别的连接数据,或者是单独一个媒体数据的连接数据。在是多播时,connection-address就该是一个多播组地址,当是单播时,connection-address就该是一个单播地址。对于addrtype是IP4的情况下,connection-address不仅包含IP地址,并且还要包含a time to live value(TTL 0-255),如:c=IN IP4 224.2.36.42/128,IP6没有这个TTL值。还允许象这样的[/]/格式的connection-address。如:c=IN IP4 224.2.1.1/127/3等同于包含c=IN IP4 224.2.1.1/127, c=IN IP4 224.2.1.2/127, c=IN IP4 224.2.1.3/127三行内容。
  4. b=: bwtype可以是CT或AS,CT方式是设置整个会议的带宽,AS是设置单个会话的带宽。缺省带宽是千比特每秒。 t= ,这个可以有行,指定多个不规则时间段,如果是规则的时间段,则r=属性可以使用。start-time和stop- time都遵从NTP(Network Time Protocol),是以秒为单位,自从1900以来的时间。要转换为UNIX时间,减去2208988800。如果stop-time设置为0,则会话没有时间限制。如果start-time也设置为0,则会话被认为是永久的。
  5. b=: bwtype可以是CT或AS,CT方式是设置整个会议的带宽,AS是设置单个会话的带宽。缺省带宽是千比特每秒。 t= ,这个可以有行,指定多个不规则时间段,如果是规则的时间段,则r=属性可以使用。start-time和stop- time都遵从NTP(Network Time Protocol),是以秒为单位,自从1900以来的时间。要转换为UNIX时间,减去2208988800。如果stop-time设置为0,则会话没有时间限制。如果start-time也设置为0,则会话被认为是永久的。
  6. r= 重复次数在时间表示里面可以如下表示: d - days (86400 seconds) h - hours (3600 seconds) m - minutes (60 seconds) s - seconds (allowed for completeness)
  7. z=<adjustment time> <offset> <adjustment time> <offset> ....
  8. k=<method>
  9. k=<method>:<encryption key>
  10. a=<attribute>
  11. a=<attribute>:<value>
  12. m=<media> <port> <proto> <fmt> ...
  13. m=<media> <port>/<number of ports> <proto> <fmt> ...
  14. a=cat:分类,根据分类接收者隔离相应的会话
  15. a=keywds:关键字,根据关键字隔离相应的会话
  16. a=tool:创建任务描述的工具的名称及版本号
  17. a=ptime:在一个包里面的以毫秒为单位的媒体长度
  18. a=maxptime:以毫秒为单位,能够压缩进一个包的媒体量。
  19. a=rtpmap: / [/]
  20. a=recvonly
  21. a=sendrecv
  22. a=sendonly
  23. a=inactive,
  24. a=orient:其可能的值,”portrait”, “landscape” and “seascape” 。
  25. a=type:,建议值是,”broadcast”, “meeting”, “moderated”, “test” and “H332”。
  26. a=charset:
  27. a=sdplang:指定会话或者是媒体级别使用的语言
  28. a=framerate:设置最大视频帧速率
  29. a=quality:值是0-10
  30. a=fmtp: 在SIP协议的包含的内容是SDP时,应该把Content-Type设置成application/sdp。

    1.3.SDP协议例子

    1.3.1.helix流媒体服务器的RTSP协议中的SDP协议:

    1
    2
    3
    4
    5
    6
    7
    8
    9
    10
    11
    12
    13
    14
    15
    16
    17
    18
    19
    20
    21
    22
    23
    24
    25
    26
    27
    28
    29
    30
    31
    32
    33
    34
    35
    36
    37
    38
    39
    40
    41
    42
    43
    44
    45
    46
    47
    48
    49
    50
    51
    52
    v=0 //SDP version
    // o field定义的源的一些信息。其格式为:o=<username> <sess-id> <sess-version> <nettype> <addrtype> <unicast-address>
    o=- 1271659412 1271659412 IN IP4 10.56.136.37 s=<No title>
    i=<No author> <No copyright> //session的信息
    c=IN IP4 0.0.0.0 //connect 的信息,分别描述了:网络协议,地址的类型,连接地址。
    c=IN IP4 0.0.0.0
    t=0 0 //时间信息,分别表示开始的时间和结束的时间,一般在流媒体的直播的时移中见的比较多。
    a=SdpplinVersion:1610641560 //描述性的信息
    a=StreamCount:integer;2 //用来描述媒体流的信息,表示有两个媒体流。integer表示信息的格式为整数。
    a=control:*
    a=DefaultLicenseValue:integer;0 //License信息
    a=FileType:string;"MPEG4" ////用来描述媒体流的信息说明当前协商的文件是mpeg4格式的文件
    a=LicenseKey:string;"license.Summary.Datatypes.RealMPEG4.Enabled"
    a=range:npt=0-72.080000 //用来表示媒体流的长度
    m=audio 0 RTP/AVP 96 //做为媒体描述信息的重要组成部分描述了媒体信息的详细内容:表示session的audio是通过RTP来格式传送的,其payload值为96传送的端口还没有定。
    b=as:24 //audio 的bitrate
    b=RR:1800
    b=RS:600
    a=control:streamid=1 //通过媒体流1来发送音频
    a=range:npt=0-72.080000 //说明媒体流的长度。
    a=length:npt=72.080000
    a=rtpmap:96 MPEG4-GENERIC/32000/2 //rtpmap的信息,表示音频为AAC的其sample为32000
    a=fmtp:96 profile-level-id=15;mode=AAC-hbr;sizelength=13;indexlength=3;indexdeltalength=3;config=1210 //config为AAC的详细格式信息
    a=mimetype:string;"audio/MPEG4-GENERIC"
    a=Helix-Adaptation-Support:1
    a=AvgBitRate:integer;48000
    a=HasOutOfOrderTS:integer;1
    a=MaxBitRate:integer;48000
    a=Preroll:integer;1000
    a=OpaqueData:buffer;"A4CAgCIAAAAEgICAFEAVABgAAAC7gAAAu4AFgICAAhKIBoCAgAEC"
    a=StreamName:string;"Audio Track"
    下面是video的信息基本和audio的信息相对称,这里就不再说了。
    m=video 0 RTP/AVP 97
    b=as:150
    b=RR:11250
    b=RS:3750
    a=control:streamid=2
    a=range:npt=0-72.080000
    a=length:npt=72.080000
    a=rtpmap:97 MP4V-ES/2500
    a=fmtp:97 profile-level-id=1;
    a=mimetype:string;"video/MP4V-ES"
    a=Helix-Adaptation-Support:1
    a=AvgBitRate:integer;300000
    a=HasOutOfOrderTS:integer;1
    a=Height:integer;240 //影片的长度
    a=MaxBitRate:integer;300000
    a=MaxPacketSize:integer;1400
    a=Preroll:integer;1000
    a=Width:integer;320 //影片的宽度
    a=OpaqueData:buffer;"AzcAAB8ELyARAbd0AAST4AAEk+AFIAAAAbDzAAABtQ7gQMDPAAABAAAAASAAhED6KFAg8KIfBgEC"
    a=StreamName:string;"Video Track"

1.3.2.Webrtc SDP示例

1
2
3
4
5
6
7
8
9
10
11
12
13
14
15
16
17
18
19
20
21
22
23
24
25
26
27
28
29
30
31
32
33
34
35
36
37
38
39
40
41
42
43
44
45
46
47
48
49
50
51
52
v=0
o=- 0 0 IN IP4 127.0.0.1
s=WX-RTC-SERVER
t=0 0
a=group:BUNDLE audio video
a=msid-semantic: WMS ryODEhTpFz
m=audio 1 UDP/TLS/RTP/SAVPF 0 126
c=IN IP4 0.0.0.0
a=rtcp:1 IN IP4 0.0.0.0
a=candidate:1 1 udp 2013266431 192.168.0.68 42739 typ host generation 0
a=ice-ufrag:T+0c
a=ice-pwd:FzV1T/5PiBI78s630cwSb6
a=fingerprint:sha-256 2D:38:ED:09:73:36:F9:18:A6:CB:BC:ED:FB:C5:60:B3:F1:6C:FC:BD:97:57:AD:A6:38:11:9D:D4:8F:77:D6:C3
a=setup:active
a=recvonly
a=extmap:1 urn:ietf:params:rtp-hdrext:ssrc-audio-level
a=mid:audio
a=rtcp-mux
a=rtpmap:0 PCMU/8000
a=rtpmap:126 telephone-event/8000
m=video 1 UDP/TLS/RTP/SAVPF 124 125 96
c=IN IP4 0.0.0.0
a=rtcp:1 IN IP4 0.0.0.0
a=candidate:1 1 udp 2013266431 192.168.0.68 42739 typ host generation 0
a=ice-ufrag:T+0c
a=ice-pwd:FzV1T/5PiBI78s630cwSb6
a=extmap:2 urn:ietf:params:rtp-hdrext:toffset
a=extmap:3 http://www.webrtc.org/experiments/rtp-hdrext/abs-send-time
a=extmap:4 urn:3gpp:video-orientation
a=extmap:6 http://www.webrtc.org/experiments/rtp-hdrext/playout-delay
a=fingerprint:sha-256 2D:38:ED:09:73:36:F9:18:A6:CB:BC:ED:FB:C5:60:B3:F1:6C:FC:BD:97:57:AD:A6:38:11:9D:D4:8F:77:D6:C3
a=setup:active
a=recvonly
a=mid:video
a=rtcp-mux
a=rtpmap:124 H264/90000
a=rtcp-fb:124 ccm fir
a=rtcp-fb:124 nack
a=rtcp-fb:124 nack pli
a=rtcp-fb:124 goog-remb
a=fmtp:124 x-google-max-bitrate=800;x-google-min-bitrate=150;x-google-start-bitrate=300
a=rtpmap:125 H264/90000
a=rtcp-fb:125 ccm fir
a=rtcp-fb:125 nack
a=rtcp-fb:125 nack pli
a=rtcp-fb:125 goog-remb
a=fmtp:125 x-google-max-bitrate=800;x-google-min-bitrate=150;x-google-start-bitrate=300
a=rtpmap:96 VP8/90000
a=rtcp-fb:96 ccm fir
a=rtcp-fb:96 nack
a=rtcp-fb:96 nack pli
a=rtcp-fb:96 goog-remb

2.RFC3264

An Offer/Answer Model with the Session Description Protocol (SDP)

2.1情态动词

定义在RFC2119:

  • “MUST”,必须、一定要;
  • “MUST NOT”,禁止;
  • “REQUIRED”,需要;
  • “SHALL”、”SHOULD”,应该;
  • “SHALL NOT”、”SHOULD NOT”,不应该;
  • “RECOMMENDED”,推荐;
  • “MAY”,可以

    2.2术语

  • 媒体流(Media Stream),或称为媒体类型(Media Type),即我们通常所说的音频流、视频流等,所有通信实体要进行媒体交互之前都必须进行媒体注的协商
  • 媒体格式(Media Format),每种媒体流都有不同的编码格式,像音频有G711、G712编码,视频有H261、H264等,像现在所谓的高清视频采用是720P、1070P等。
  • 单一会话(Unitcast Session)
  • 多会话(Multicast Sessions)
  • 单一媒体流(Unitcast Streams)
  • 多媒体流(Multicast Streams)

    2.3offer/answer

    rfc3264协议[1]主要概述一个请求/响应模型(offer/answer,以下叙述采用英文),包括请求/响应的实体和不同阶段的操作行为,如初始协商过程和重协商过程,并简单介绍消息中各种参数的含义。具体各个参数的详细说明见rfc2327协议[2]
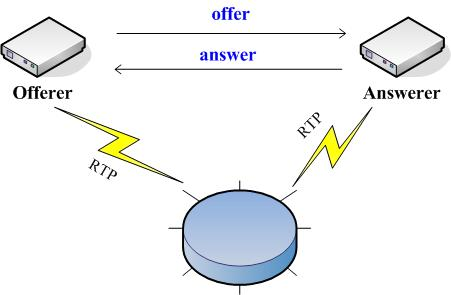
    SDP模型组网图

    2.3.1.实体,消息

    Offer/Answer模型包括两个实体,一个是请求主体Offerer,另外一个是响应实体Answerer,两个实体只是在逻辑上进行区分,在一定条件可以转换。例如,手机A发起媒体协商请求,那么A就是Offerer,反之如果A为接收请求则为Offerer。 Offerer发给Answerer的请求消息称为请求offer,内容包括媒体流类型、各个媒体流使用的编码集,以及将要用于接收媒体流的IP和端口。 Answerer收到offer之后,回复给Offerer的消息称为响应,内容包括要使用的媒体编码,是否接收该媒体流以及告诉Offerer其用于接收媒体流的IP和端口。

    2.3.2.SDP各个参数简单介绍

    下面示例摘自3264协议[1]
  • v=0
  • o=carol 28908764872 28908764872 IN IP4 100.3.6.6 //会话ID号和版本
  • s=- //用于传递会话主题
  • t=0 0 //会话时间,一般由其它信令消息控制,因此填0
  • c=IN IP4 192.0.2.4 //描述本端将用于传输媒体流的IP
  • m=audio 0 RTP/AVP 0 1 3 //媒体类型 端口号 本端媒体使用的编码标识(Payload)集
  • a=rtpmap:0 PCMU/8000 //rtpmap映射表,各种编码详细描述参数,包括使用带宽(bandwidth)
  • a=rtpmap:1 1016/8000
  • a=rtpmap:3 GSM/8000
  • a=sendonly //说明本端媒体流的方向,取值包括sendonly/recvonly/sendrecv/inactive
  • a=ptime:20 //说明媒体流打包时长
  • m=video 0 RTP/AVP 31 34
  • a=rtpmap:31 H261/90000
  • a=rtpmap:34 H263/90000

    2.3.3.实体行为、操作过程

    2.3.3.1.初始协商的Offer请求
    实体A <-> 实体B,实体首先发起Offer请求,内容如2节所示,对于作何一个媒体流/媒体通道,这时实体A必须:
  1. 如果媒体流方向标为recvonly/sendrecv,即a=recvonly或a=sendrecv,则A必须(MUST)准备好在这个IP和端口上接收实体B发来的媒体流;
  2. 如果媒体流方向标为sendonly/inactive,即a=recvonly或a=sendrecv,则A不需要进行准备。
    2.3.3.1.Answer响应
    实体B收到A的请求offer后,根据自身支持的媒体类型和编码策略,回复响应。
  3. 如果实体B回复的响应中的媒体流数量和顺序必须(MUST)和请求offer一致,以便实体A进行甄别和决策。即m行的数量和顺序必须一致,B不能(MUST NOT)擅自增加或删除媒体流。如果B不支持某个媒体流,可以在对应的端口置0,但不能不带这个m行描述。
  4. 对于某种媒体,实体B必须(MUST)从请求offer中选出A支持且自己也支持的该媒体的编码标识集,并且可以(MAY)附带自己支持的其它类型编码。
  5. 对于响应消息中各个媒体的方向:
    • 如果请求某媒体流的方向为sendonly,那么响应中对应媒体的方向必须为recvonly;
    • 如果请求某媒体流的方向为recvonly,那么响应中对应媒体的方向必须为sendonly;
    • 如果请求某媒体流的方向为sendrecv,那么响应中对应媒体的方向可以为sendrecv/sendonly/recvonly/inactive中的一种;
    • 如果请求某媒体流的方向为inactive,那么响应中对应媒体的方向必须为inactive;
  6. 响应answer里提供IP和端口,指示Offerer本端期望用于接收媒体流的IP和端口,一旦响应发出之后,Offerer必须(MUST)准备好在这个IP和端口上接收实体A发来的媒体流。
  7. 如果请求offer中带了ptime(媒体流打包间隔)的a行或带宽的a行,则响应answer也应该(SHOULD)相应的携带。
  8. 实体B Offerer应该(SHOULD)使用实体A比较期望的编码生成媒体流发送。一般来说对于m行,如m=video 0 RTP/AVP 31 34,排充越靠前的编码表示该实体越希望以这个编码作为载体,这里示例31(H261),34(H263)中H261为A更期望使用的编码类型。同理,当实体A收到响应answer后也是这样理解的。
    2.3.3.2.实体收到响应后的处理
    当实体A收到B回复的响应后,可以(MAY)开始发送媒体流,如果媒体流方向为sendonly/sendrecv,
  9. 必须(MUST)使用answer列举的媒体类型/编码生成媒体发送;
  10. 应该(SHOULD)使用answer中的ptime和bandwidth来打包发送媒体流;
  11. 可以(MAY)立即停止监听端口,该端口为offer支持answer不支持的媒体所使用的端口。

2.3.4.修改媒体流(会话)

修改媒体流的offer-answer操作必须基于之前协商的媒体形式(音频、视频等),不能(MUST NOT)对已有媒体流进行删减。

2.3.4.1.删除媒体流

如果实体认定新的会话不支持之前媒商的某个媒体,新的offer只须对这种媒体所在m行的端口置0,但不能不描述这种媒体,即不带对应m行。当answerer收到响应之后,处理同初始协商一样。

2.3.4.2.增加媒体流

如果实体打算新增媒体流,在offer里只须加上描述即可或者占用之前端口被置0的媒体流,即用新的媒体描述m行替换旧的。当answerer收到offer请求后,发现有新增媒体描述,或者过于端口被置0的媒体行被新的媒体描述替换,即知道当前为新增媒体流,处理同初始协商。

2.3.4.3.修改媒体流

修改媒体注主要是针对初始协商结果,如果有变更即进入修改流程处理,可能的变更包括IP地址、端口,媒体格式(编码),媒体类型(音、视频),媒体属性(ptime,bandwidth,媒体流方向变更等)。

webrtc之入门

发表于 2017-04-27 | 分类于 webrtc

webrtc developers

The WebRTC APIs

Three main tasks

  • Acquiring audio and video
  • Communicating audio and video
  • Communicating arbitrary data

Three main JavaScript APIs

  • MediaStream(aka getUserMedia)
  • RTCPeerConnection
  • RTCDataChannel

MediaStream

(Acquiring audio and video)

MediaStream

  • Pepresent a stream of audio and/or video
  • Can contain multiple ‘tracks’
  • Obtain a MediaStream with navigator.getUserMedia()

Constraints

  • Controls the contents of the MediaStream
  • Media type, resolution, frame rate

    RTCPeerConnection

    (Audio and video communication between peers)

    RTCPeerConnection does a lot

  • Signal processing
  • Codec handling
  • Peer to peer communication
  • Security
  • Bandwidth management

    WebRTC architecture

    image

RTCDataChannel

(Bidirectional communication of arbitrary data between peers)

RTCDataChannel

  • Same API as WebSockets
  • Ultra-low latency
  • Unreliable or reliable
  • Secure

Servers and Protocols

(Peer to peer — but we need servers :)

Abstract Signaling

  • Need to exchange ‘session description’ objects:
    • What formats I support, what I want to send
    • Network information for peer-to-peer setup
  • Can use any messaging mechanism
  • Can use any messaging protocol image

STUN and TRUN

(P2P in the age of firewalls and NATs)

An ideal world

image

The real world

image

STUN

  • Tell me what my public IP address is
  • Simple server, cheap to run
  • Data flows peer-to-peer image

TURN

  • Provide a cloud fallback if peer-to-peer communication fails
  • Data is sent through server, uses server bandwidth
  • Ensures the call works in almost all environments image

ICE

  • ICE: a framework for connecting peers
  • Tries to find the best path for each call
  • Vast majority of calls can use STUN (webrtcstats.com):

Deploying STUN/TURN

  • stun.l.google.com:19302
  • WebRTC stunserver, turnserver
  • rfc5766-turn-server
  • restund

Security

Security throughout WebRTC

  • Mandatory encryption for media and data
  • Secure UI, explicit opt-in
  • Sandboxed, no plugins
  • WebRTC Security Architecture

Architectures

Peer to Peer : one-to-one call

clientA <——–> clientB

Mesh: small N-way call

1
2
3
4
5
6
clientA <-------------> clientB
/|\ \ / /|\
| \ / |
| / \ |
\|/ / \|/
clientC <--------------> clientD

Star: medium N-way call

1
2
3
clientA <---------> clientB
clientA <---------> clientC
clientA <---------> clientD

MCU: large N-way call

1
2
3
4
5
6
7
MCU <-------------->clientA
MCU <-------------->clientB
MCU <-------------->clientC
MCU <-------------->clientD
MCU <-------------->clientE
MCU <-------------->clientF
MCU <-------------->clientG

webrtc之源码管理工具gclient

发表于 2017-04-27 | 分类于 webrtc

google的chromium项目是用gclient来管理源码的checkout, update等。 gclient是google专门为这种多源项目编写的脚本,它可以将多个源码管理系统中的代码放在一起管理。甚至包括将Git和svn代码放在一起。

webrtc也是使用gclient管理代码.

gclient的sync,update等命令密切相关的两类文件.gclient和DEPS。

.gclient文件是gclient的控制文件,该文件放在工作目录的最上层(webrtc环境下与src统计目录)。”.gclient”文件是一个Python的脚本,定义了一组”solutions”,格式类似如下

1
2
3
4
5
6
7
8
9
10
11
solutions = [  
{ "name" : "src",
"url" : "svn://svnserver/component/trunk/src",
"custom_deps" : {
# To use the trunk of a component instead of what's in DEPS:
#"component": "https://svnserver/component/trunk/",
# To exclude a component from your working copy:
#"data/really_large_component": None,
}
},
]
  • name:checkout出源码的名字

  • url:源码所在的目录,gclient希望checkout出的源码中包括一个DEPS的文件,这个文件包含了必须checkout到工作目录的源码信息;

  • deps_file:这是一个文件名(不包括路径),指在工程目录中包含依赖列表的文件,该项可选,默认值为”DEPS”

  • custom_deps:这是一个可选的字典对象,会覆盖工程的”DEPS”文件定义的条目.一般它用作本地目录中,那些不用checkout的代码,或者让本地目录从不同位置checkout一个新的代码出来,或者checkout不同的分支,版本等.也可以用于增加在DEPS中不存在的新的项目.如:

    1
    2
    3
    4
    5
    6
    7
    8
    "custom_deps": {  
    "src/content/test/data/layout_tests/LayoutTests": None,
    "src/chrome/tools/test/reference_build/chrome_win": None,
    "src/chrome_frame/tools/test/reference_build/chrome_win": None,
    "src/chrome/tools/test/reference_build/chrome_linux": None,
    "src/chrome/tools/test/reference_build/chrome_mac": None,
    "src/third_party/hunspell_dictionaries": None,
    },
  • target_os:这个可选的条目可以指出特殊的平台,根据平台类checkout出不同代码,如:

    1
    target_os = ['android']

如果target_os_only值为True的话,那么,仅仅checkout出对应的代码,如:

1
2
target_os = [ "ios" ]  
target_os_only = True

在每个checkout出的工程中,gclient期望发现一个DEPS文件(由deps_file来给定),它定义了工程不同部分都是如何checkout出来。 “DEPS”也是一个python脚本,最简单的,如下:

1
2
3
4
5
deps = {  
"src/outside" : "http://outside-server/trunk@1234",
"src/component" : "svn://svnserver/component/trunk/src@77829",
"src/relative" : "/trunk/src@77829",
}

deps的每个条目都包含一个key-value对,key是被checkout的本地目录,而value就是对应的远程URL。如果路径是以’/‘开头的,那么它是一个相对URL,相对与.gclient中URL地址。

URL通常包含一个版本号,以便锁定源码在特定版本上。当然,这是可选的。如果没有,那么它将获取指定分支上最新的版本。

DEPS还可以包含其他类型的数据,如vars,

1
2
3
4
5
6
7
8
9
10
11
12
13
vars = {
'pymox':
'http://pymox.googlecode.com/svn',
'sfntly':
'http://sfntly.googlecode.com/svn',
'eyes-free':
'http://eyes-free.googlecode.com/svn',
'rlz':
'http://rlz.googlecode.com/svn',
'smhasher':
'http://smhasher.googlecode.com/svn',
...
}

vars定义了一组变量,在后面,可以通过Var(xxx)来访问。Var(xxx)返回一个字符串,故此,也可以进行操作,如

1
2
3
4
'src/third_party/cros_dbus_cplusplus/source':
Var("git.chromium.org") + '/chromiumos/third_party/dbus-cplusplus.git@5e8f6d9db5c2abfb91d91f751184f25bb5cd0900',
'src/third_party/WebKit':
Var("webkit_trunk")[:-6] + '/branches/chromium/1548@153044',

第二个自立,Var(“webkit_trunk”)[:-6]是一个python表达式,表示取得”webkit_trunk”表示的字符串的最后6个 Hooks:DEPS包含可选的内容 hooks,也有重要的作用,它表示在sync, update或者recert后,执行一个hook操作。 如果使用 –nohooks选项(hook默认执行),那么在gclient sync或者其他操作后,不会执行hook。你可以通过gclient runhooks来单独执行; 如果有 gclient sync –force,那么,无论sync是否成功,都会执行hook。 hook在DEPS中的写法,一般是:

1
2
3
4
5
6
7
hooks = [
{ "pattern": "\\.(gif|jpe?g|pr0n|png)$",
"action": ["python", "image_indexer.py", "--all"]},
{ "pattern": ".",
"name": "gyp",
"action": ["python", "src/build/gyp_chromium"]},
]

hooks包含一组hook,每个hook有几个重要项:

  • pattern 是一个正则表达式,用来匹配工程目录下的文件,一旦匹配成功,action项就会执行
  • action 描述一个根据特定参数运行的命令行。这个命令在每次gclient时,无论多少文件匹配,至多运行一次。这个命令和.gclient在同一目录下运行。如果第一个参数是”python”,那么,当前的python解释器将被使用。如果包含字符串 “$matching_files”,它将该字符串扩展为匹配出的文件列表。
  • name 可选,标记出hook所属的组,可以被用来覆盖和重新组织。

deps_os: DEPS中定义不同平台依赖关系的项目,如

1
2
3
4
5
6
7
8
9
10
11
12
13
14
15
16
17
18
19
20
21
22
23

deps_os = {
"win": {
"src/chrome/tools/test/reference_build/chrome_win":
"/trunk/deps/reference_builds/chrome_win@197743",

"src/third_party/cygwin":
"/trunk/deps/third_party/cygwin@133786",

.....
},

"ios": {
"src/third_party/GTM":
(Var("googlecode_url") % "google-toolbox-for-mac") + "/trunk@" +
Var("gtm_revision"),

"src/third_party/nss":
"/trunk/deps/third_party/nss@" + Var("nss_revision"),
....
},
...
}

deps_os指定不同平台的依赖,它可以包含多种平台,和.gclient中的target_os对应。这种对应关系如下:

1
2
3
4
5
6
7
8
9
10
11
12
13

DEPS_OS_CHOICES = {
"win32": "win",
"win": "win",
"cygwin": "win",
"darwin": "mac",
"mac": "mac",
"unix": "unix",
"linux": "unix",
"linux2": "unix",
"linux3": "unix",
"android": "android",
}

下载webrtc android代码的.gclient文件(与src同级目录):

1
2
3
4
5
6
7
8
9
10
solutions = [
{
"url": "https://chromium.googlesource.com/external/webrtc.git",
"managed": False,
"name": "src",
"deps_file": "DEPS",
"custom_deps": {},
},
]
target_os = ["android", "unix"]

src同级目录下.gclient_entries定义了各模块及对应地址

1
2
3
4
5
6
7
8
9
10
11
12
13
14
15
16
17
18
19
20
21
22
23
24
25
26
27
28
29
30
31
32
33
34
35
36
37
38
39
40
41
42
43
44
entries = {
'src': 'https://chromium.googlesource.com/external/webrtc.git',
'src/base': 'https://chromium.googlesource.com/chromium/src/base@413df39df4640665d7ee1e8c198be1e91cedb4d9',
'src/build': 'https://chromium.googlesource.com/chromium/src/build@98f2769027214c848094d0d58156474eada3bc1b',
'src/buildtools': 'https://chromium.googlesource.com/chromium/buildtools.git@98f00fa10dbad2cdbb2e297a66c3d6d5bc3994f3',
'src/testing': 'https://chromium.googlesource.com/chromium/src/testing@3eab1a4b0951ac1fcb2be8bf9cb24143b509ea52',
'src/testing/gmock': 'https://chromium.googlesource.com/external/googlemock.git@0421b6f358139f02e102c9c332ce19a33faf75be',
'src/testing/gtest': 'https://chromium.googlesource.com/external/github.com/google/googletest.git@6f8a66431cb592dad629028a50b3dd418a408c87',
'src/third_party': 'https://chromium.googlesource.com/chromium/src/third_party@939f3a2eae486dd7cf3b31eae38642d2bc243737',
'src/third_party/android_tools': 'https://chromium.googlesource.com/android_tools.git@b65c4776dac2cf1b80e969b3b2d4e081b9c84f29',
'src/third_party/boringssl/src': 'https://boringssl.googlesource.com/boringssl.git@777fdd6443d5f01420b67137118febdf56a1c8e4',
'src/third_party/catapult': 'https://chromium.googlesource.com/external/github.com/catapult-project/catapult.git@6939b1db033bf35f4adf1ee55824b6edb3e324d6',
'src/third_party/ced/src': 'https://chromium.googlesource.com/external/github.com/google/compact_enc_det.git@e21eb6aed10b9f6e2727f136c52420033214d458',
'src/third_party/colorama/src': 'https://chromium.googlesource.com/external/colorama.git@799604a1041e9b3bc5d2789ecbd7e8db2e18e6b8',
'src/third_party/ffmpeg': 'https://chromium.googlesource.com/chromium/third_party/ffmpeg.git@28a5cdde5c32bcf66715343c10f74e85713f7aaf',
'src/third_party/gflags': 'https://chromium.googlesource.com/external/webrtc/deps/third_party/gflags@892576179b45861b53e04a112996a738309cf364',
'src/third_party/gflags/src': 'https://chromium.googlesource.com/external/github.com/gflags/gflags@03bebcb065c83beff83d50ae025a55a4bf94dfca',
'src/third_party/gtest-parallel': 'https://chromium.googlesource.com/external/github.com/google/gtest-parallel@7eb02a6415979ea59e765c34fe9da6c792f53e26',
'src/third_party/icu': 'https://chromium.googlesource.com/chromium/deps/icu.git@b34251f8b762f8e2112a89c587855ca4297fed96',
'src/third_party/jsoncpp/source': 'https://chromium.googlesource.com/external/github.com/open-source-parsers/jsoncpp.git@f572e8e42e22cfcf5ab0aea26574f408943edfa4',
'src/third_party/jsr-305/src': 'https://chromium.googlesource.com/external/jsr-305.git@642c508235471f7220af6d5df2d3210e3bfc0919',
'src/third_party/junit/src': 'https://chromium.googlesource.com/external/junit.git@64155f8a9babcfcf4263cf4d08253a1556e75481',
'src/third_party/libFuzzer/src': 'https://chromium.googlesource.com/chromium/llvm-project/llvm/lib/Fuzzer.git@16f5f743c188c836d32cdaf349d5d3effb8a3518',
'src/third_party/libjpeg_turbo': 'https://chromium.googlesource.com/chromium/deps/libjpeg_turbo.git@7260e4d8b8e1e40b17f03fafdf1cd83296900f76',
'src/third_party/libsrtp': 'https://chromium.googlesource.com/chromium/deps/libsrtp.git@ccf84786f8ef803cb9c75e919e5a3976b9f5a672',
'src/third_party/libvpx/source/libvpx': 'https://chromium.googlesource.com/webm/libvpx.git@f22b828d685adee4c7a561990302e2d21b5e0047',
'src/third_party/libyuv': 'https://chromium.googlesource.com/libyuv/libyuv.git@fc02cc3806a394a6b887979ba74aa49955f3199b',
'src/third_party/lss': 'https://chromium.googlesource.com/linux-syscall-support.git@63f24c8221a229f677d26ebe8f3d1528a9d787ac',
'src/third_party/mockito/src': 'https://chromium.googlesource.com/external/mockito/mockito.git@de83ad4598ad4cf5ea53c69a8a8053780b04b850',
'src/third_party/openh264/src': 'https://chromium.googlesource.com/external/github.com/cisco/openh264@0fd88df93c5dcaf858c57eb7892bd27763f0f0ac',
'src/third_party/openmax_dl': 'https://chromium.googlesource.com/external/webrtc/deps/third_party/openmax.git@7acede9c039ea5d14cf326f44aad1245b9e674a7',
'src/third_party/requests/src': 'https://chromium.googlesource.com/external/github.com/kennethreitz/requests.git@f172b30356d821d180fa4ecfa3e71c7274a32de4',
'src/third_party/robolectric/robolectric': 'https://chromium.googlesource.com/external/robolectric.git@2a0b6ba221c14f3371813a676ce06143353e448d',
'src/third_party/ub-uiautomator/lib': 'https://chromium.googlesource.com/chromium/third_party/ub-uiautomator.git@00270549ce3161ae72ceb24712618ea28b4f9434',
'src/third_party/usrsctp/usrsctplib': 'https://chromium.googlesource.com/external/github.com/sctplab/usrsctp@8679f2b0bf063ac894dc473debefd61dbbebf622',
'src/third_party/yasm/source/patched-yasm': 'https://chromium.googlesource.com/chromium/deps/yasm/patched-yasm.git@7da28c6c7c6a1387217352ce02b31754deb54d2a',
'src/tools': 'https://chromium.googlesource.com/chromium/src/tools@4718dd2b6d53fb68819b3fd23676b40935f4f31e',
'src/tools/gyp': 'https://chromium.googlesource.com/external/gyp.git@eb296f67da078ec01f5e3a9ea9cdc6d26d680161',
'src/tools/swarming_client': 'https://chromium.googlesource.com/external/swarming.client.git@11e31afa5d330756ff87aa12064bb5d032896cb5',
'src/buildtools/clang_format/script': 'https://chromium.googlesource.com/chromium/llvm-project/cfe/tools/clang-format.git@c09c8deeac31f05bd801995c475e7c8070f9ecda',
'src/buildtools/third_party/libc++/trunk': 'https://chromium.googlesource.com/chromium/llvm-project/libcxx.git@b1ece9c037d879843b0b0f5a2802e1e9d443b75a',
'src/buildtools/third_party/libc++abi/trunk': 'https://chromium.googlesource.com/chromium/llvm-project/libcxxabi.git@0edb61e2e581758fc4cd4cd09fc588b3fc91a653',
'src/third_party/android_tools/ndk': 'https://chromium.googlesource.com/android_ndk.git@26d93ec07f3ce2ec2cdfeae1b21ee6f12ff868d8',
}
1…171819
轻口味

轻口味

190 日志
27 分类
63 标签
RSS
GitHub 微博 豆瓣 知乎
友情链接
  • SRS
© 2015 - 2019 轻口味
京ICP备17018543号
本站访客数 人次 本站总访问量 次